You are browsing camaro6 
 11-09-2023, 10:33 AM
|
#14309 | |
     
Drives: 2020 Chevy Camaro ZL1 Join Date: Apr 2023
Location: Calgary Canada
Posts: 1,653
|
Quote:
|
|

|

|
|
11-09-2023, 10:51 AM
|
#14310 | |
 
Drives: 2022 LT1 Join Date: Sep 2022
Location: St Louis, MO
Posts: 76
|
Quote:
__________________
 |
|
|
|
|
|
11-09-2023, 11:32 AM
|
#14311 | |

|
Quote:
__________________
2020 Camaro 2SS - Riverside Blue, NPP, Magnetic Ride, Sunroof
Soler DLX Bluetooth Throttle Controller / OFFKAT Smoked LED Side Marker Lights / Blue SS emblems on front & rear / Wildhammer Rear Dark Reflectors / Trim Illusion Gloss Black Door Handle Covers / eBay Black Fuel Door / Screaming Chicken Fender Hash Marks / Color-Matched G2 Caliper Paint CT Sounds Tropo 10" Sub / Down4Sound MM1000 Mini Maxx amp / JL Audio LoC-22 line output converter / Sub Thump Plug N Play T-Harness With ANC Defeat Harness Kit My Camaro Journal |
|
|
|
|
|
11-09-2023, 11:34 AM
|
#14312 | |
|
|
Quote:

__________________
2020 Camaro 2SS - Riverside Blue, NPP, Magnetic Ride, Sunroof
Soler DLX Bluetooth Throttle Controller / OFFKAT Smoked LED Side Marker Lights / Blue SS emblems on front & rear / Wildhammer Rear Dark Reflectors / Trim Illusion Gloss Black Door Handle Covers / eBay Black Fuel Door / Screaming Chicken Fender Hash Marks / Color-Matched G2 Caliper Paint CT Sounds Tropo 10" Sub / Down4Sound MM1000 Mini Maxx amp / JL Audio LoC-22 line output converter / Sub Thump Plug N Play T-Harness With ANC Defeat Harness Kit My Camaro Journal |
|
|
|
|
|
11-09-2023, 12:13 PM
|
#14313 | ||||||
|
2020 Shadow Gray 2SS

Drives: 2020 2SS - A10, NPP, MRC, CAI Join Date: Dec 2019
Location: SoCal
Posts: 3,816
|
Quote:
Quote:
Quote:
Quote:
Quote:
Quote:
__________________
2020 SGM 2SS - A10, NPP, MRC, Red Calipers, Black Fender Badge, Footwell Lighting
After delivery: - GMP CAI, GMP Black Strut Tower Brace, MRR017 1LE Wheels, SS Armrest, Black Fuel Door, Stainless Pedals, SS Wheel Caps, GM Splash Guards, DD Smoked LED Markers, Smoked Rear Reflectors, Mishimoto Catch Can, Xpel PPF-Full Front & Rockers, 35% Tint, CeramicPro coated, RST Stainless Brake Lines, Castrol SRF, MSD Plug Wires, Mamo V3 Ported TB Left: My "fun" ride (475 HP). Right: My "work" ride (52,000 HP): a Gulfstream G600. One's top speed is 180 Mph, the other, 620 Mph. BOTH AWESOME to operate...  |
||||||
|
|
|
|
11-09-2023, 03:18 PM
|
#14314 | |
 
Drives: 2023 Camaro ZL1 Join Date: Jan 2023
Location: NC
Posts: 353
|
Quote:
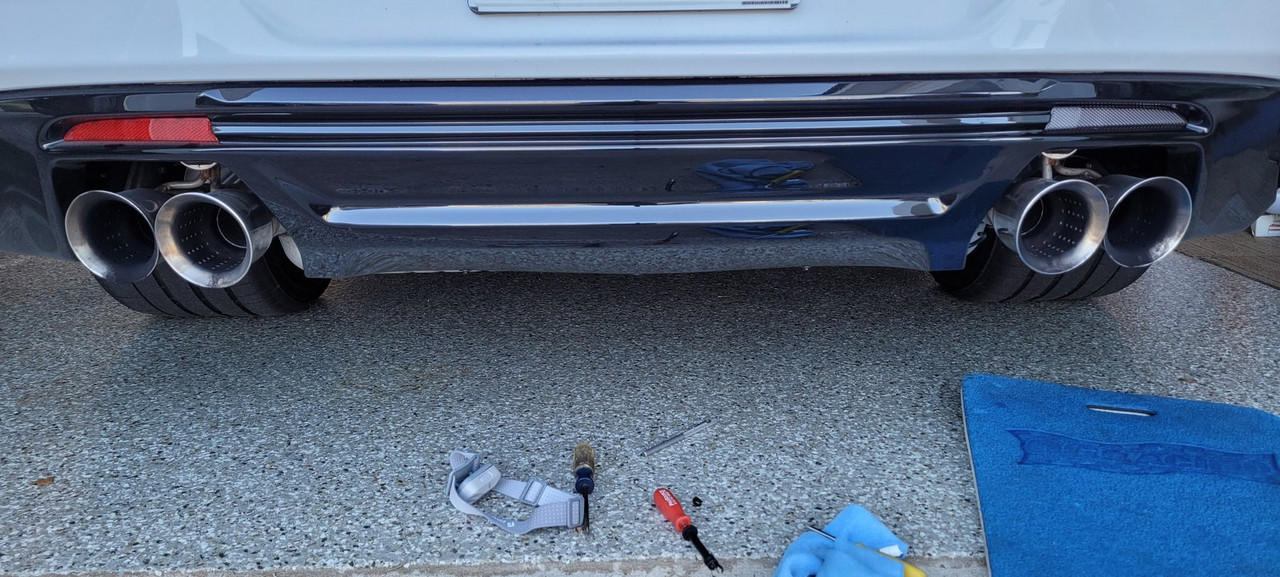
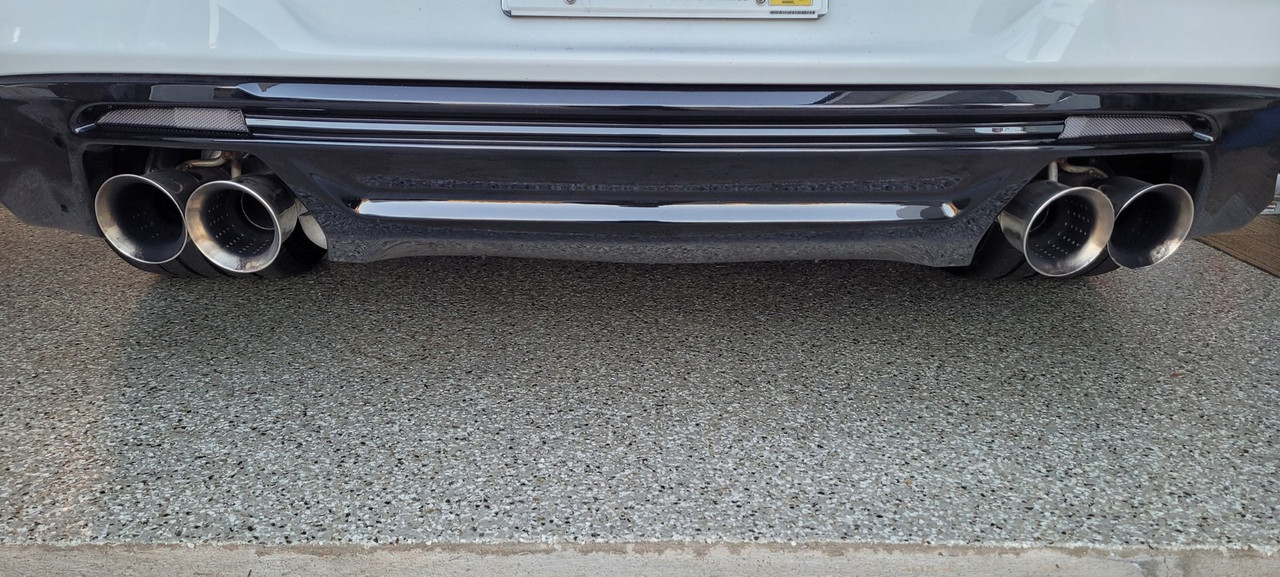
Aim a flash light at the area where you will put a small Phillips screw driver (preferably magnetized) into the black abyss and attempt to extract the small OEM screw. If you are lucky after many tries to get the little tip into the screw and slowly, delicately, gently un-screw the fastener. You will drop it inside and must retrieve it with a slender pen magnet. The red reflector comes out easily. I used the OEM screw (kind of mistake) which has a built-in washer versus the supplied screw which is shorter and a separate washer. Put a small orientation screw driver from the outside in to find the area first where you want to put the screw in from the inside. My screw driver was magnetized enough to hold the screw while I attempted to put it in a tiny hole that you cannot see. This is the most frustrating part. Once obtained the area where you will feed in the screw, pull out the orientation screw driver from the outside. Put your finger in that same hole area while you feed the screw from inside. Eventually you will feel the point of the screw with your other hand/finger outside. With that same outside hand place the new reflector in and try to start the screw to bite into the plastic hole. Accomplishing this task is a great relief. Tighten gently the screw carefully as not to risk the screw driver falling off the screw. Maybe 20-30 minutes of frustration. One down, one more to go. I did the other side the same way, but for some reason I could not completely tighten the OEM screw (reflector was to lose) and wasted a lot of time. Took a break then went back creeping under the car to start all over. Removed the new reflector and decided to use the smaller screw/washer provided. These screws are shorter, hence easier to apply and overall better (guess that is why they included them). Next my magnetized Phillip screw driver went limp and would not pick up the screw. I resorted to blue painters tape wrapped around the tip and the screw/washer to hold them in place. This time luck was on my side and I was able to remove and replace quickly in five- or ten-minutes total. What a fun project and a challenging surprise, but totally worth the outcome. I think the rear end looks so much better.
__________________
2023 Camaro ZL1 6MT Summit White
|
|
|
|
|
|
11-09-2023, 03:54 PM
|
#14315 |

Drives: 2024 ZL1 M6, 1978 Beechcraft Baron Join Date: Jun 2018
Location: Dallas
Posts: 371
|
Before and after.
|
|
|
|
|
11-09-2023, 03:55 PM
|
#14316 |
|
NYTMARE23

Drives: Black 2023 ZL1 A10 Join Date: Oct 2022
Location: Nebraska
Posts: 669
|
I went with the tinted overlays instead of the reflectors and came out great!
 
__________________
2023 A10 ZL1 "NYTMARE"
‐‐--------------------------------------------------------  |
|
|
|
|
11-09-2023, 03:59 PM
|
#14317 | |

Drives: 2023/2SS/1LE/RadiantRed/A10 Join Date: Jul 2022
Location: Great Lakes
Posts: 346
|
What did you do to your 6th Gen Camaro today?!
Quote:
Wow, I didnt even know I had ugly red reflectors. I had to go out and look. Thank you for posting this!
__________________
2023/2SS/1LE/Radiant-Red/A10/Sunroof/Copper-Free-Breaks/Navigation Order History: 6/17/22-1100, 3/7/23-3000, TPW-4/3/23, 4/4/23-3800, 4/8/23-Delivered
|
|
|
|
|
|
11-09-2023, 05:53 PM
|
#14318 | |
|
Drives: 2022 1SS 1LE RB Join Date: Mar 2021
Location: Edmonton
Posts: 63
|
Quote:

|
|
|
|
|
|
11-10-2023, 06:35 AM
|
#14319 | |
|
Drives: 2020 Chevy Camaro ZL1 Join Date: Apr 2023
Location: Calgary Canada
Posts: 1,653
|
Quote:
|
|
|
|
|
|
11-10-2023, 10:00 AM
|
#14320 |
|
Makis

Drives: 2020 Red Hot ZL1 A10 Join Date: Apr 2019
Location: London - UK
Posts: 819
|
Just to come back to the reverse ligh bulbs discussion that we had a couple of weeks ago: I bought these Xenon reverse bulbs from eBay and they work great! Very bright and I love the colour at 6500K. No CAN-BUS error either and therefore no need for resistors.
https://www.ebay.co.uk/itm/133942799...mis&media=COPY
__________________
Red Hot 2020 Camaro ZL1 A10 <-- Enjoying the hell out of it
Mosaic black 2018 Camaro 2SS A8 (sold) |
|
|
|
|
11-10-2023, 10:49 AM
|
#14321 |
|
NYTMARE23
Drives: Black 2023 ZL1 A10 Join Date: Oct 2022
Location: Nebraska
Posts: 669
|
What i did today was look at my ZL1 and Thank God I paid 67k for mine and not what they are asking for this Mopar.
 
__________________
2023 A10 ZL1 "NYTMARE"
‐‐-------------------------------------------------------- |
|
|
|
|
11-10-2023, 11:59 AM
|
#14322 | |
 Drives: 2023 Camaro LT1 M6 Join Date: Dec 2022
Location: Massachusetts
Posts: 159
|
Quote:
__________________
2023 Black LT1 M6, Dual Mode Exhaust, Sunroof, Tech Pkg w/Bose Audio, Red Front Brake Calipers, Carbon Flash Wheels, Ground Effects & RS Pkg
Added after delivery: Continental ExtCont DWS06+ Tires: 245/40/20 Front & 275/35/20 w/9.5 Rear Wheels, Red Rear MGP Caliper Covers |
|
|
|
|
|
|
|
|
|
Post Reply
|
|
|