You are browsing camaro6 
 05-20-2025, 05:58 PM
|
#57 | |
 Drives: 2022 Camaro SS 1LE Join Date: Sep 2011
Location: Sugar Land TX
Posts: 36
|
Quote:
I also wanted to tell you that I really appreciate you taking the time to document your work. This will be a very big help for me and many others I'm sure.
__________________
Mark
Sugar Land TX 2022 VOM Camaro SS 1LE |
|

|

|
|
07-29-2025, 03:24 PM
|
#58 |
|
Electrical Engineer

Drives: 2023 1SS A10 Black Join Date: Apr 2022
Location: Illinois
Posts: 929
|
I don't like cables being visible and wanted hidden wiring for both a Radar Detector and a USB-C charging port.
The violet wire for the power socket is much easier to access under the center console, and it's a safer place to tap. It has retained accessory power. To remove the center console you just remove six bolts and the shift knob. The seats can remain in-place (just move forward or backward to access bolts. 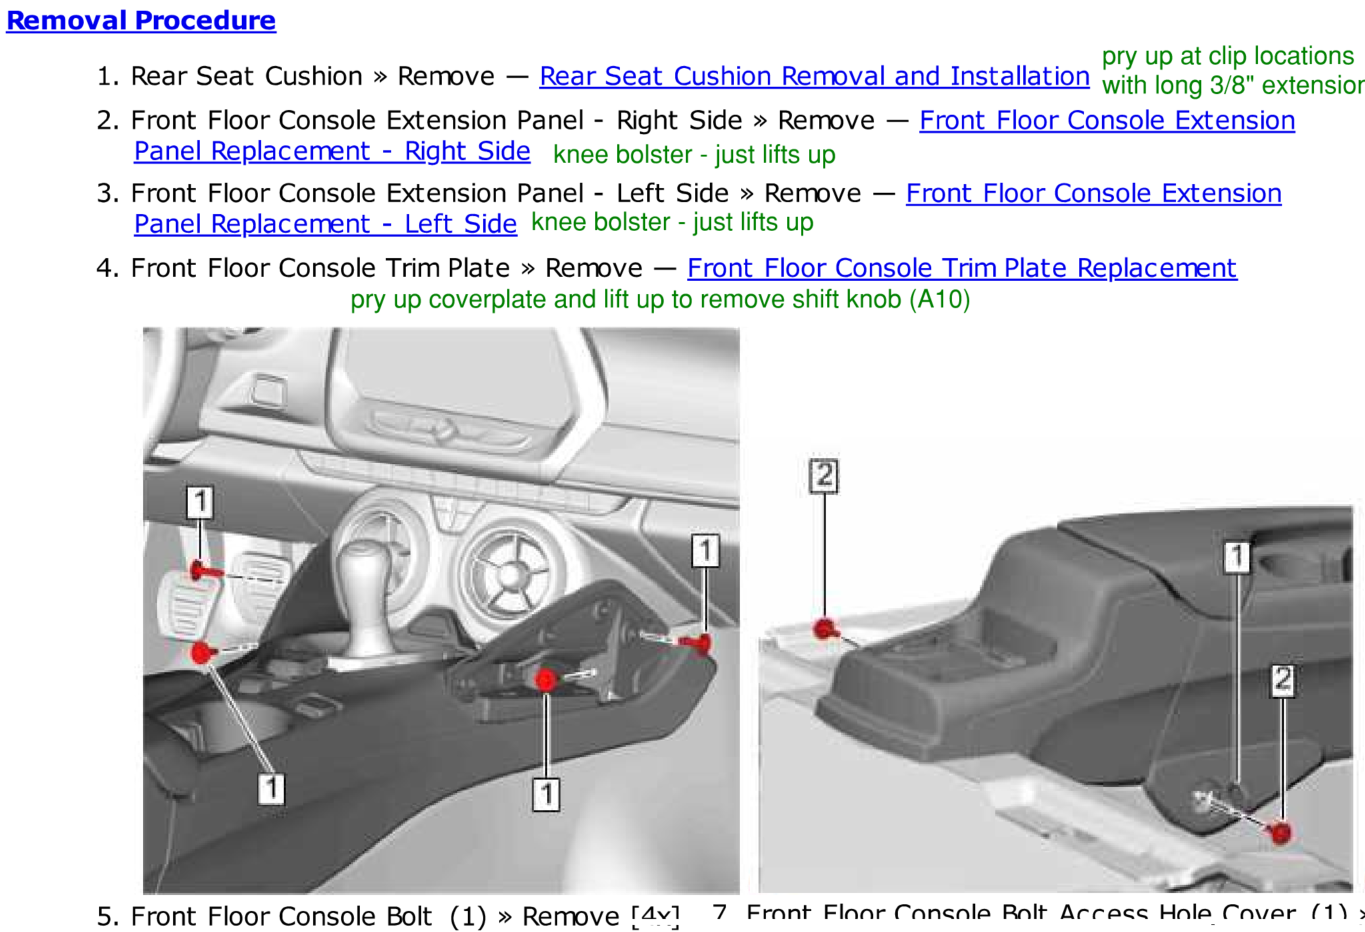 Under the center console you can tap the same Violet wire easily on either side of the console harness (vehicle side or console side). Here is the accessory port wiring intercepted and soldered on the console side (before covering): 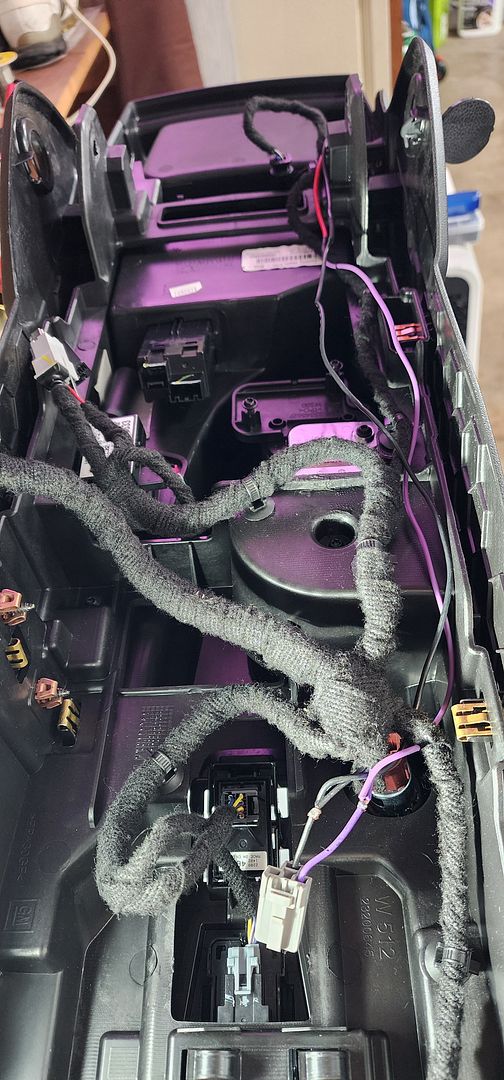 And this is after insulating and covering with Tesa Tape:  You can also access power on the floor, where the Violet wire enters the harness. Which side depends on if you want the device to stay with the console or not. In my case, I wanted power for a radar detector (vehicle side) and an additional power socket in the console (console side), hence two tap locations. On the floor location before covering: 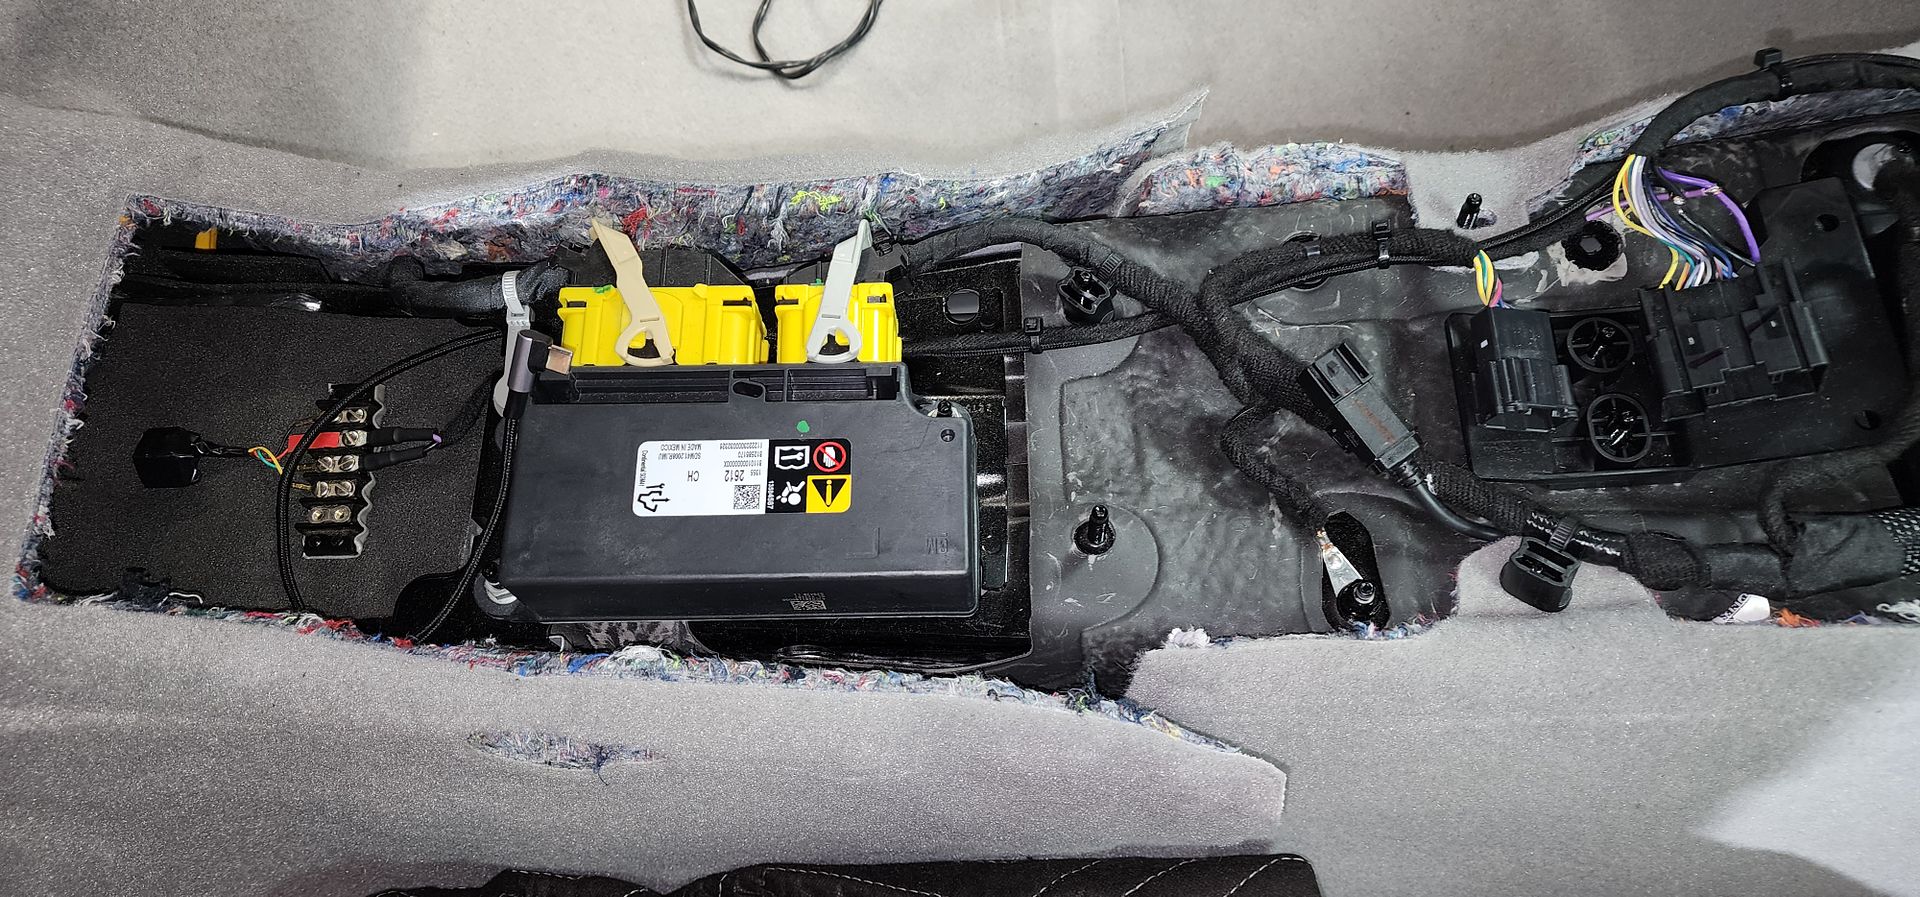 After covering and showing a terminal block for easy power adds to this circuit later: 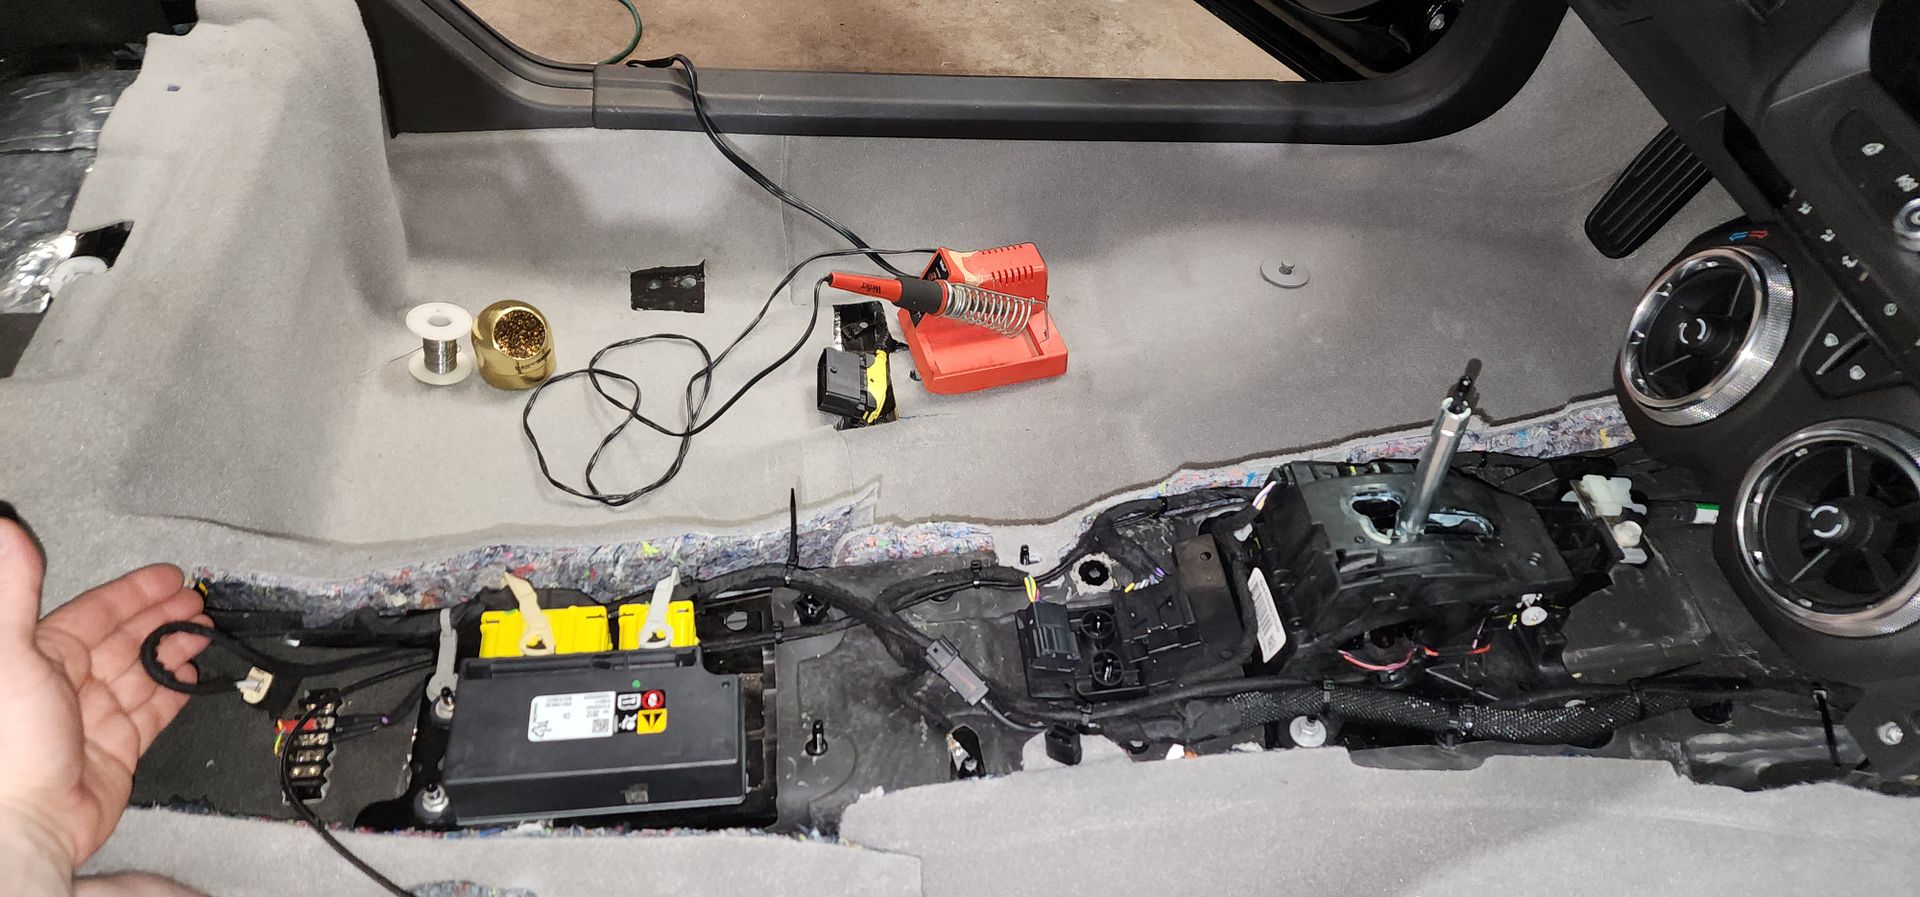 The power socket I added: 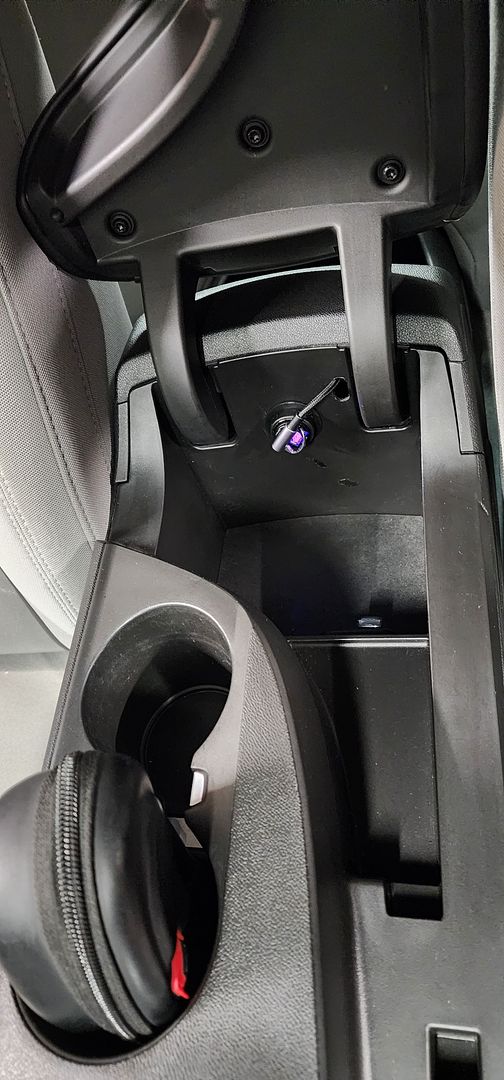 The cord for that power socket routes to my phone mount, you can also see my radar detector which is hard wired to the vehicle side of the violet wire. 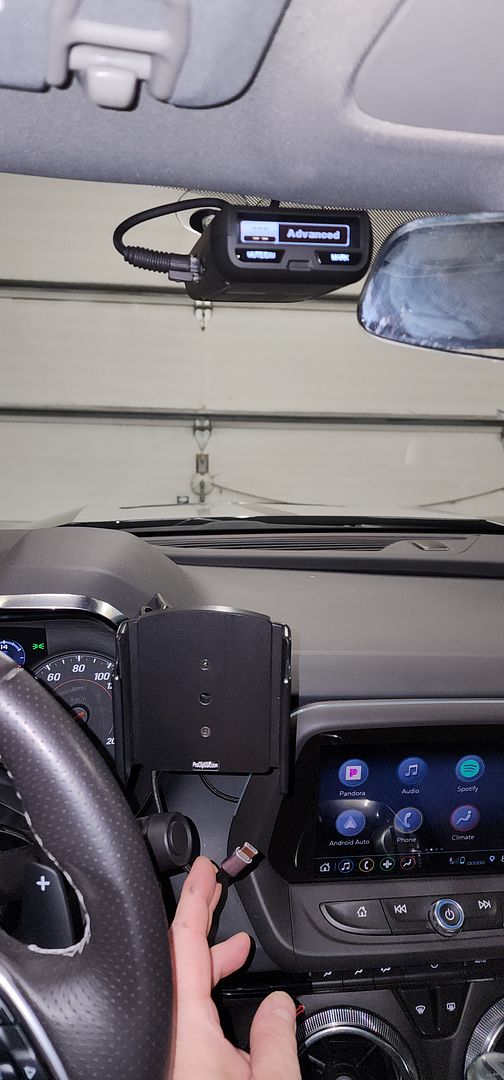 Routing the radar detector cord required removing the a-pillar cover to ensure the cord did not conflict with the airbag and stayed hidden in the dash. I covered the power cable with Tesa Tape so it looks stock and secured with factory wiring. I went with the Uniden R3: https://uniden.com/products/r3
__________________
2023 1SS A10 Black H72/C2U/56W/NPP - Daily Driver
1100: 5/3/22 . . . . . . . 2000: 6/25/22 . . . . . .4000: 8/17/22 . . . . . . . 6000: 9/10/22 Daily Driver mileage update: 45k mi. @ Mar 2025 New Engine @ 22,600 mi. due to dealer confusing bad gas with a bad engine. Build Log: https://www.camaro6.com/forums/showt...6#post11353116 |
|
|
|
|
07-29-2025, 03:25 PM
|
#59 |
|
Electrical Engineer
Drives: 2023 1SS A10 Black Join Date: Apr 2022
Location: Illinois
Posts: 929
|
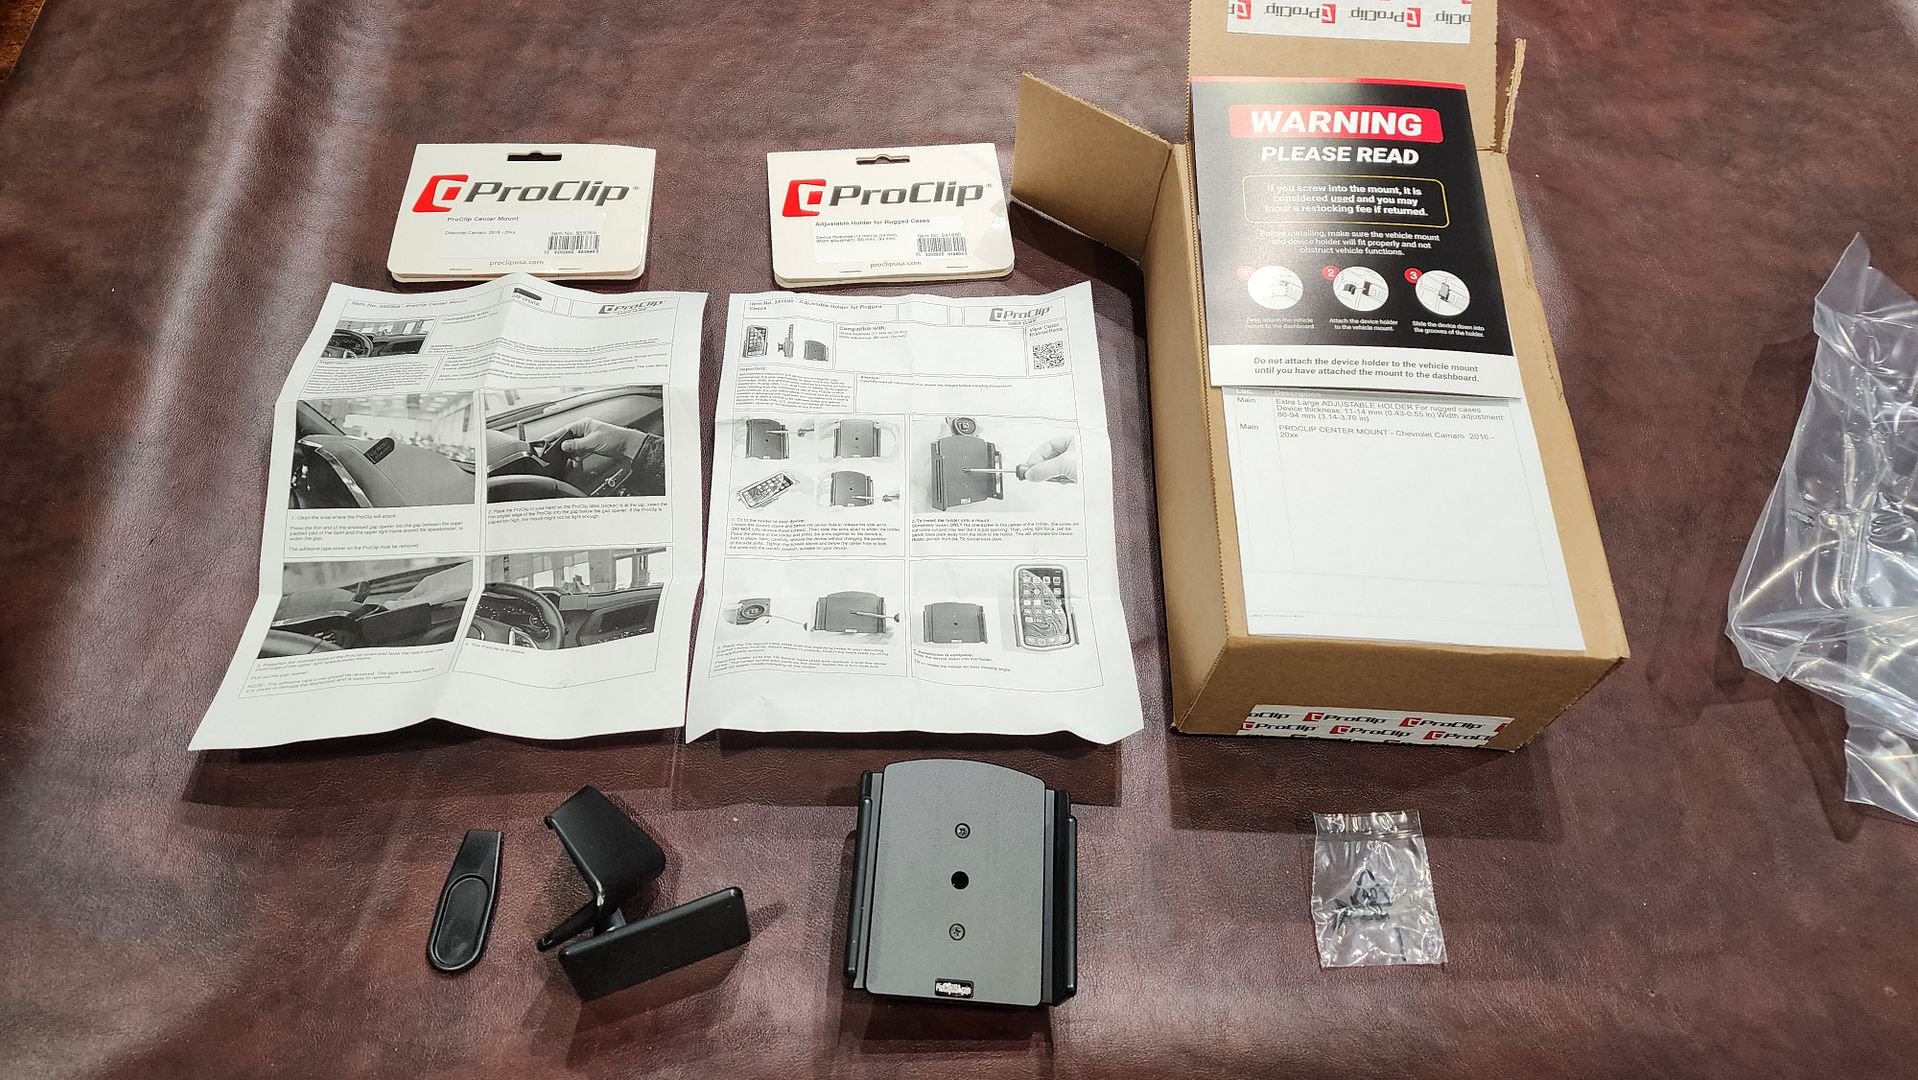
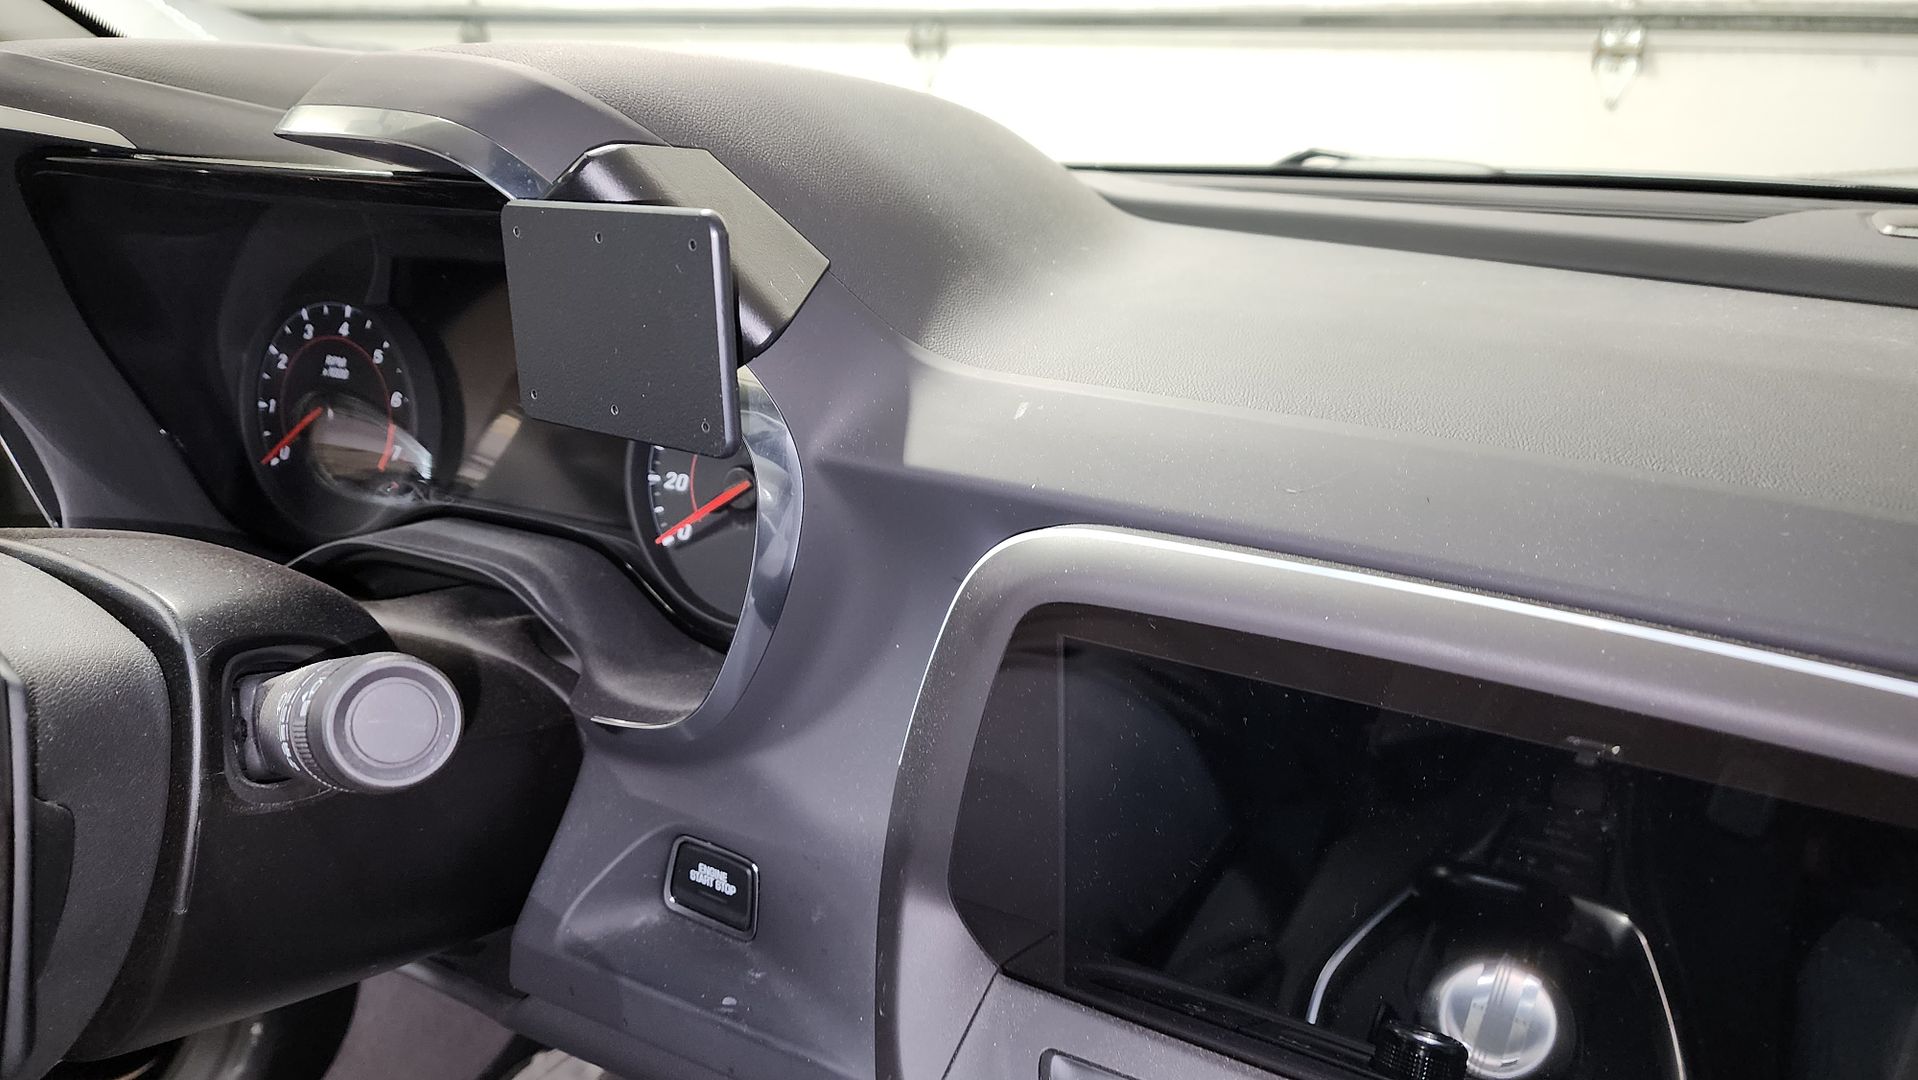
I took a simple approach to the phone mount, going with Pro Clip. Options are vehicle specific and phone specific (the two pieces are purchased separately).
   I also took a simple approach to power, using the power socket in the center console with a 10' USB-C to C cable routed in a fairly aesthetic way without drilling holes or making modifications. Socket: https://www.amazon.com/gp/product/B0BLYX8SHZ Cable: https://www.amazon.com/gp/product/B081SFHFTF The phone slides into the mount, it doesn't clamp (mount width is adjustable). It hold securely yet is easy to add/remove. It also allows the phone to rotate 90 deg. so you can hold the phone in portrait or landscape positions as desired. 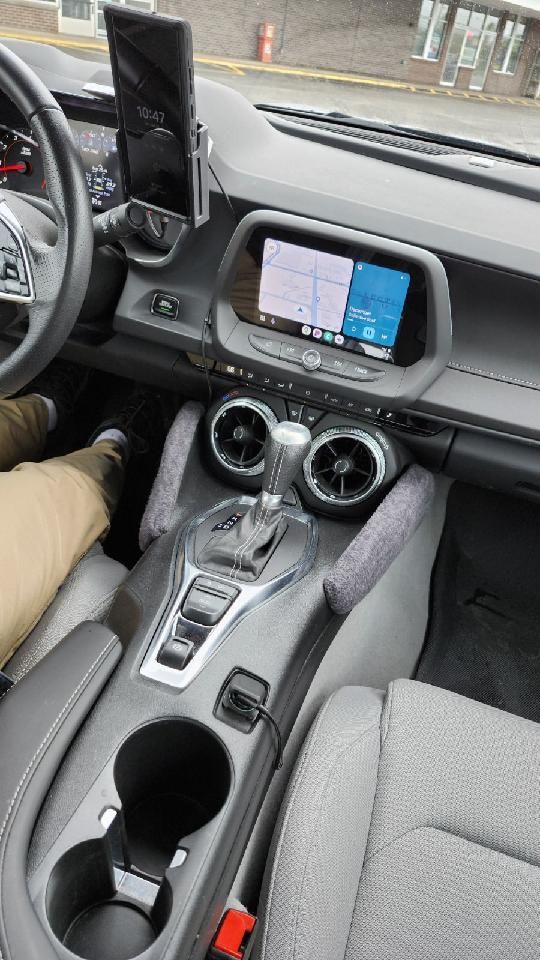 The 90 deg USB fitting hugs well and the cable just tucks under the console edge. The USB power adapter sits flush in the socket. The USB-B port is still available for passengers. 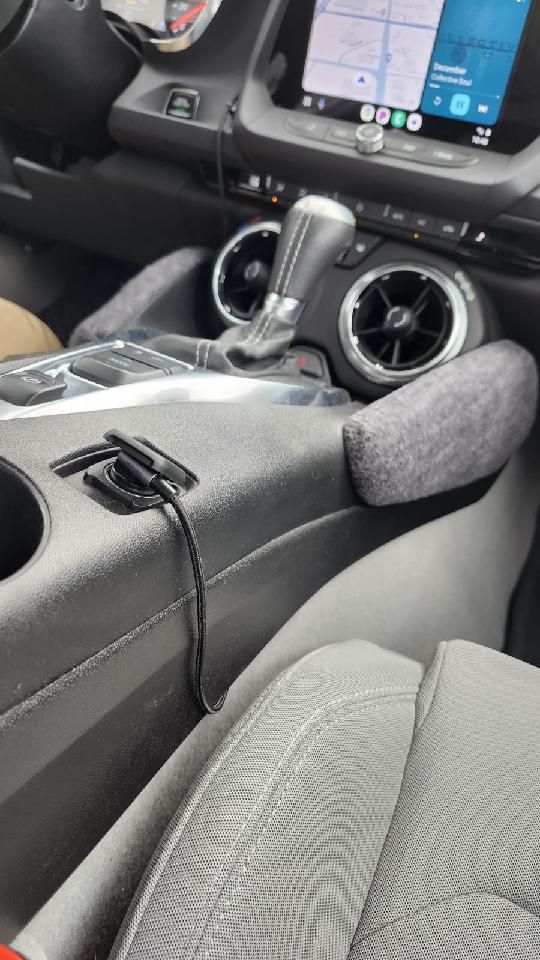 The cable routes around the knee bolster, then fills the gap below the HVAC vents (so nothing can fall down there), then routes up the dash as shown. I used zip ties to secure the cable by tucking the tail behind the radio (i trimmed the tail to an inch or so). The tail just friction-fits in place in the panel gaps.  The cable is then secured to the mount so it hangs just enough to not bang around when not used but easily plugs into the phone when in use. 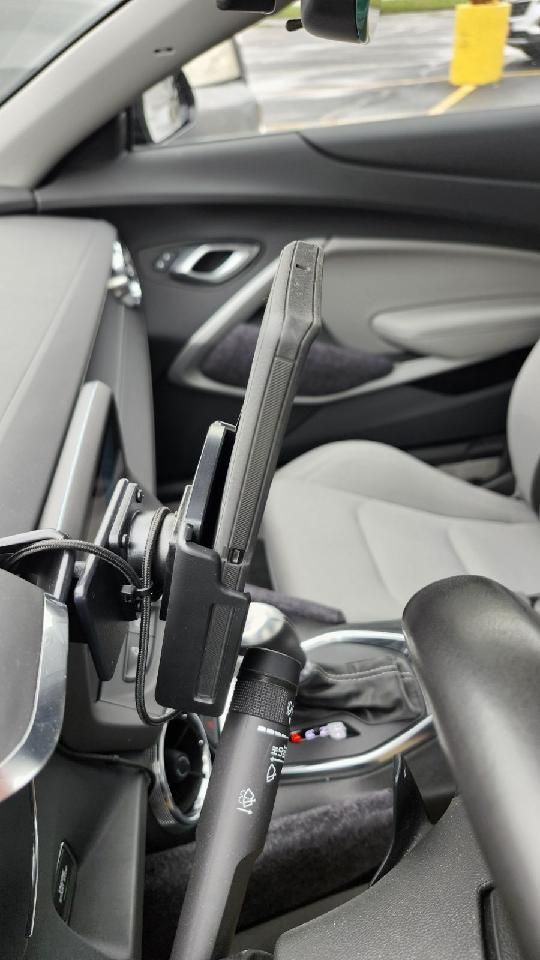 Pros: No modifications needed to vehicle. Cable is mostly hidden, and isn't annoying. Mount is sturdy and doesn't vibrate or shake. Phone can be portrait or landscape as desired. Power socket adapter has a spare USB-B for passengers. Cons: The location is higher than I really like. The wiper control gets really close to the phone, it's usable but there isn't a lot of space left. USB cable has to be manually plugged-in (not wireless nor a socket).
__________________
2023 1SS A10 Black H72/C2U/56W/NPP - Daily Driver
1100: 5/3/22 . . . . . . . 2000: 6/25/22 . . . . . .4000: 8/17/22 . . . . . . . 6000: 9/10/22 Daily Driver mileage update: 45k mi. @ Mar 2025 New Engine @ 22,600 mi. due to dealer confusing bad gas with a bad engine. Build Log: https://www.camaro6.com/forums/showt...6#post11353116 |
|
|
|
|
02-26-2026, 12:16 PM
|
#60 |
|
Electrical Engineer
Drives: 2023 1SS A10 Black Join Date: Apr 2022
Location: Illinois
Posts: 929
|
Needed to get the amp rack installed and I went with the previously coordinated location, the well on the drivers side. A mount was constructed so the MVi amplifier pair and MVi hub would be compact.
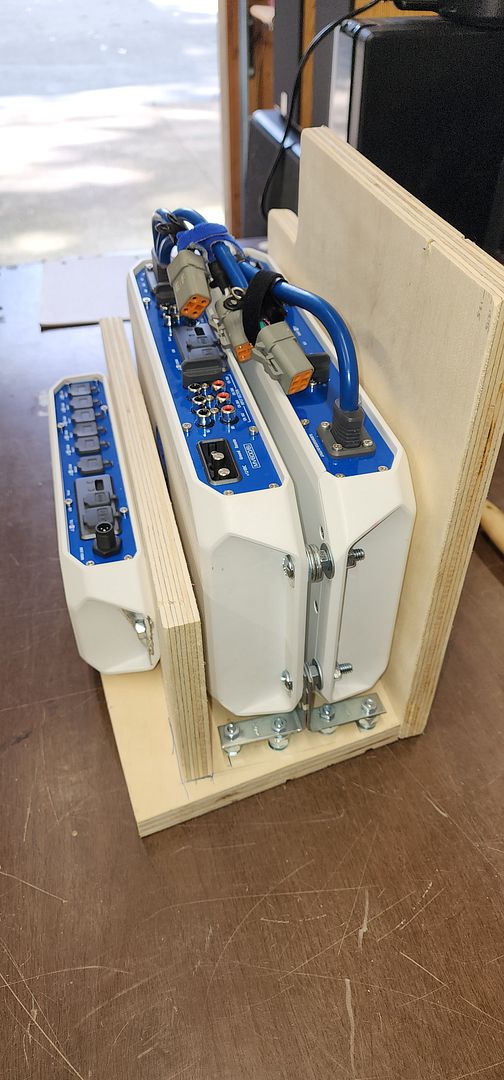 These amps work well for this application because they have everything on one end. 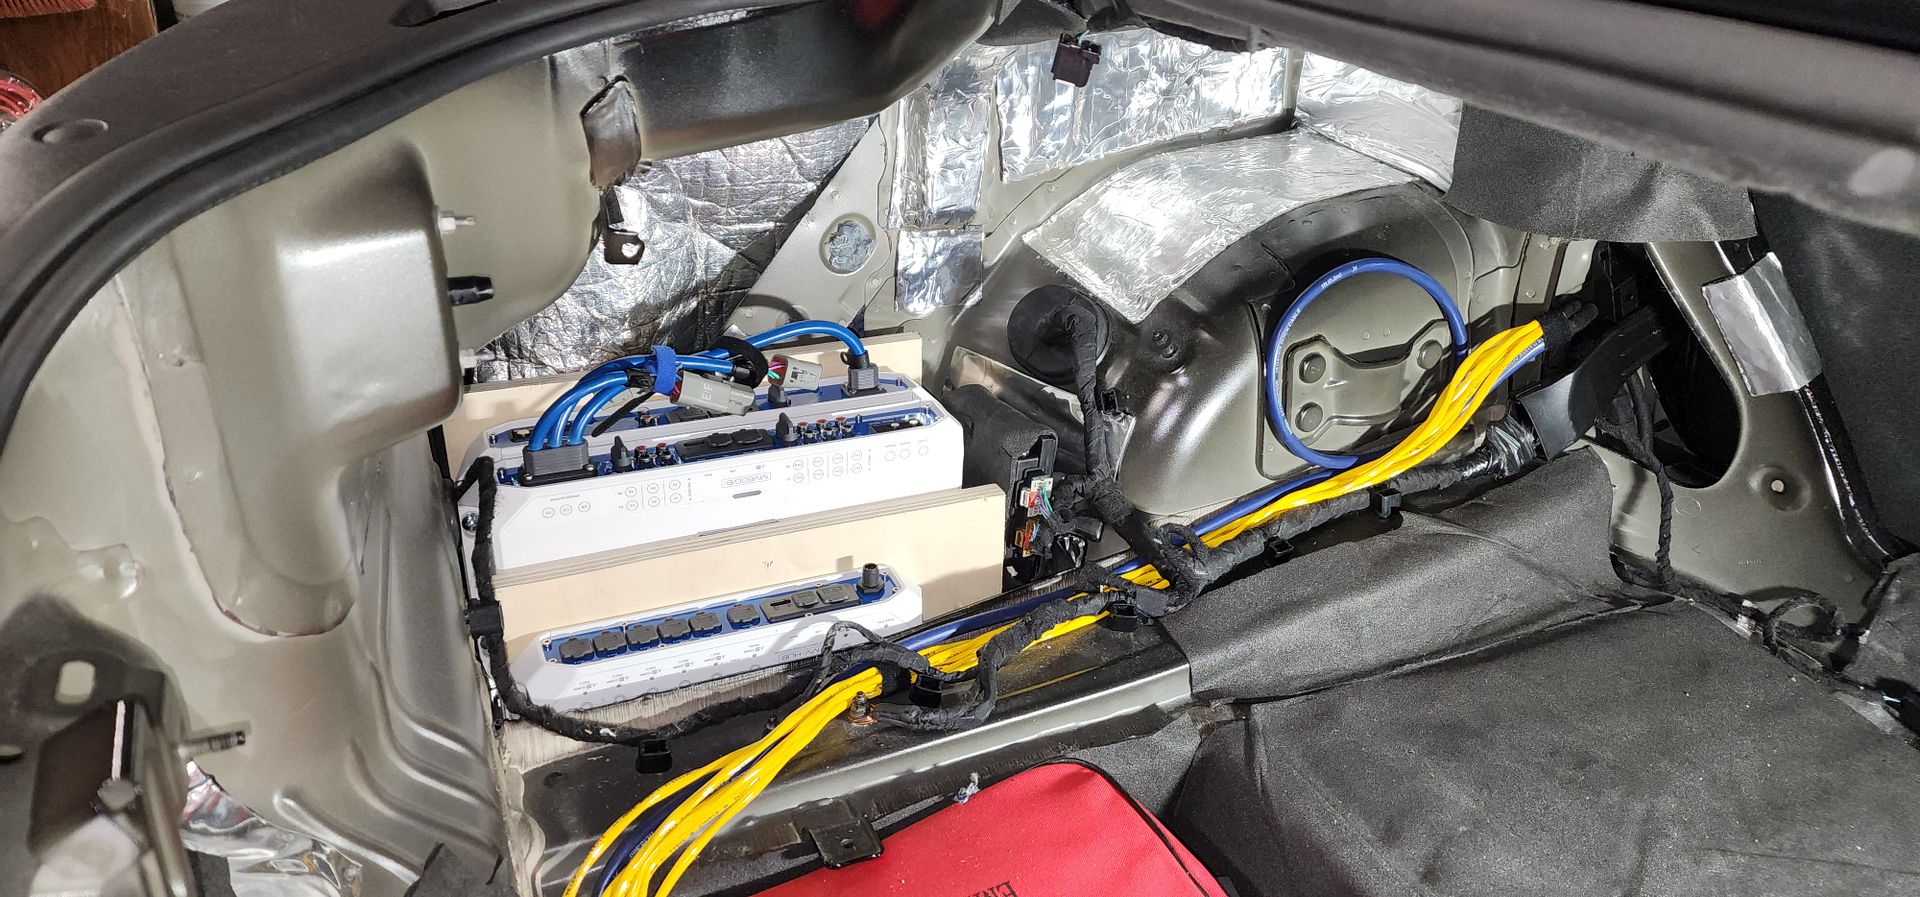 Next, I needed power. For power I made my own terminal with copper tubing. 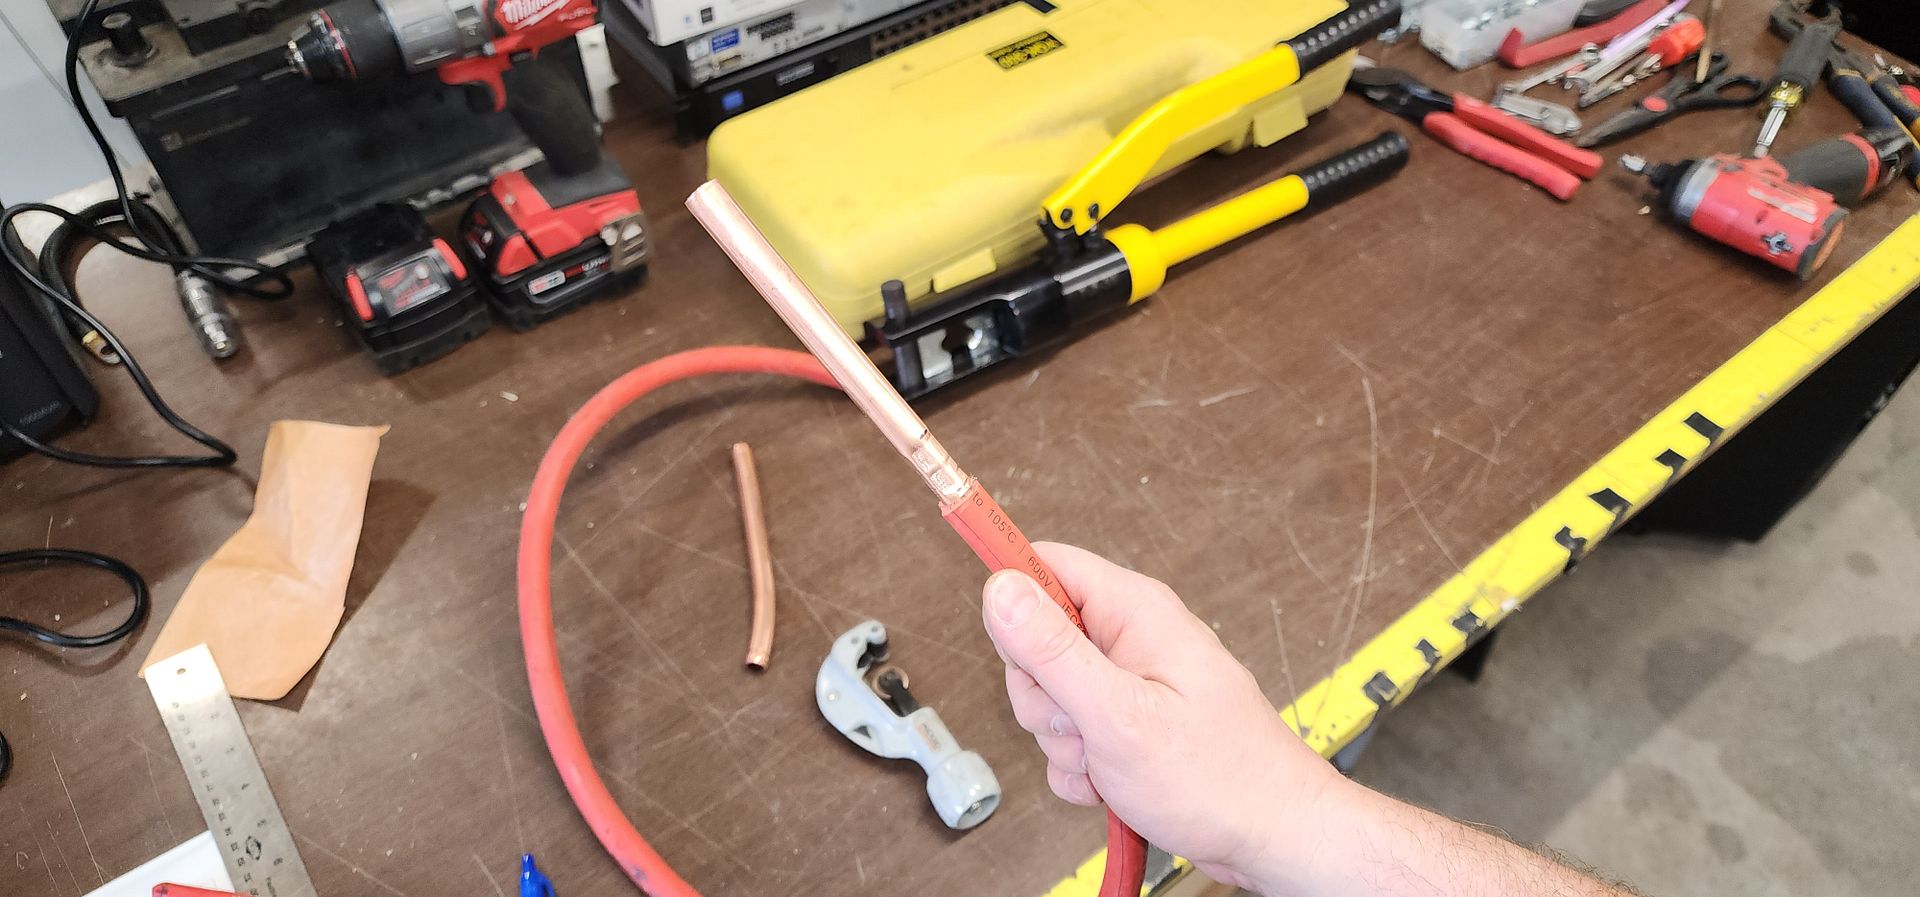 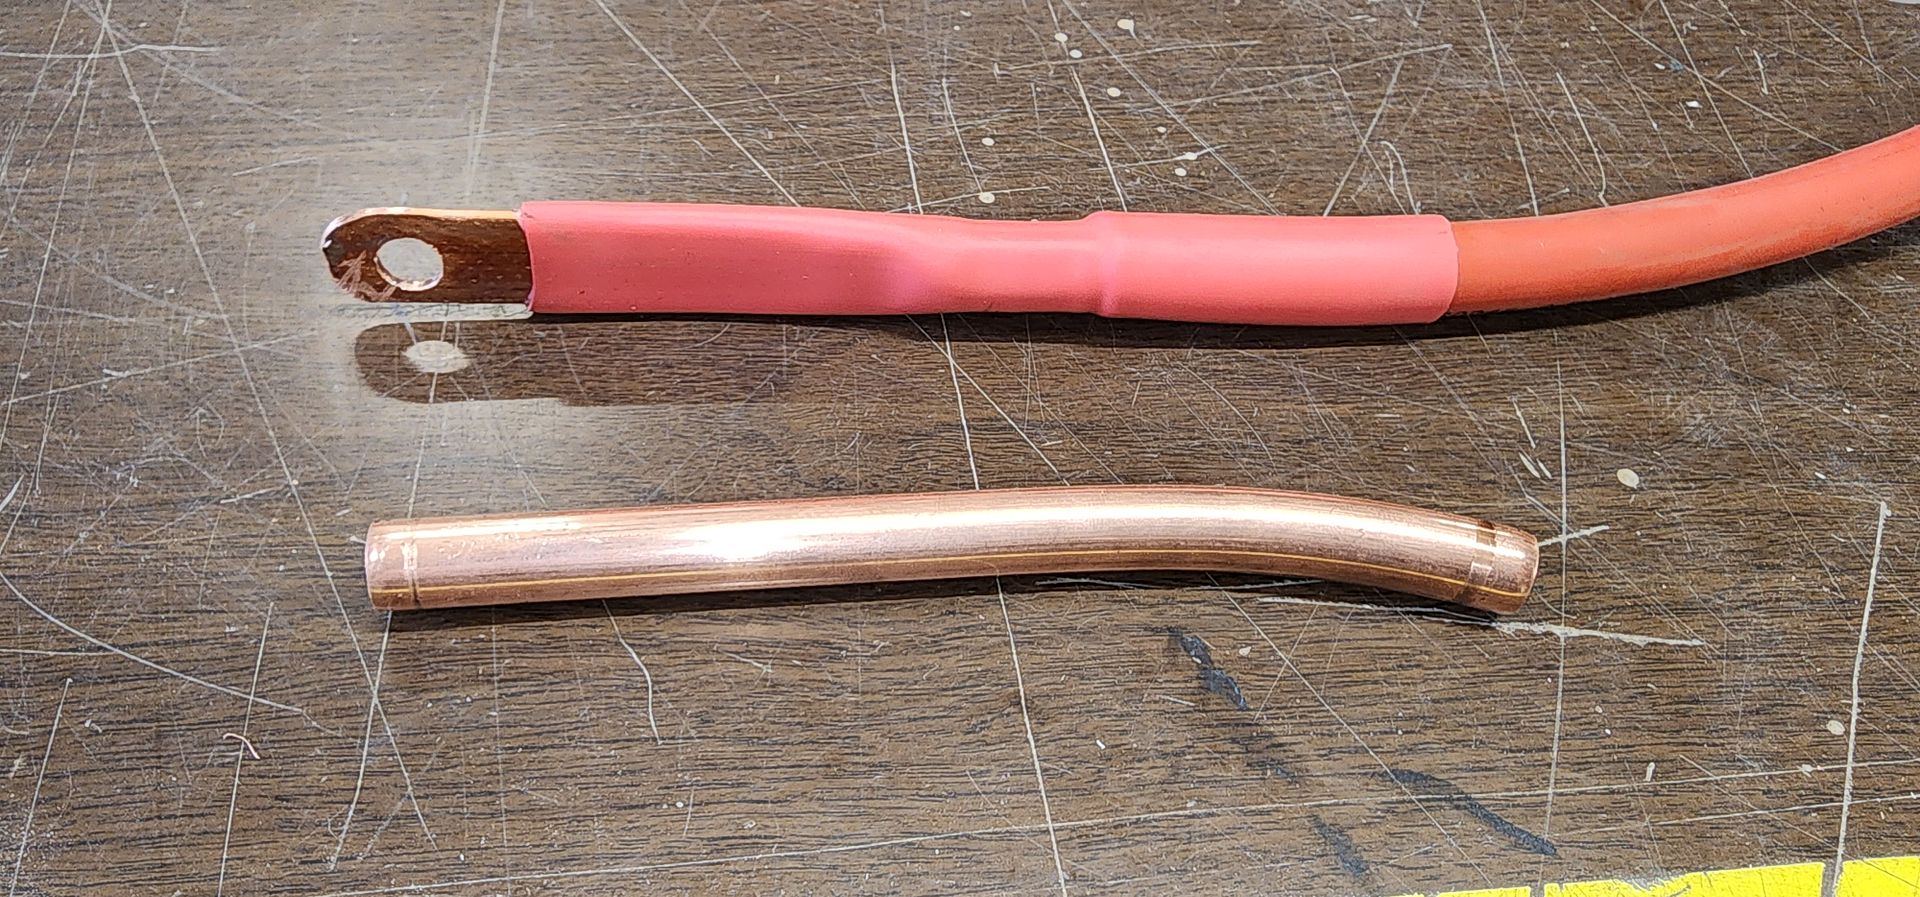 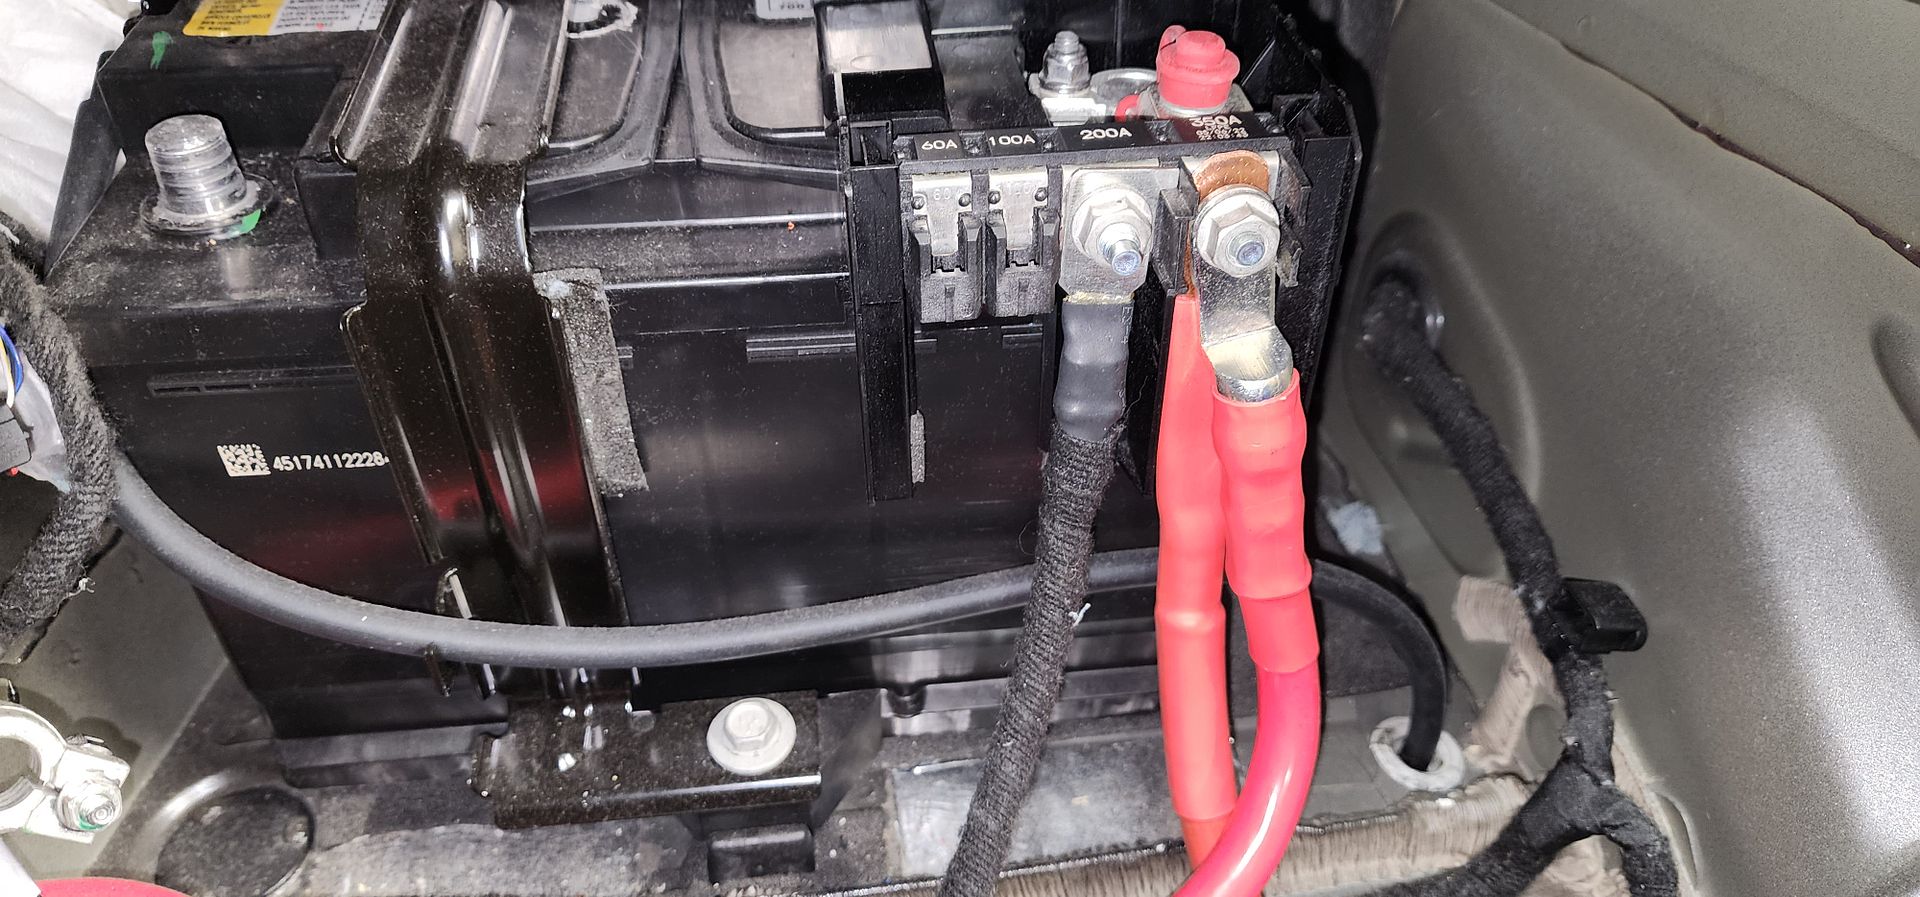 I wanted the factory battery cover to fit after adding the new power cabling. 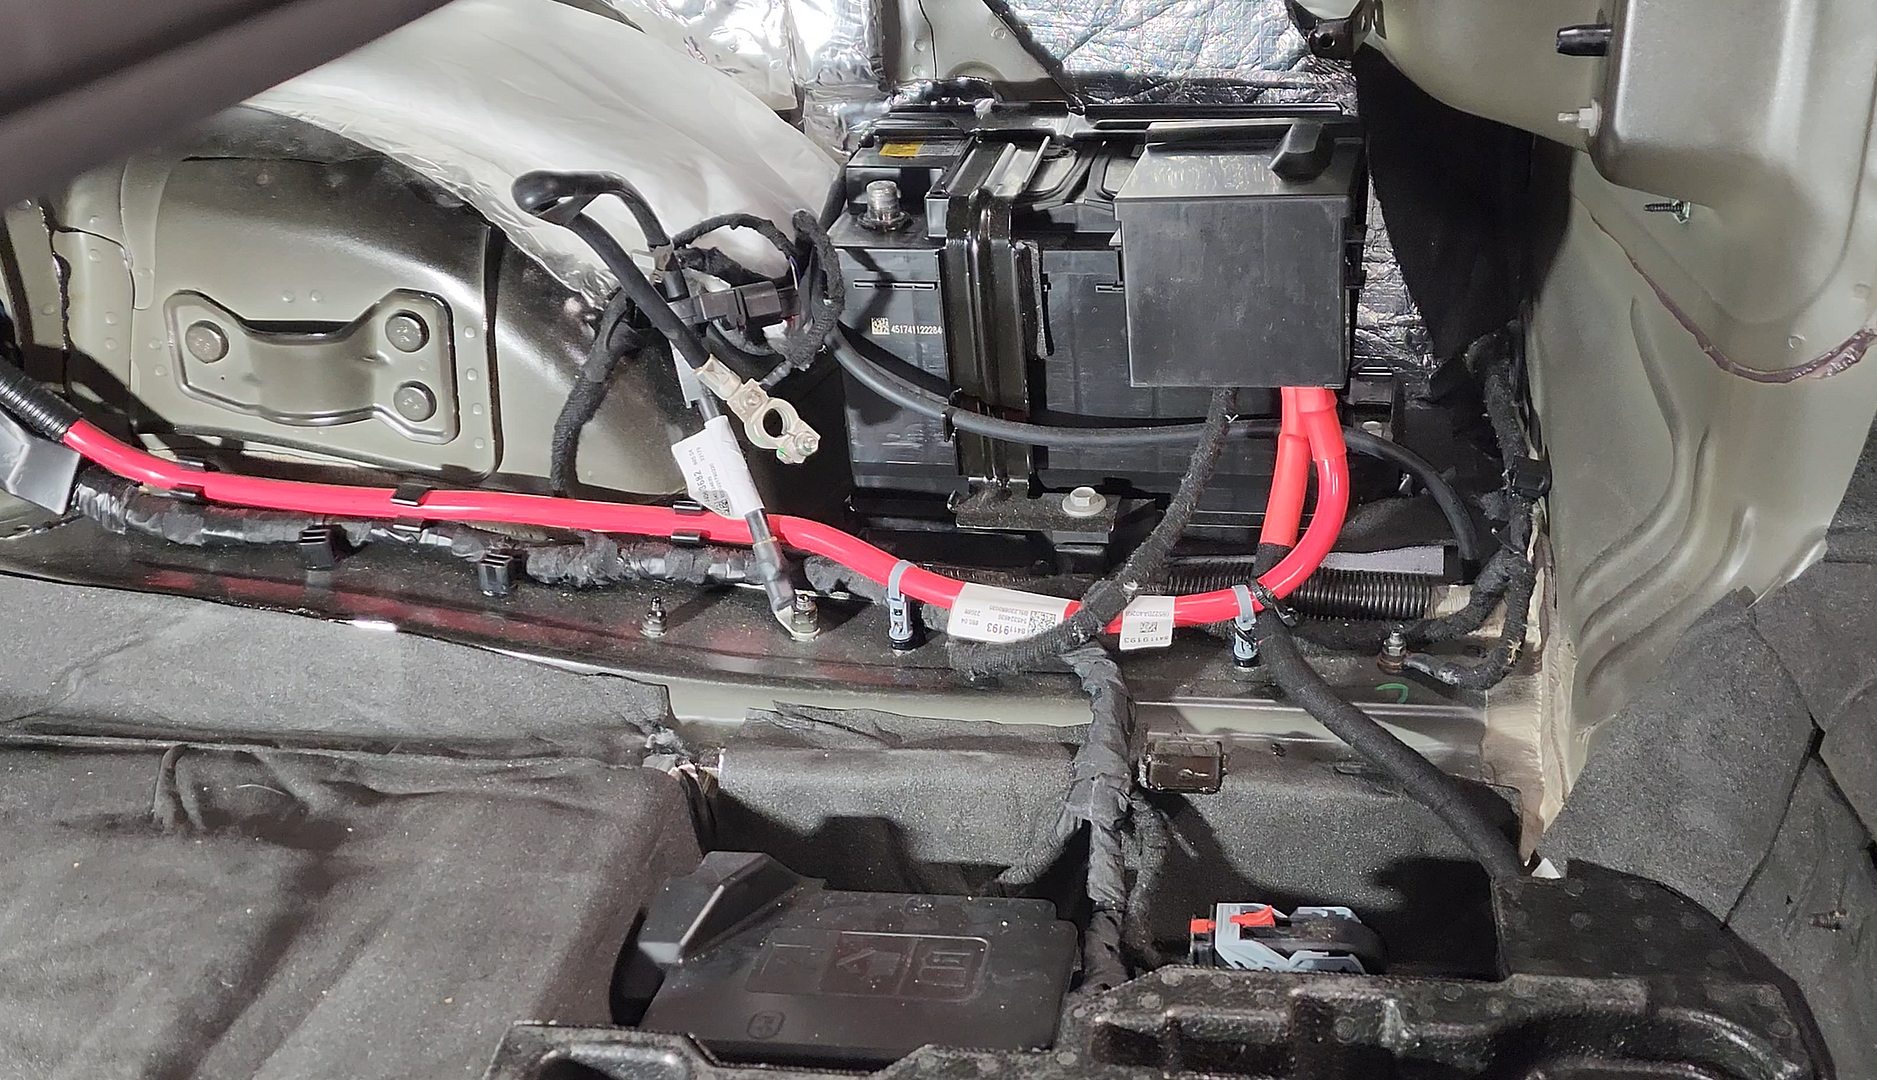 I added a fuse holder where it would be accessible and protected. 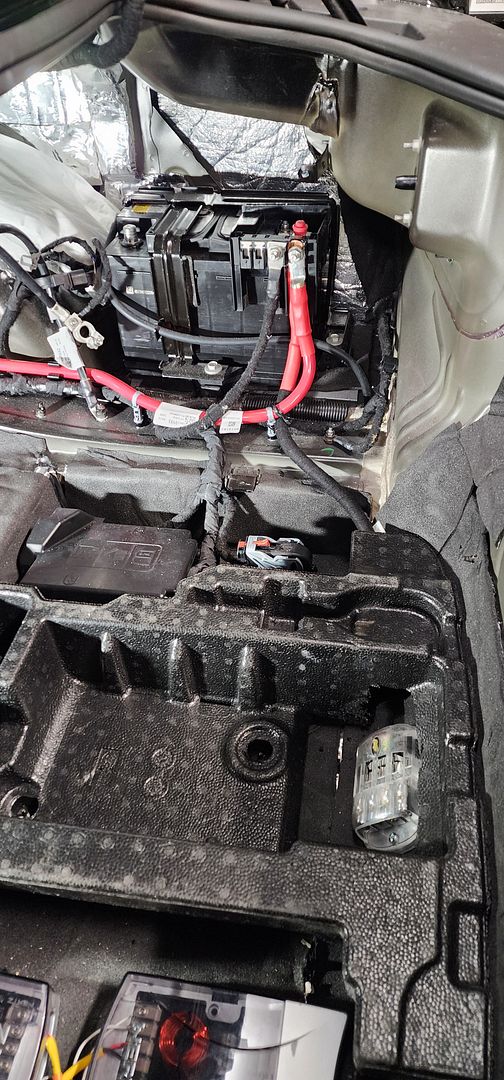 Then I could start testing and seeing what I like and dont like. Once everything is finalized, I will shorten cables and finalize routing. For now, flexibility was important. All of this is covered by the factory side panels anyway. 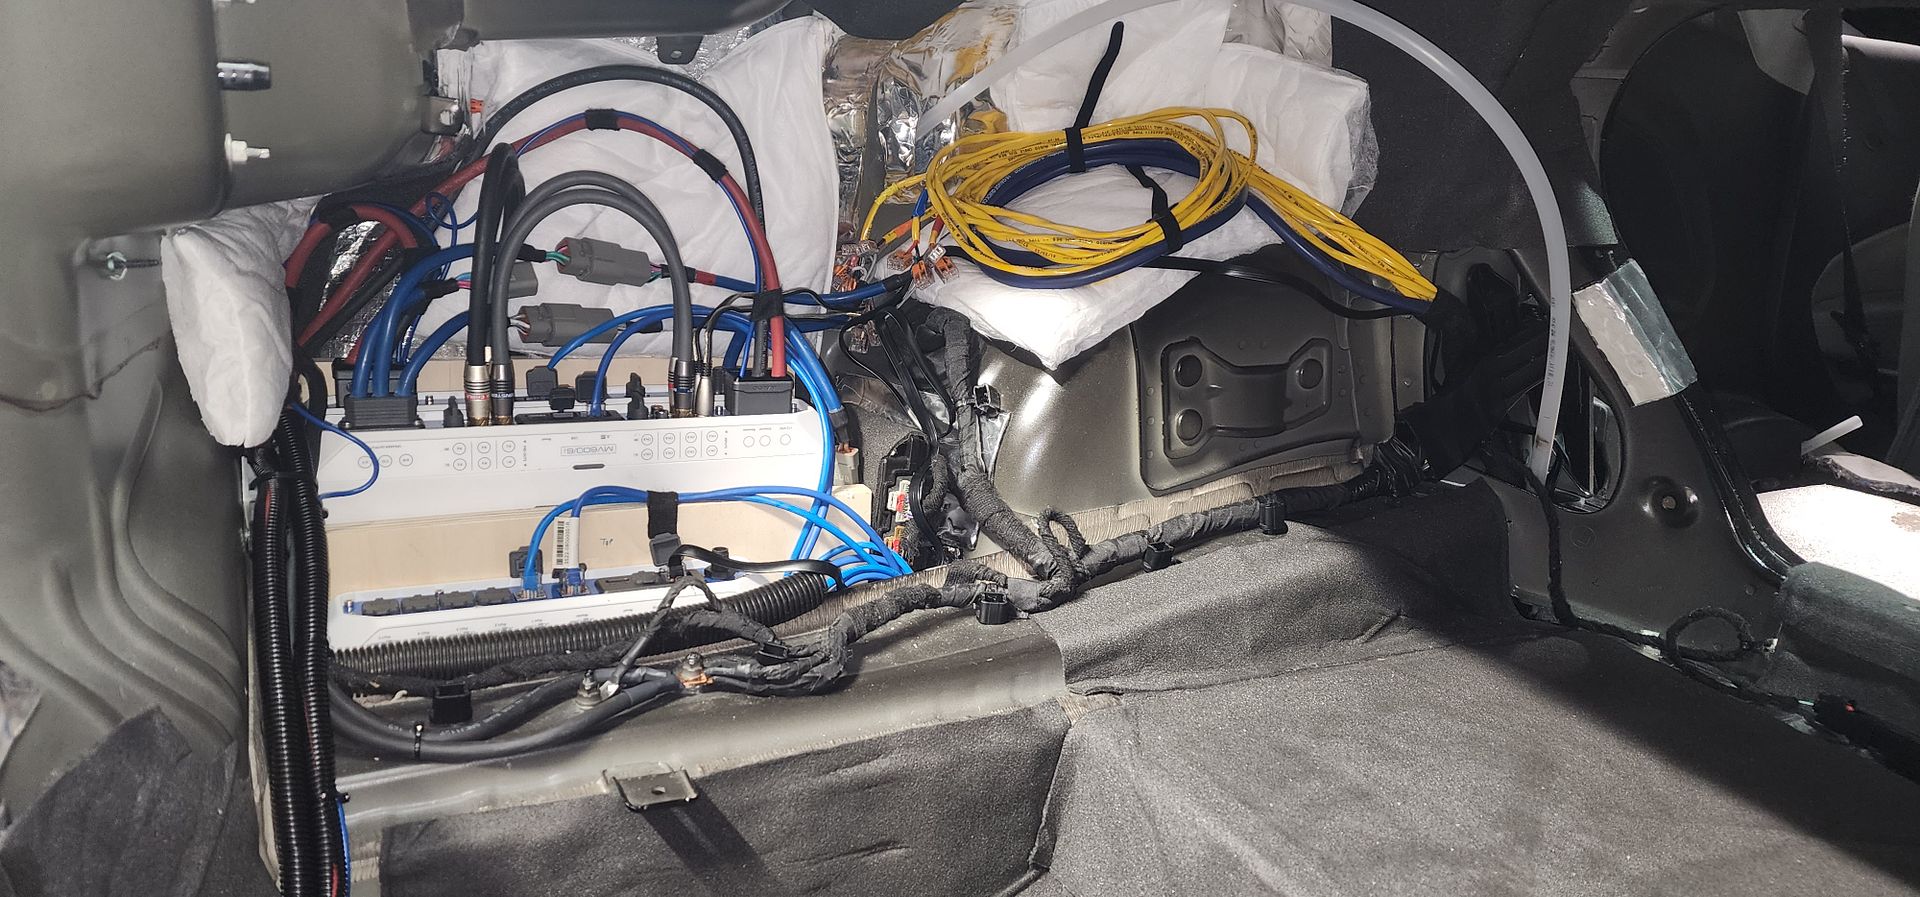 For tuning, I configured the MV600/6i amplifier so I could see signals and correct them. 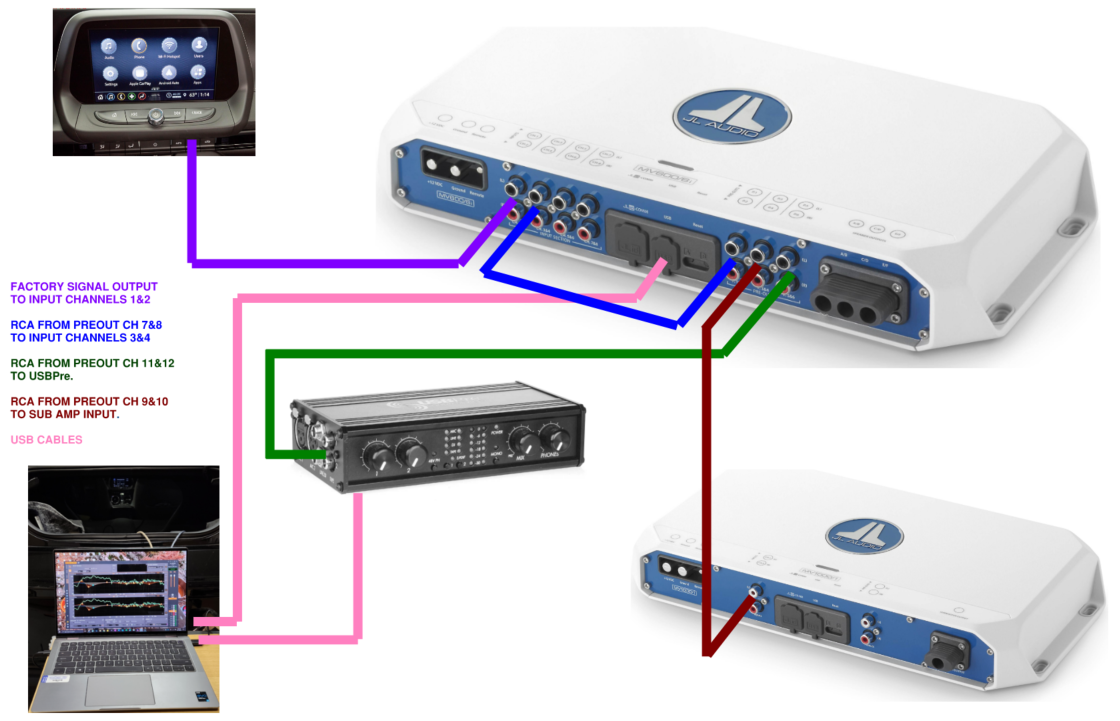 This is the factory EQ signal that we are trying to fix: 
__________________
2023 1SS A10 Black H72/C2U/56W/NPP - Daily Driver
1100: 5/3/22 . . . . . . . 2000: 6/25/22 . . . . . .4000: 8/17/22 . . . . . . . 6000: 9/10/22 Daily Driver mileage update: 45k mi. @ Mar 2025 New Engine @ 22,600 mi. due to dealer confusing bad gas with a bad engine. Build Log: https://www.camaro6.com/forums/showt...6#post11353116 |
|
|
|
|
02-26-2026, 12:23 PM
|
#61 |
|
Electrical Engineer
Drives: 2023 1SS A10 Black Join Date: Apr 2022
Location: Illinois
Posts: 929
|
I modified my rear seat to let bass through, since I will be using a forward-firing sub stage that is sealed off from the rest of the trunk. This is due to the extensive treatments Ive already done in the rear. The rear seat has a hard wooden backing that needs to go, and since no one sits behind my seat, that foam section needed to be removed.
Start by opening up the cover and removing it. 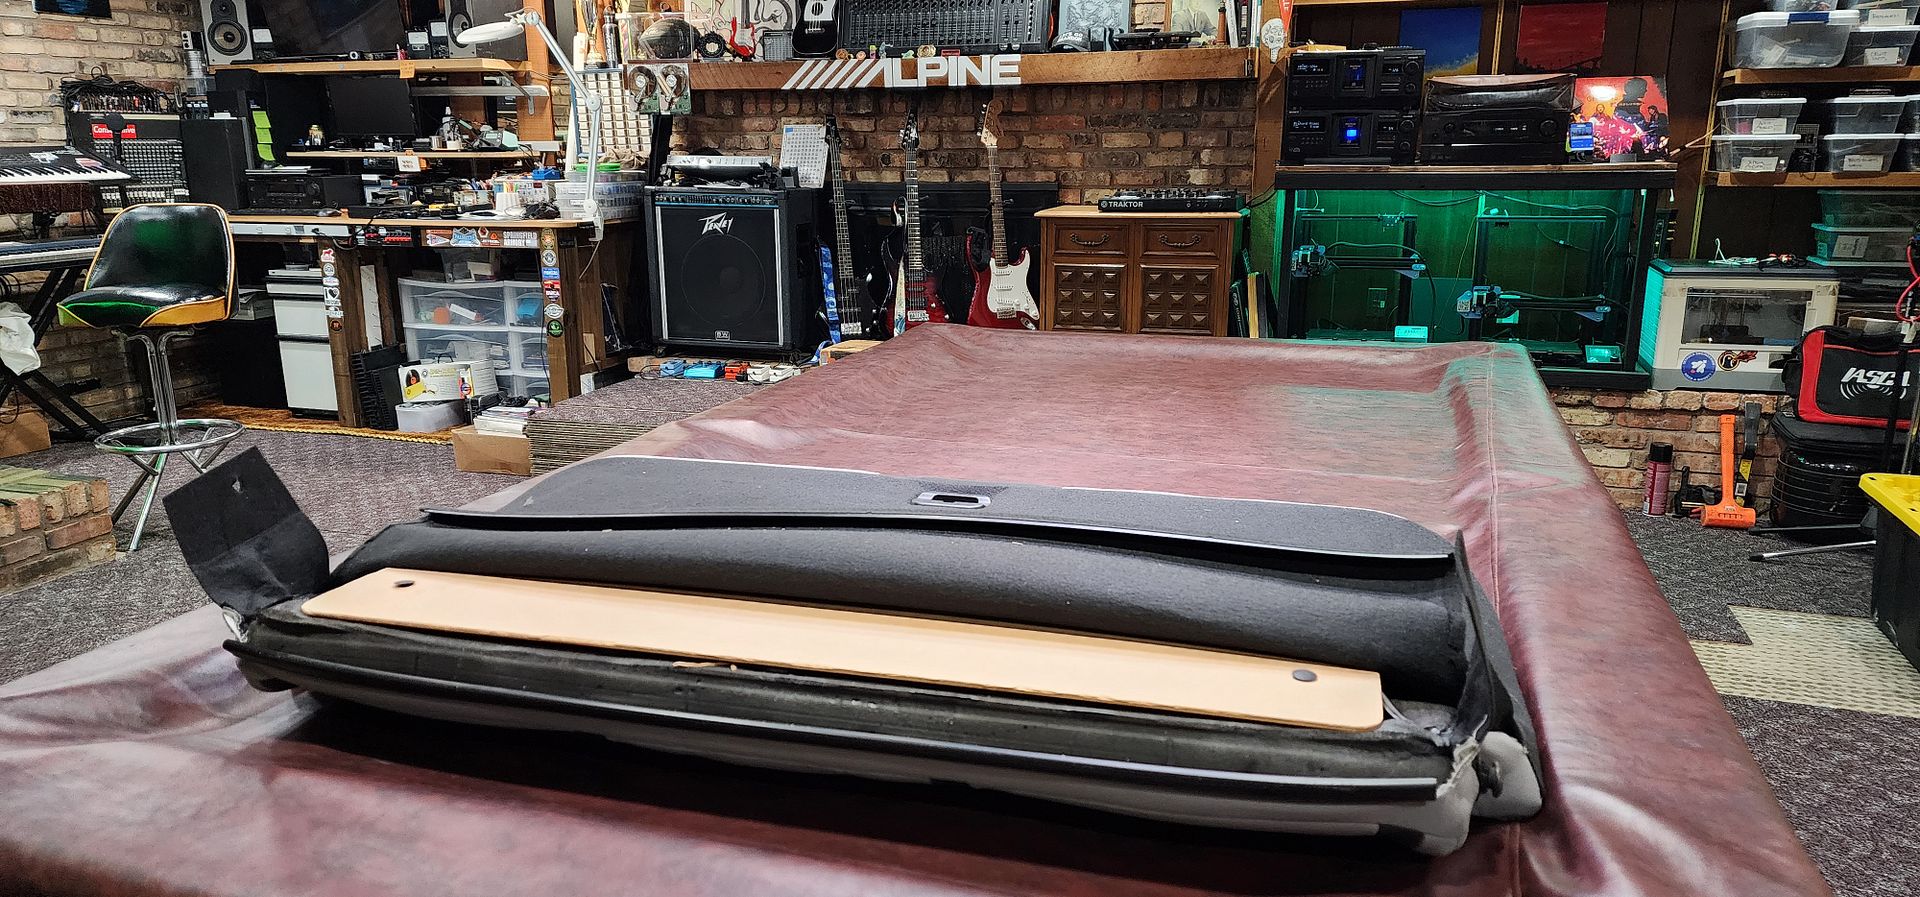 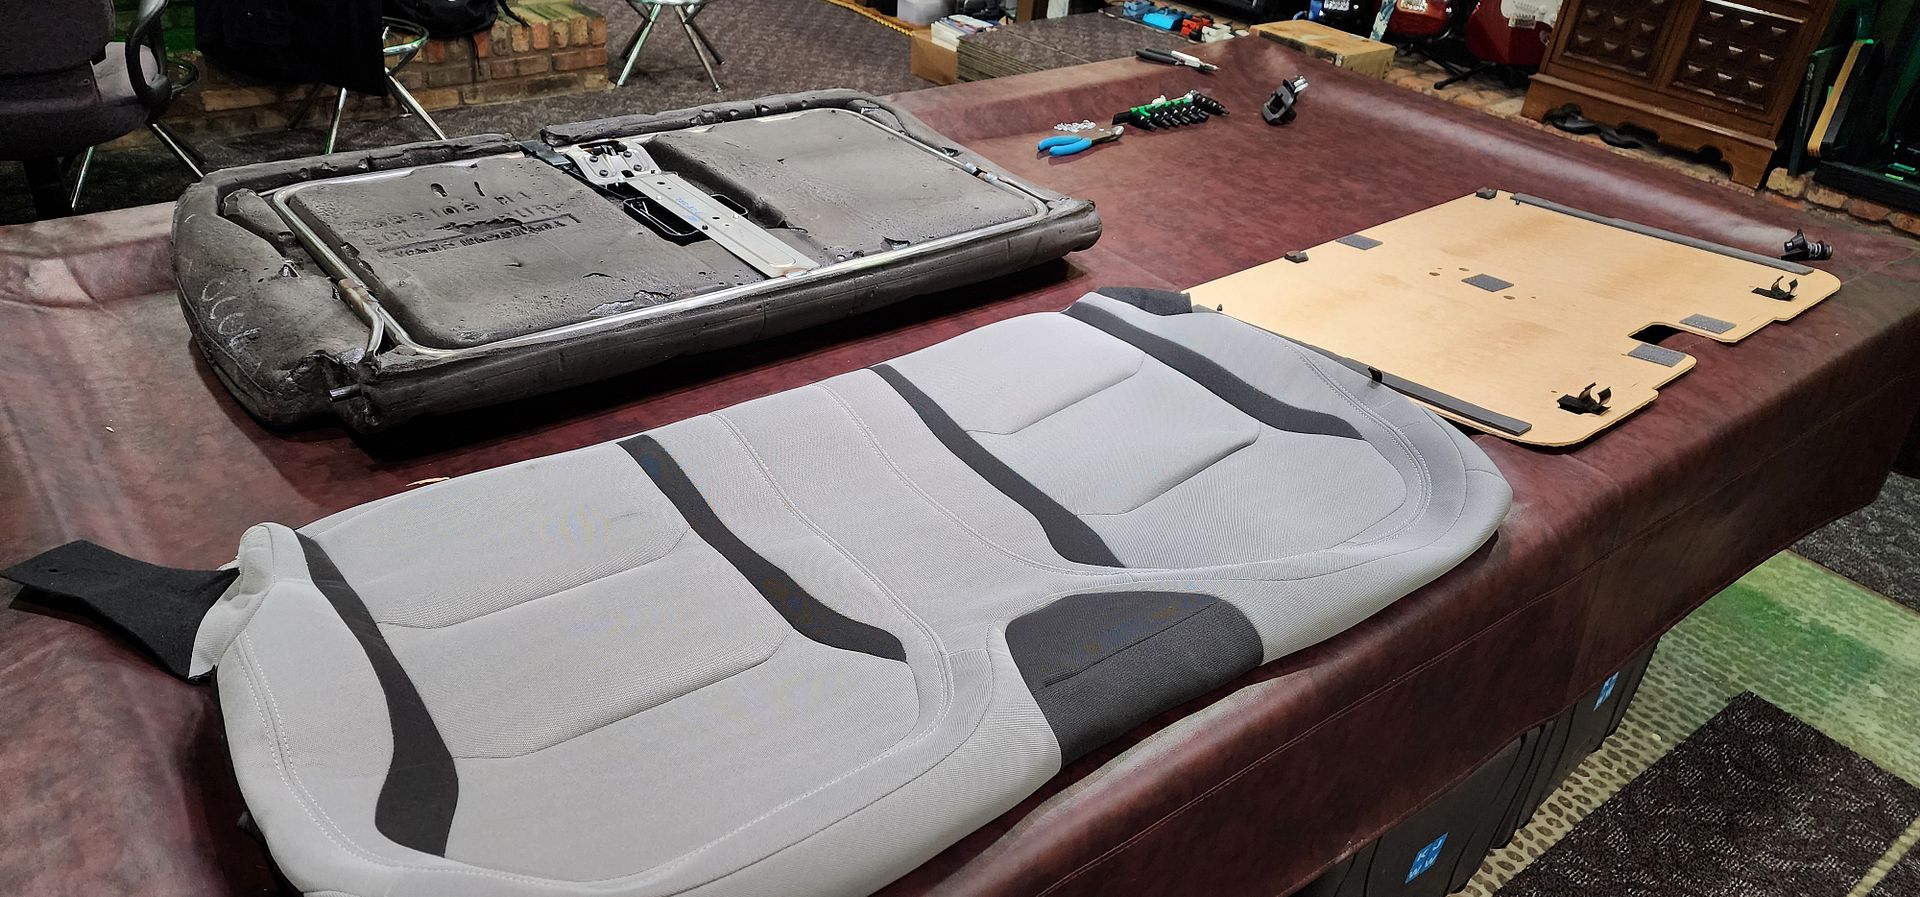 The latching mechanism needs to remain, so we have to leave the center. 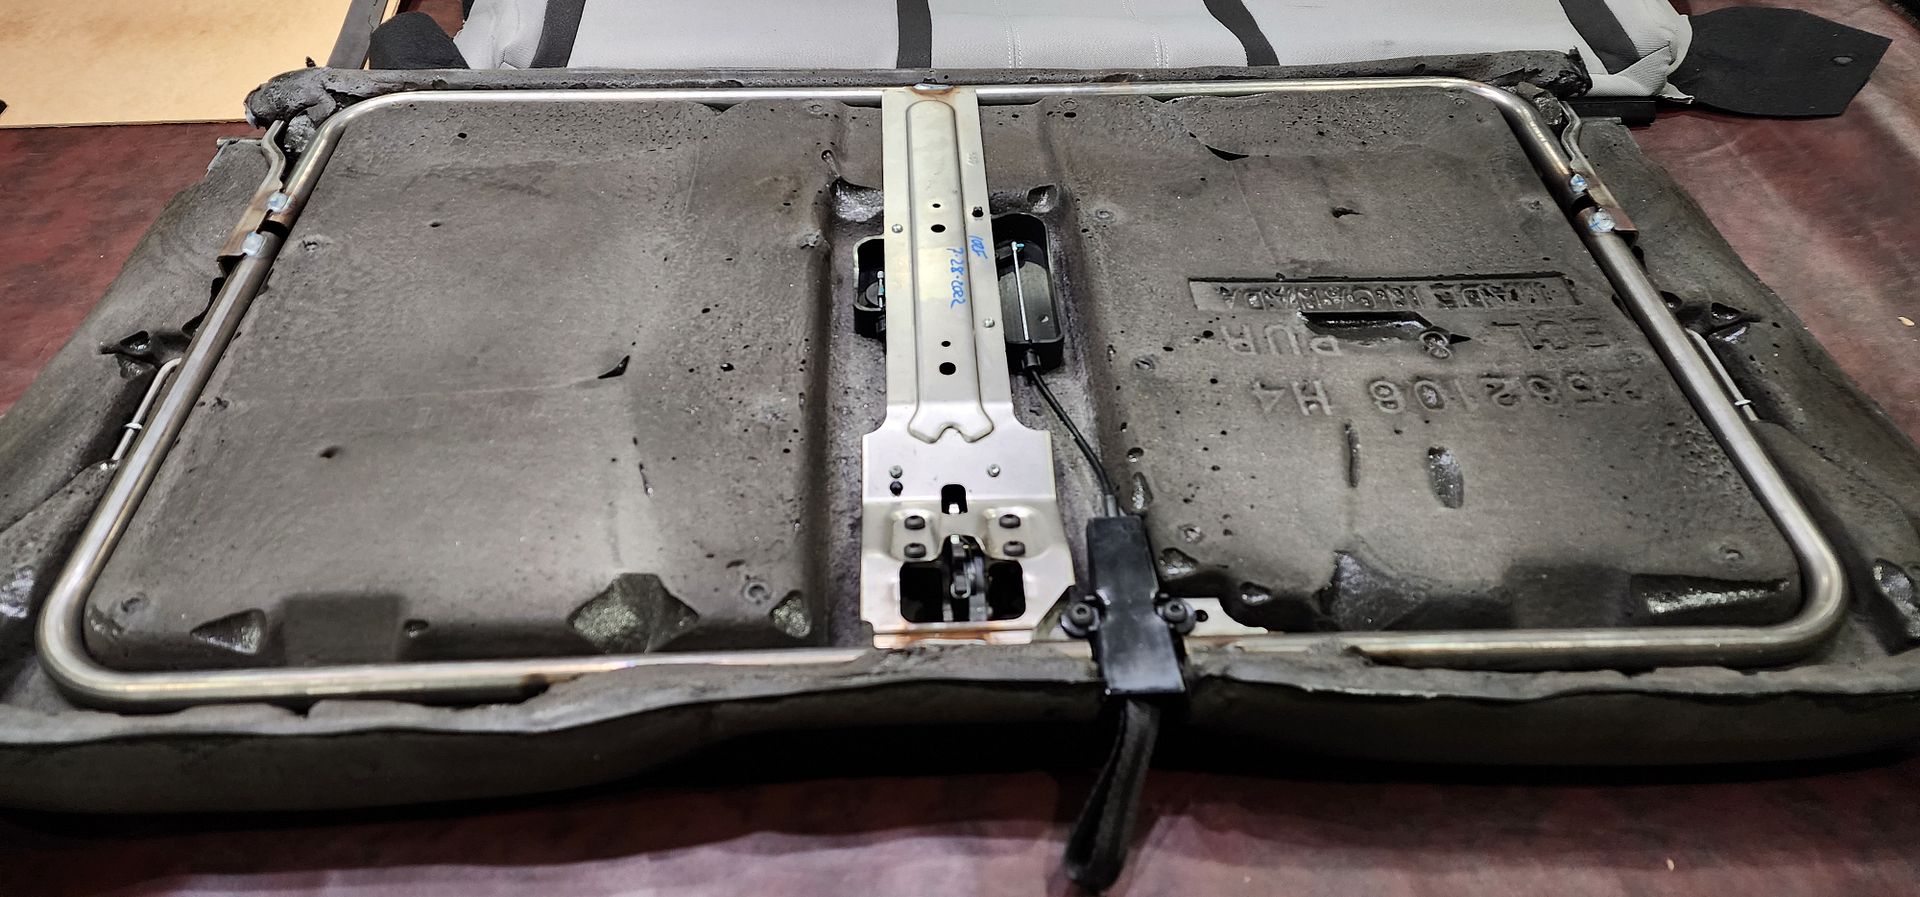 Cutting the foam out was easy with a long bladed knife. Just avoid cutting through metal and I retained the Velcro strip so the seat would look good. 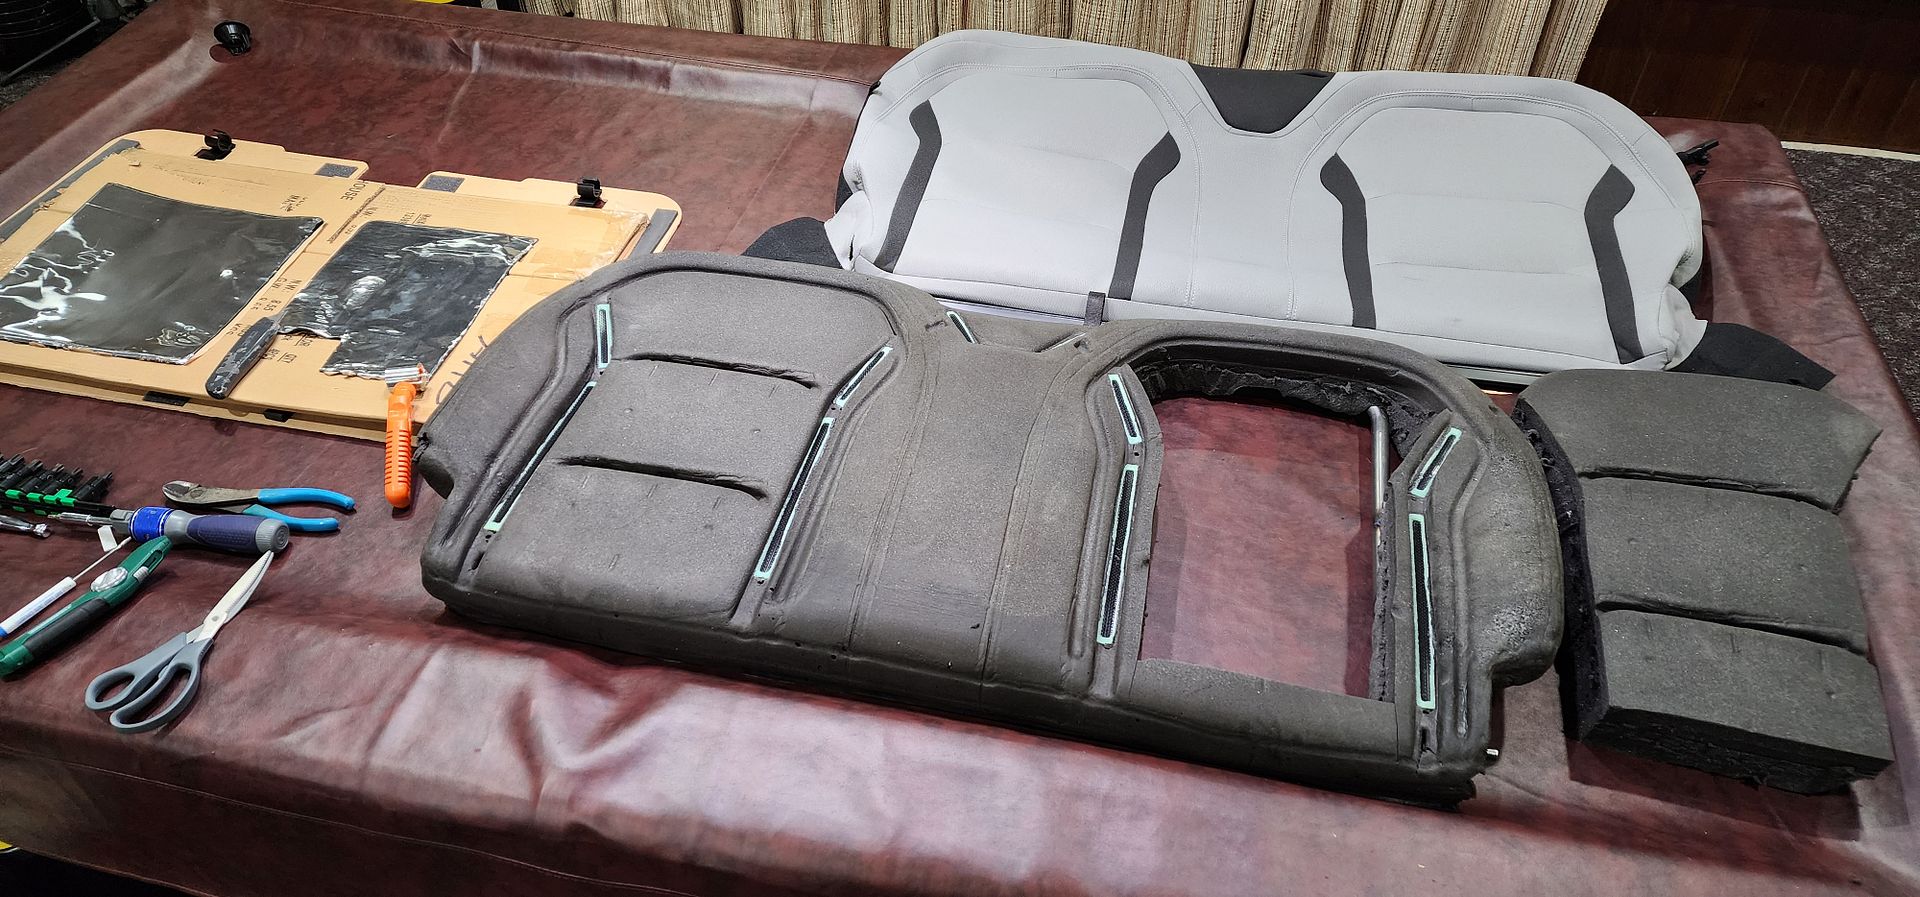 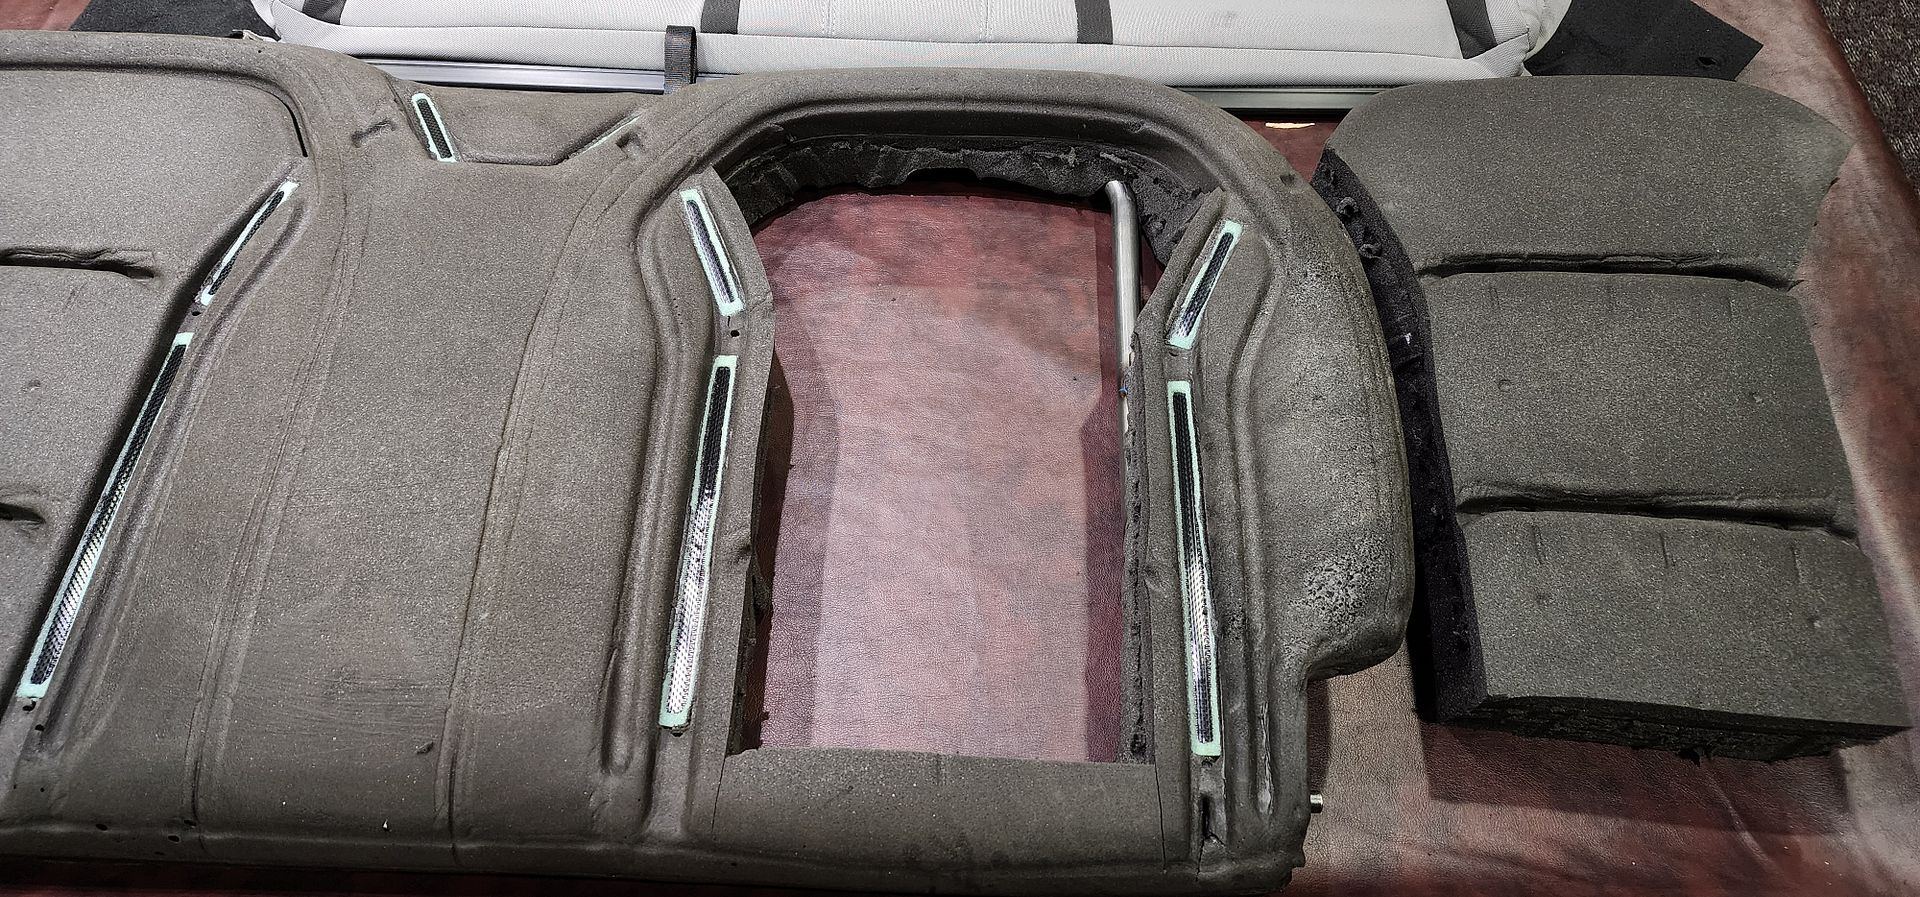 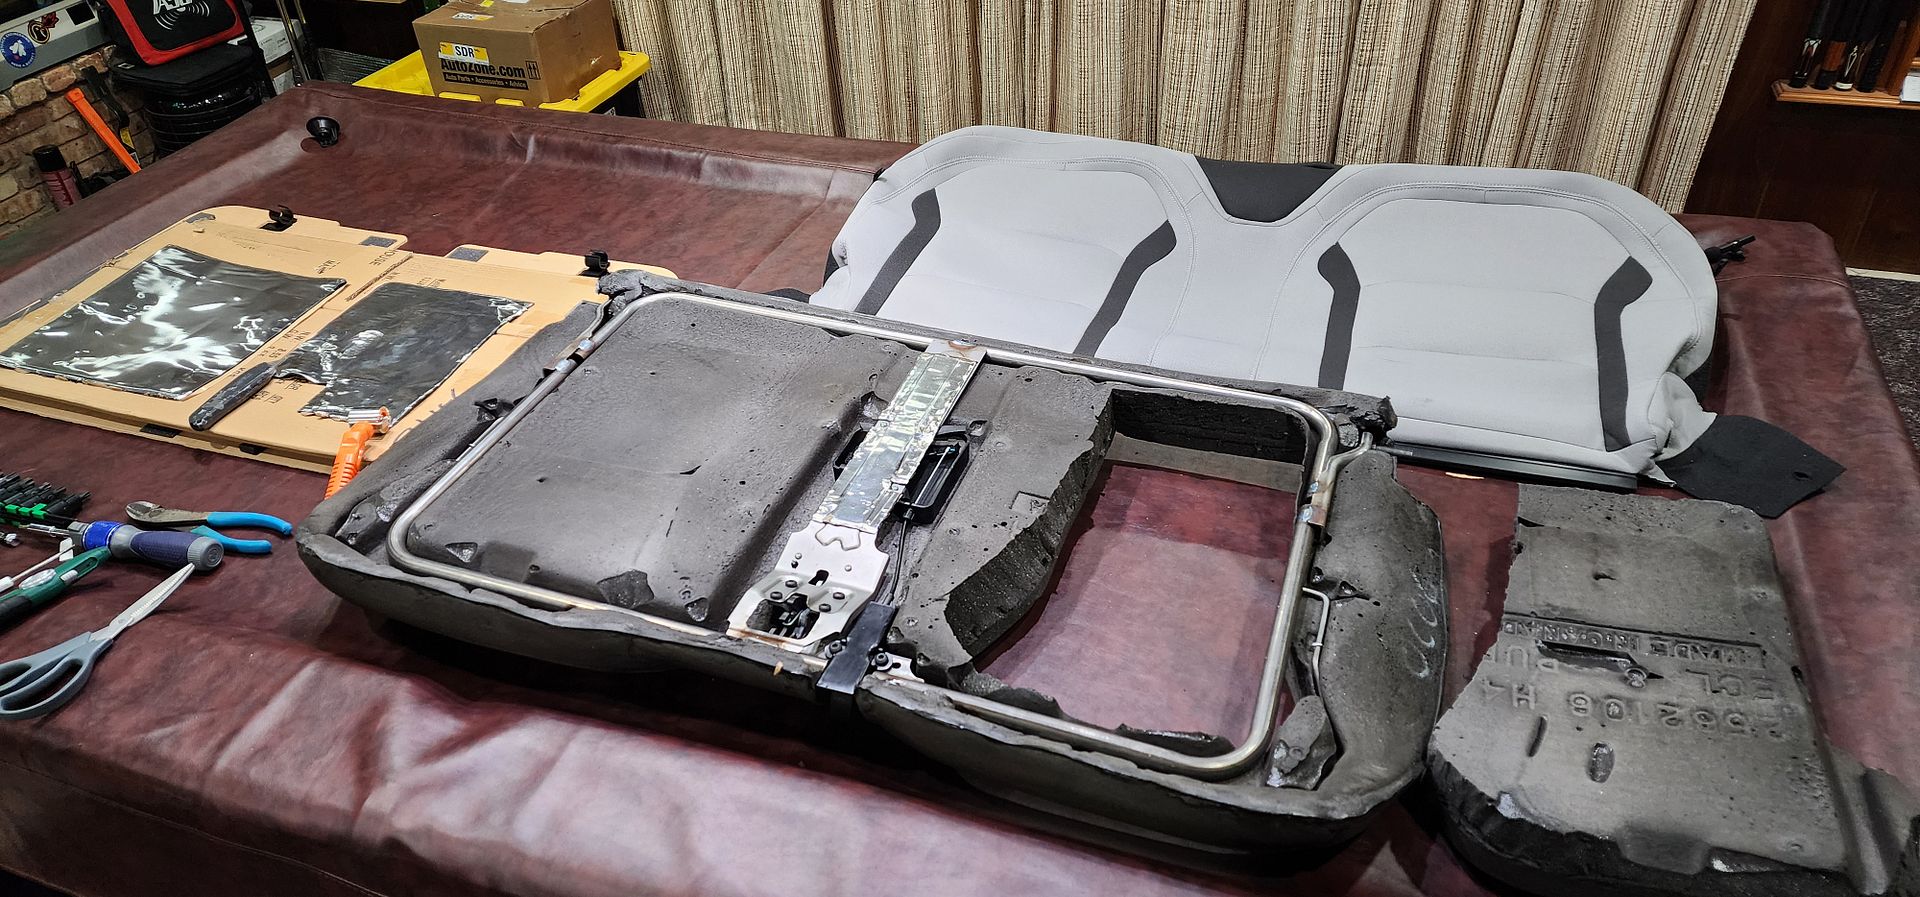 Completed 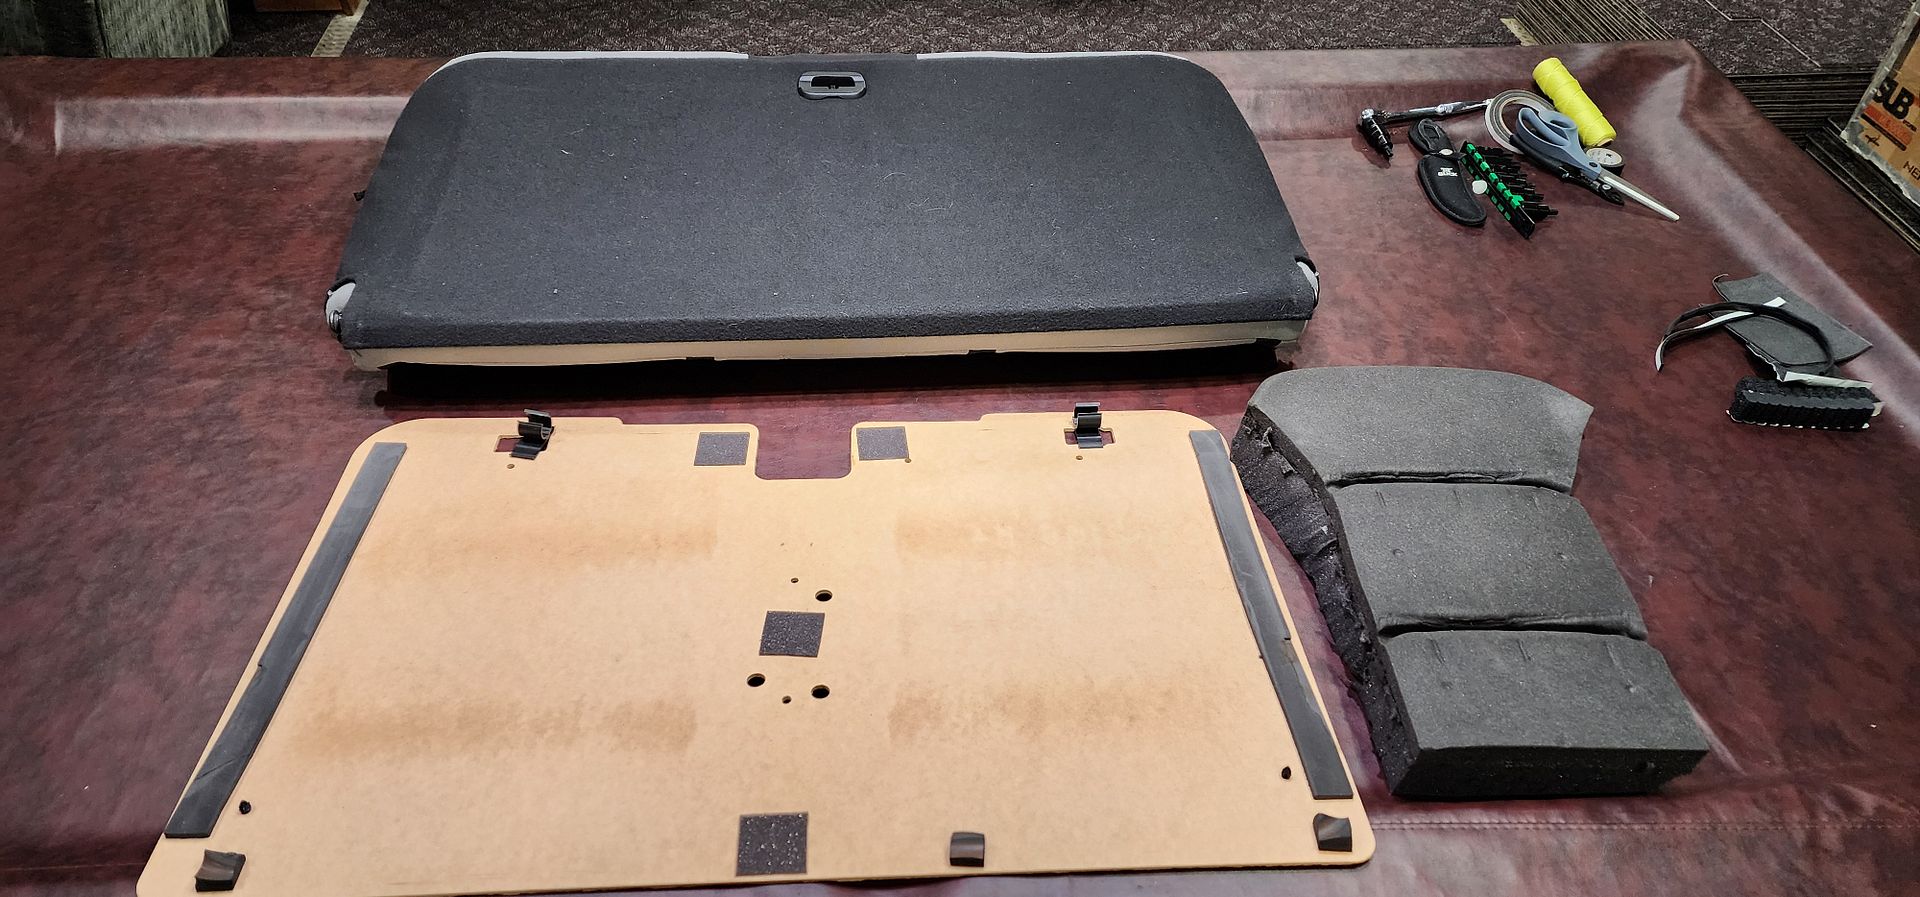 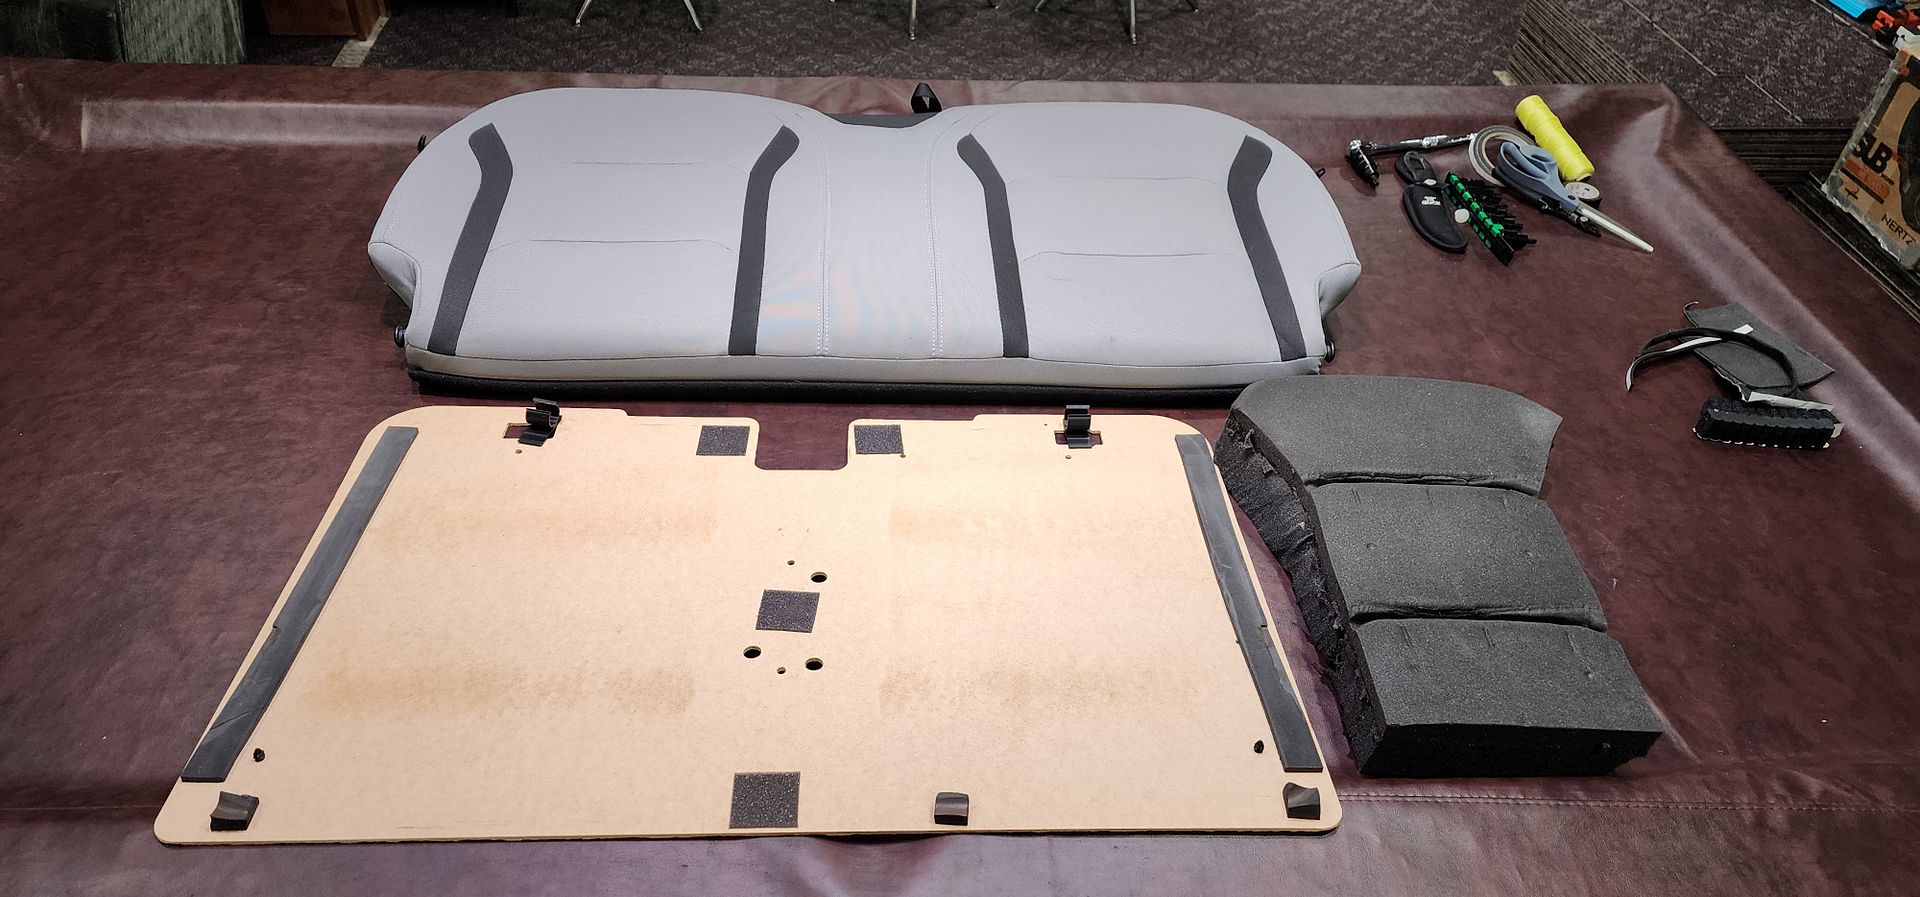 This was a test, the final configuration will be custom to fully seal to the opening. 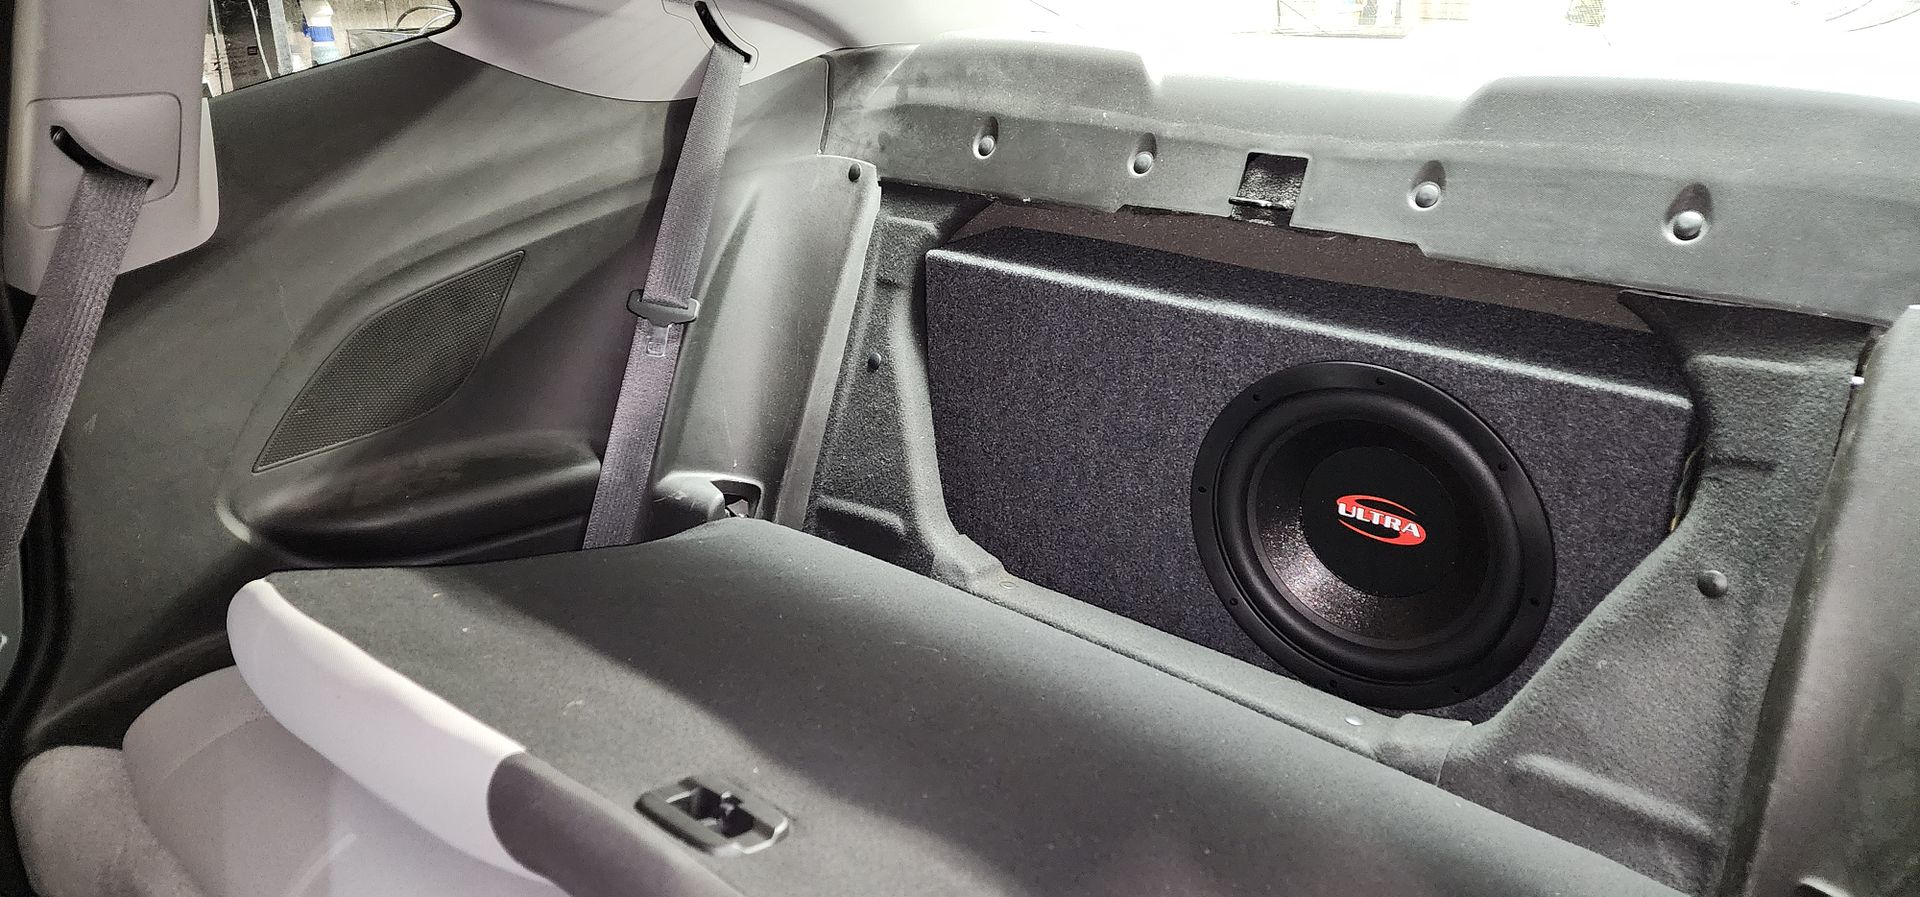 Cant tell anything is different. 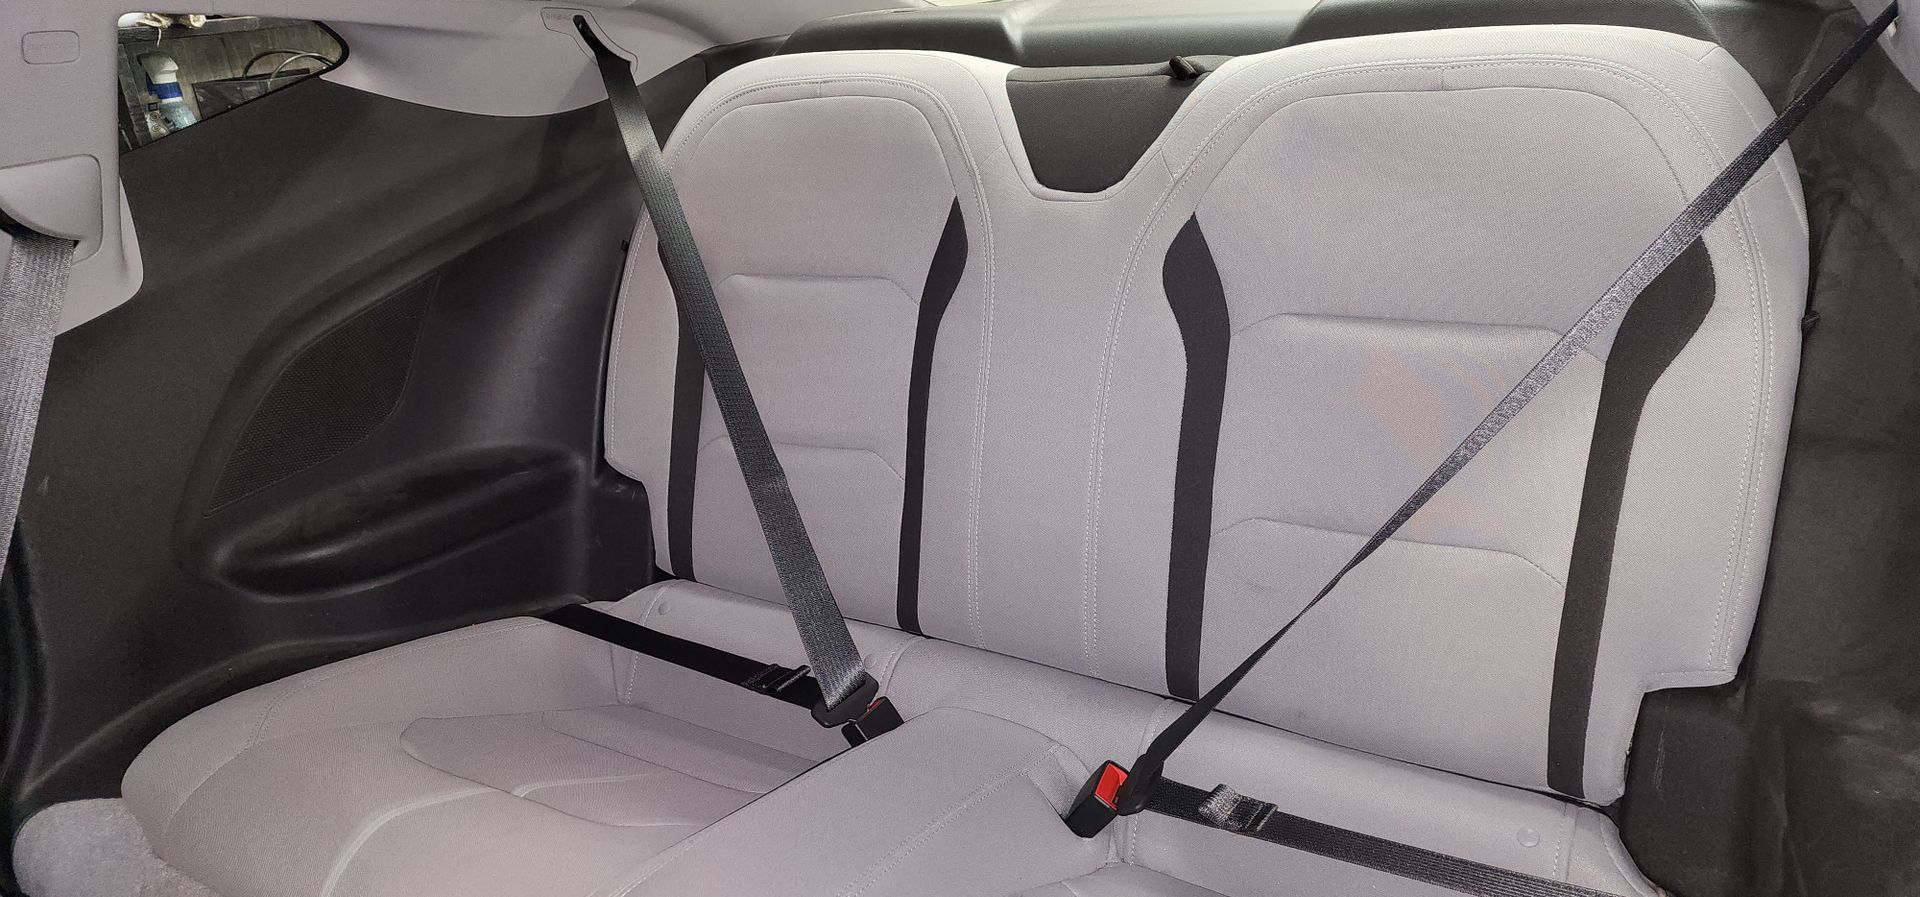
__________________
2023 1SS A10 Black H72/C2U/56W/NPP - Daily Driver
1100: 5/3/22 . . . . . . . 2000: 6/25/22 . . . . . .4000: 8/17/22 . . . . . . . 6000: 9/10/22 Daily Driver mileage update: 45k mi. @ Mar 2025 New Engine @ 22,600 mi. due to dealer confusing bad gas with a bad engine. Build Log: https://www.camaro6.com/forums/showt...6#post11353116 |
|
|
|
|
02-26-2026, 01:28 PM
|
#62 |
|
Electrical Engineer
Drives: 2023 1SS A10 Black Join Date: Apr 2022
Location: Illinois
Posts: 929
|
I made a change to the speakers up front to try a wideband driver in place of factory. Ive experimented with two different drivers, a Kicker KS and an Audio Dynamics ADMC23
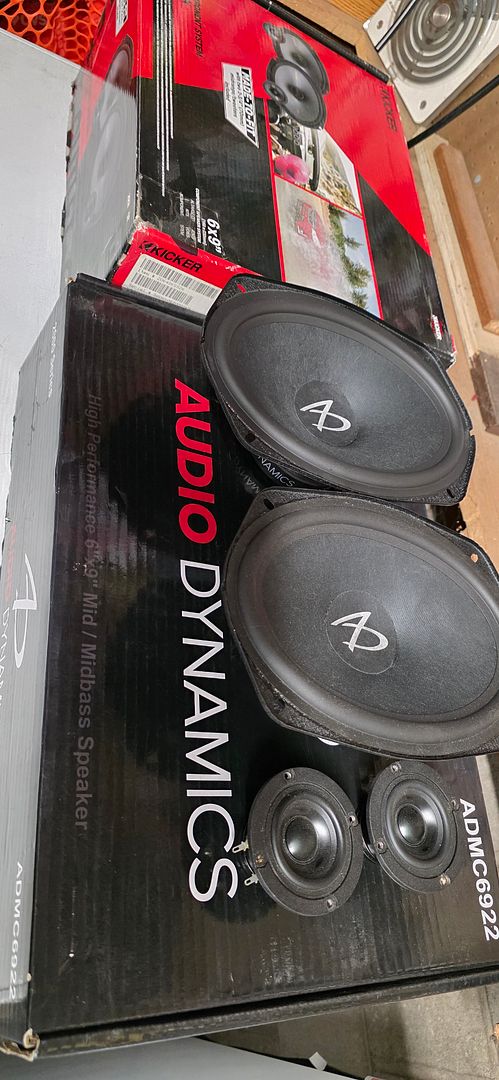 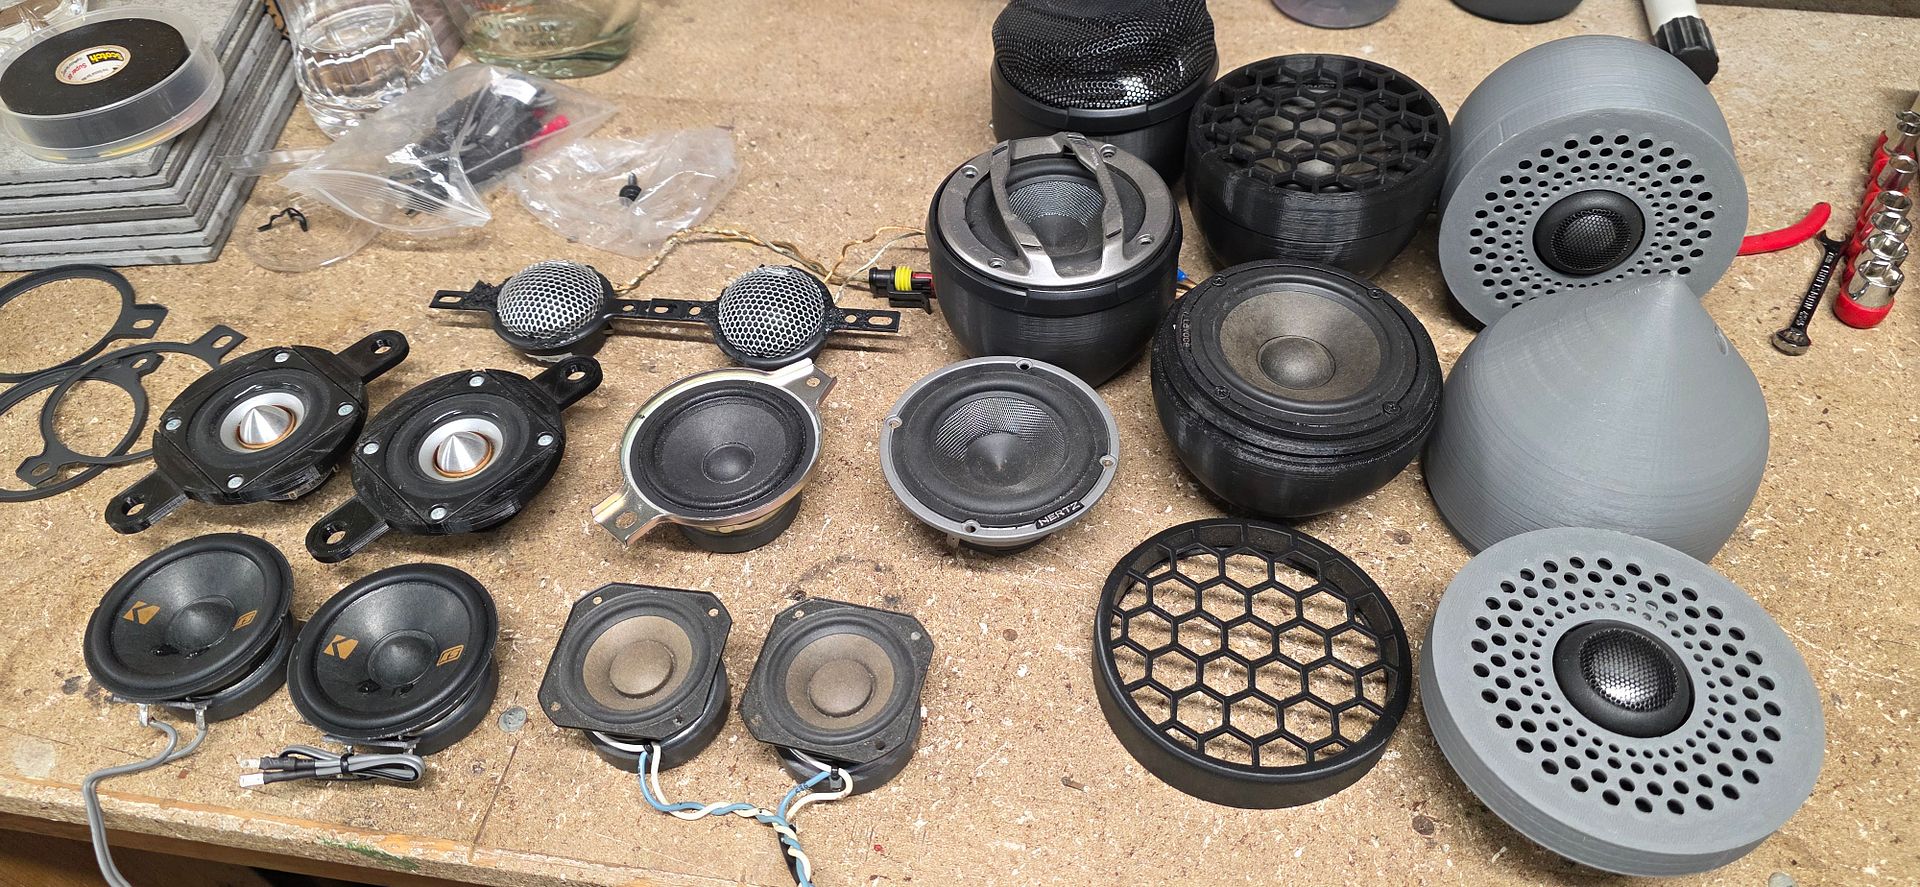 A 3 mid wont fit in the dash locations without cutting, so pods will be needed for larger mids. 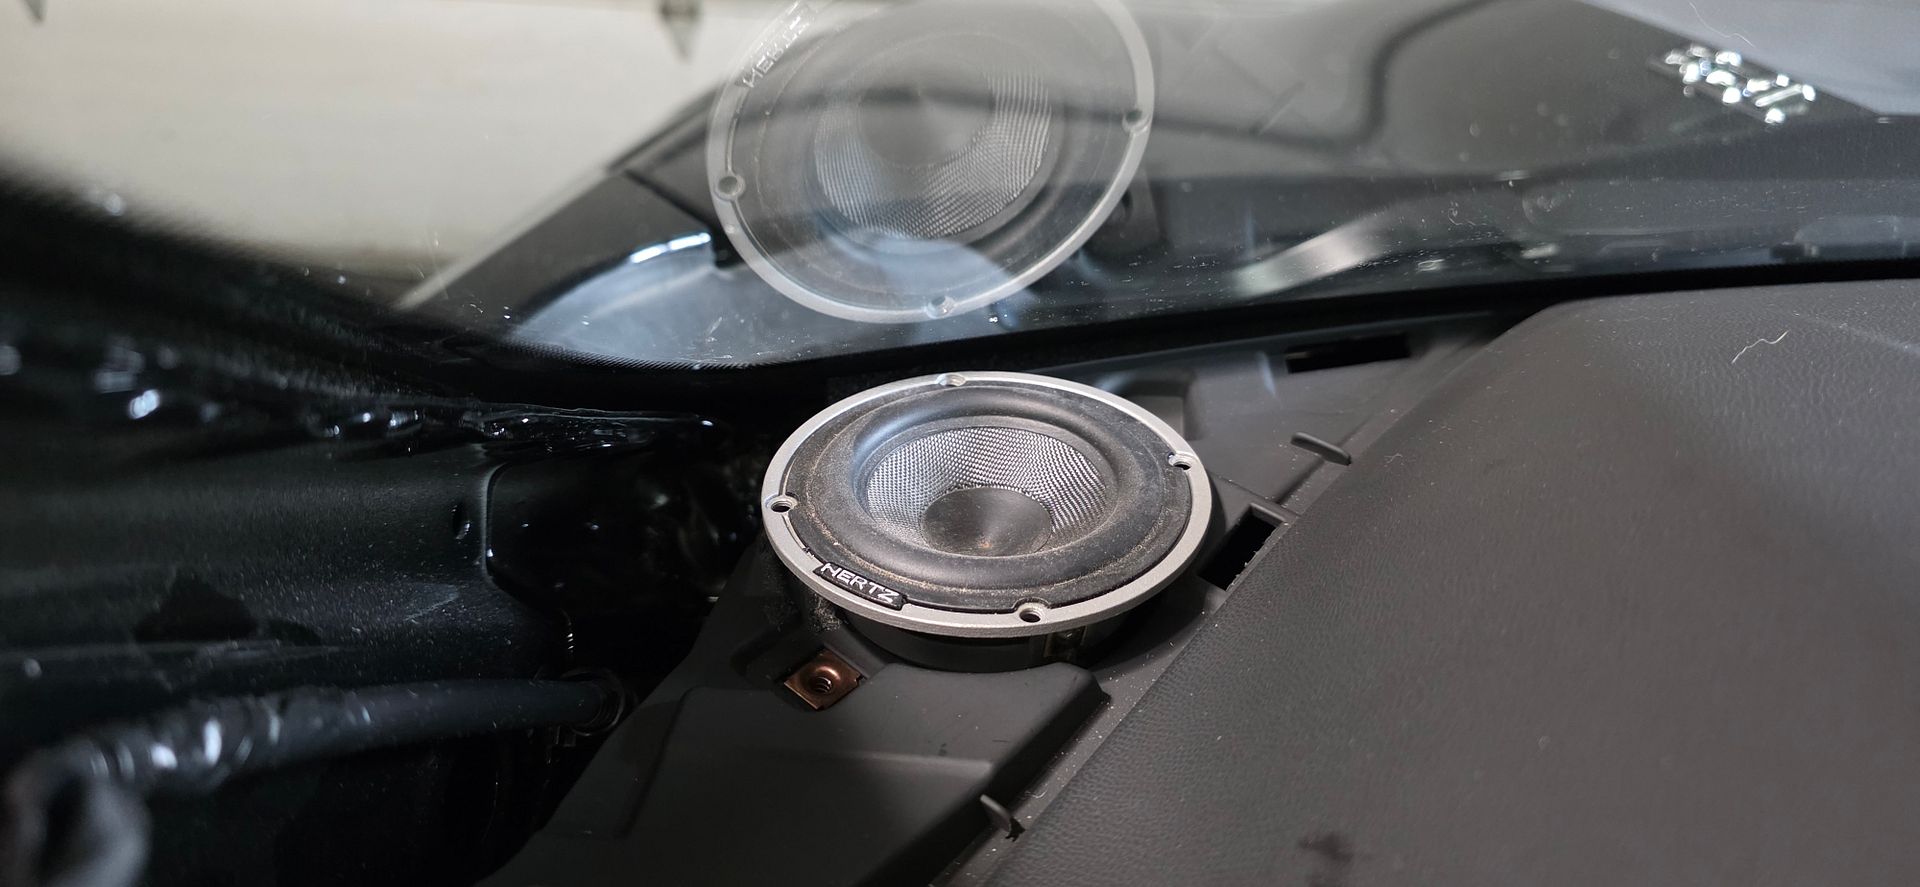 The adapters with the Kicker KS series fit perfectly. These sounded pretty good for the money. I didnt use the 6x9 midbass that came with the kit since I already had much nicer midbass drivers. 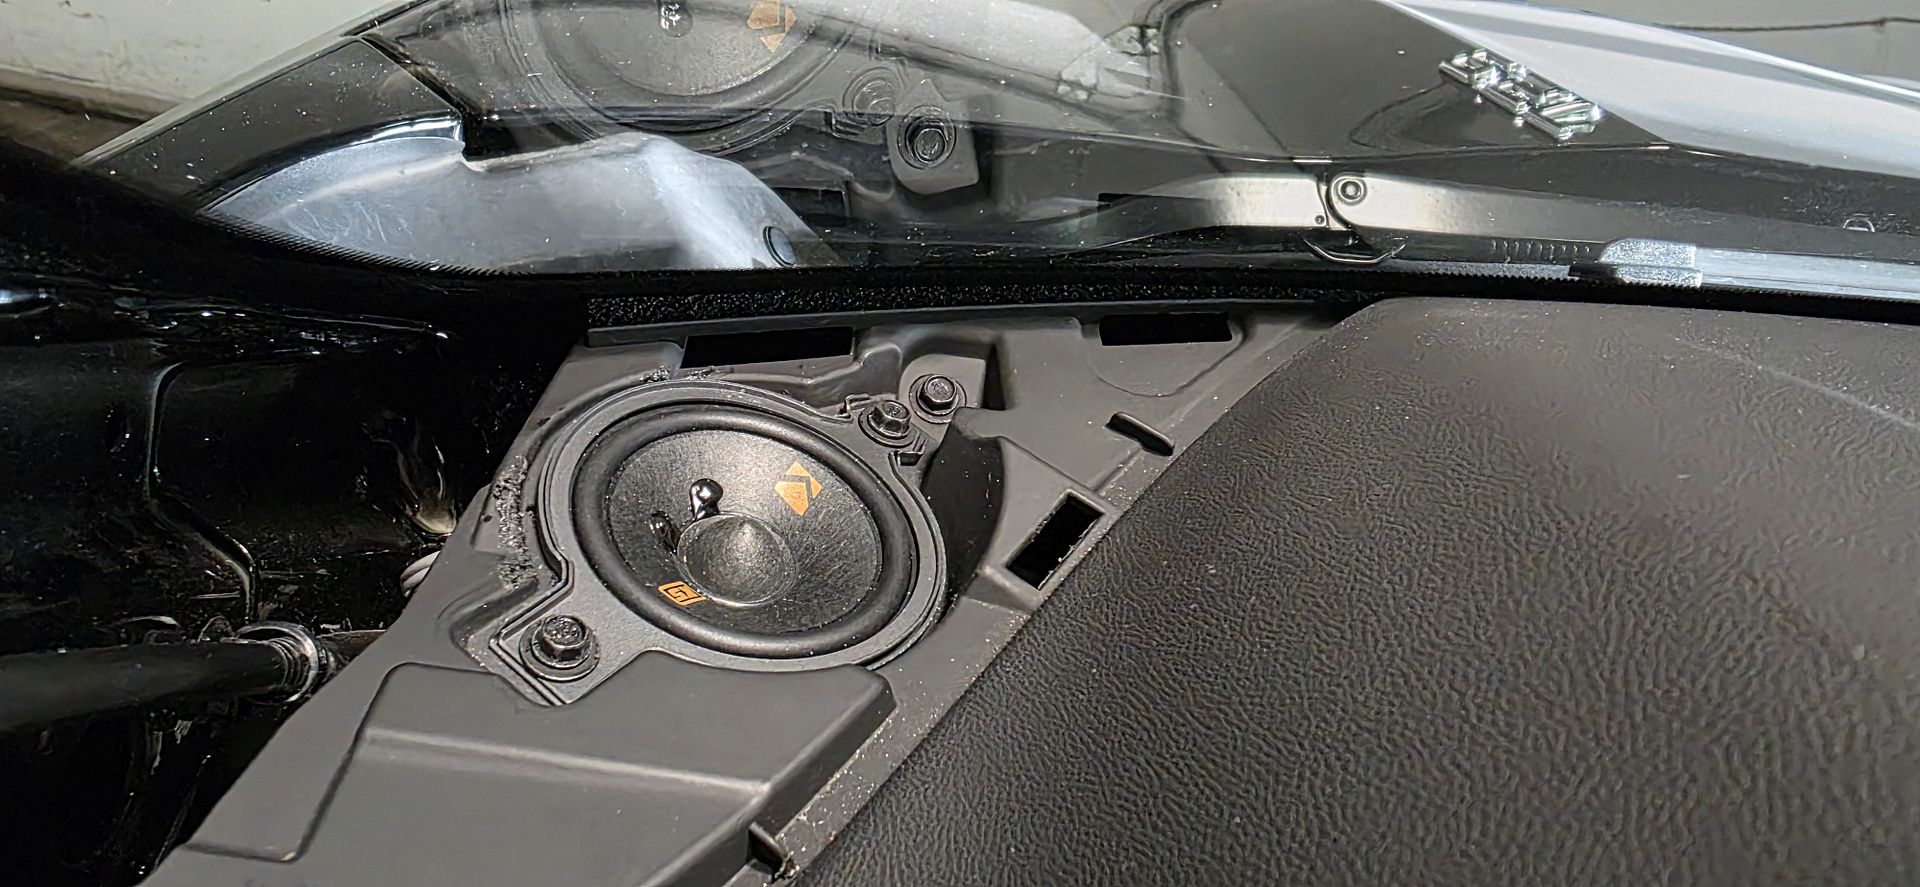 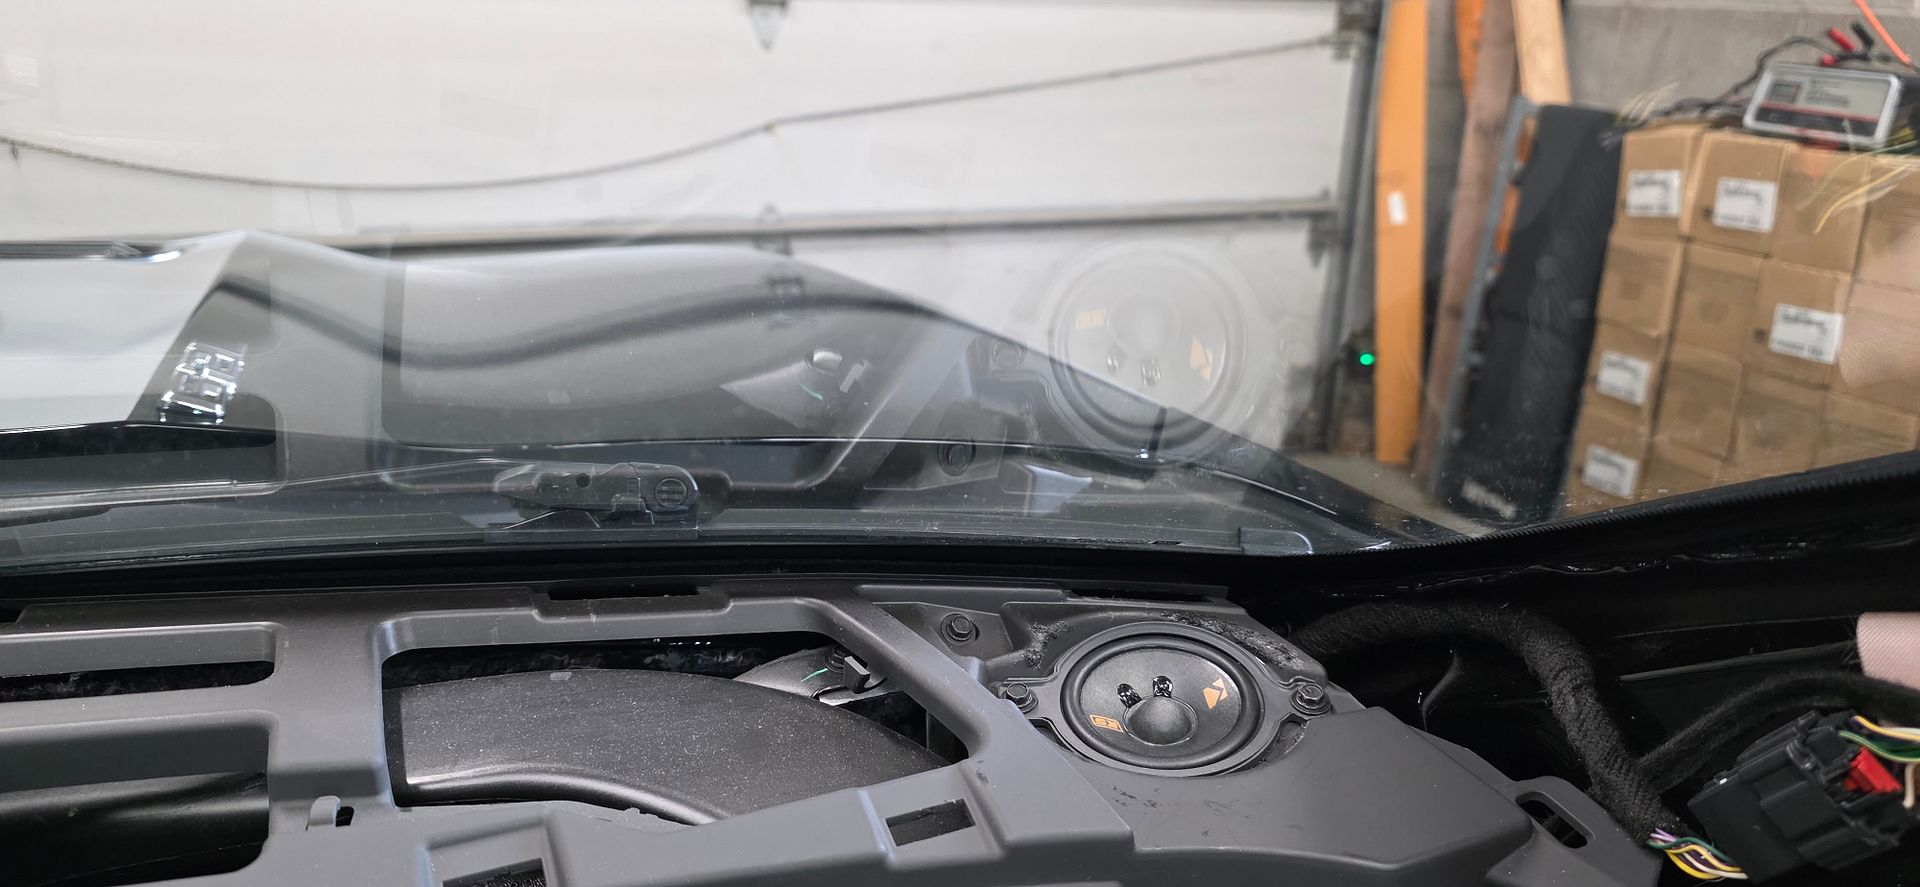 The deck cover is also treated with foam to eliminate any buzzes.  Then I decided to try swapping to Audio Dynamics for both dash and doors. I wanted to experience this combo. 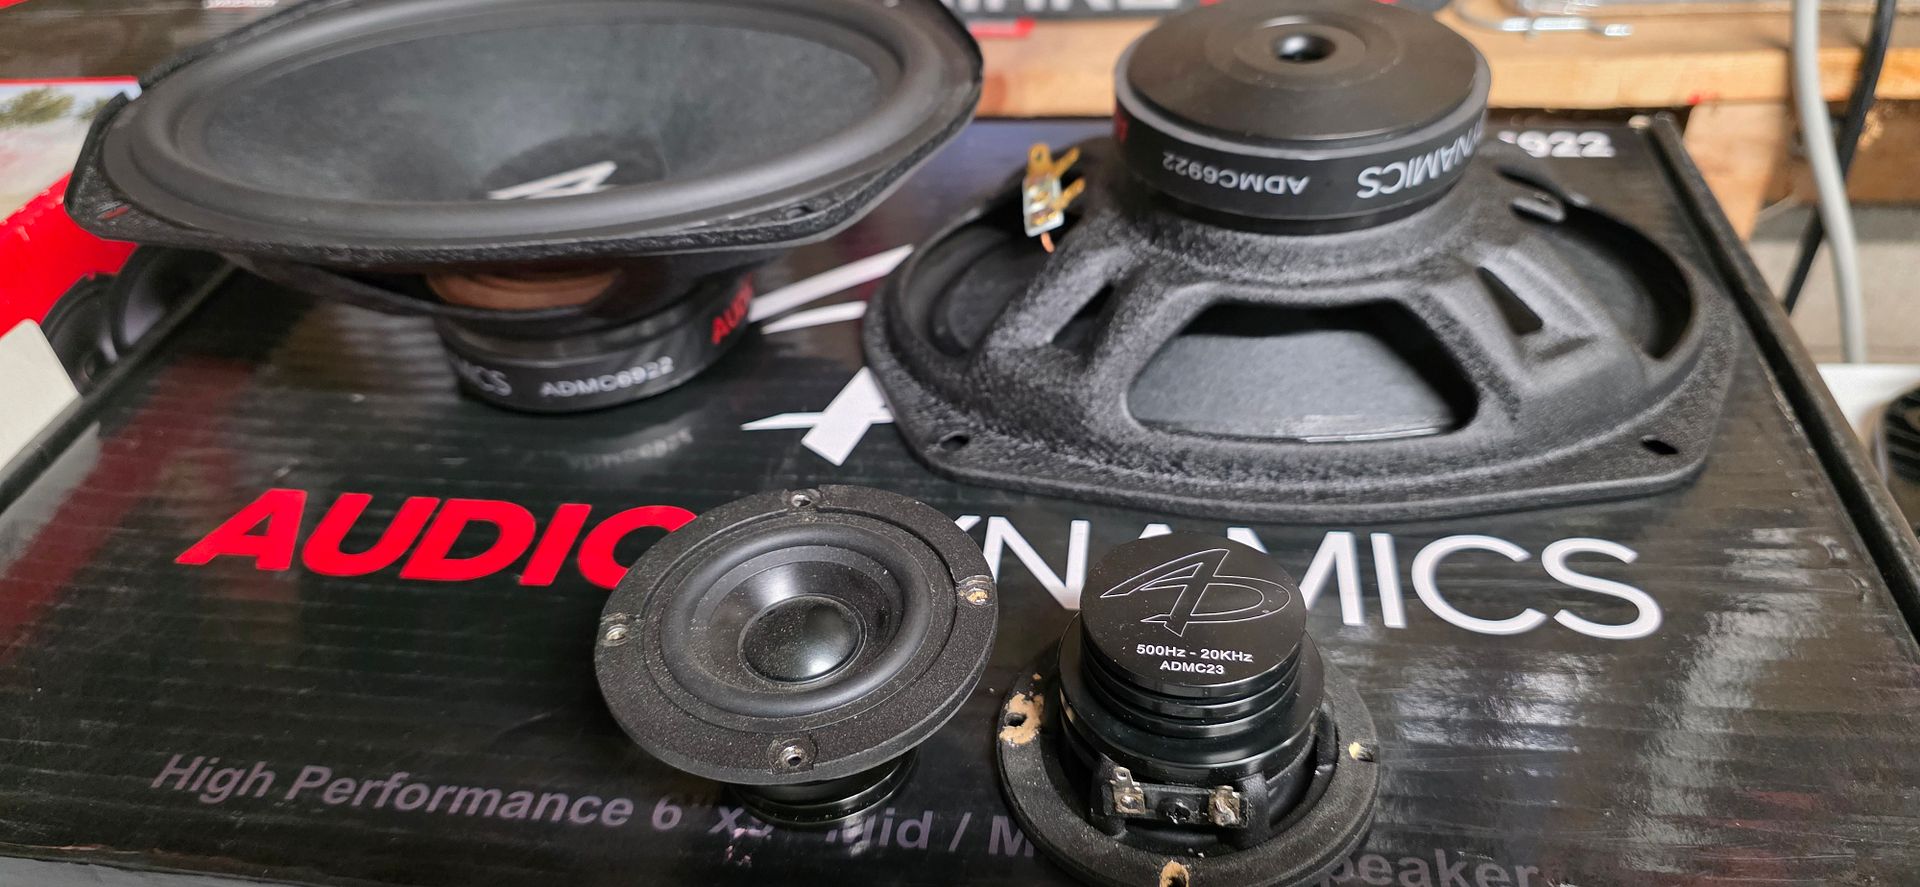 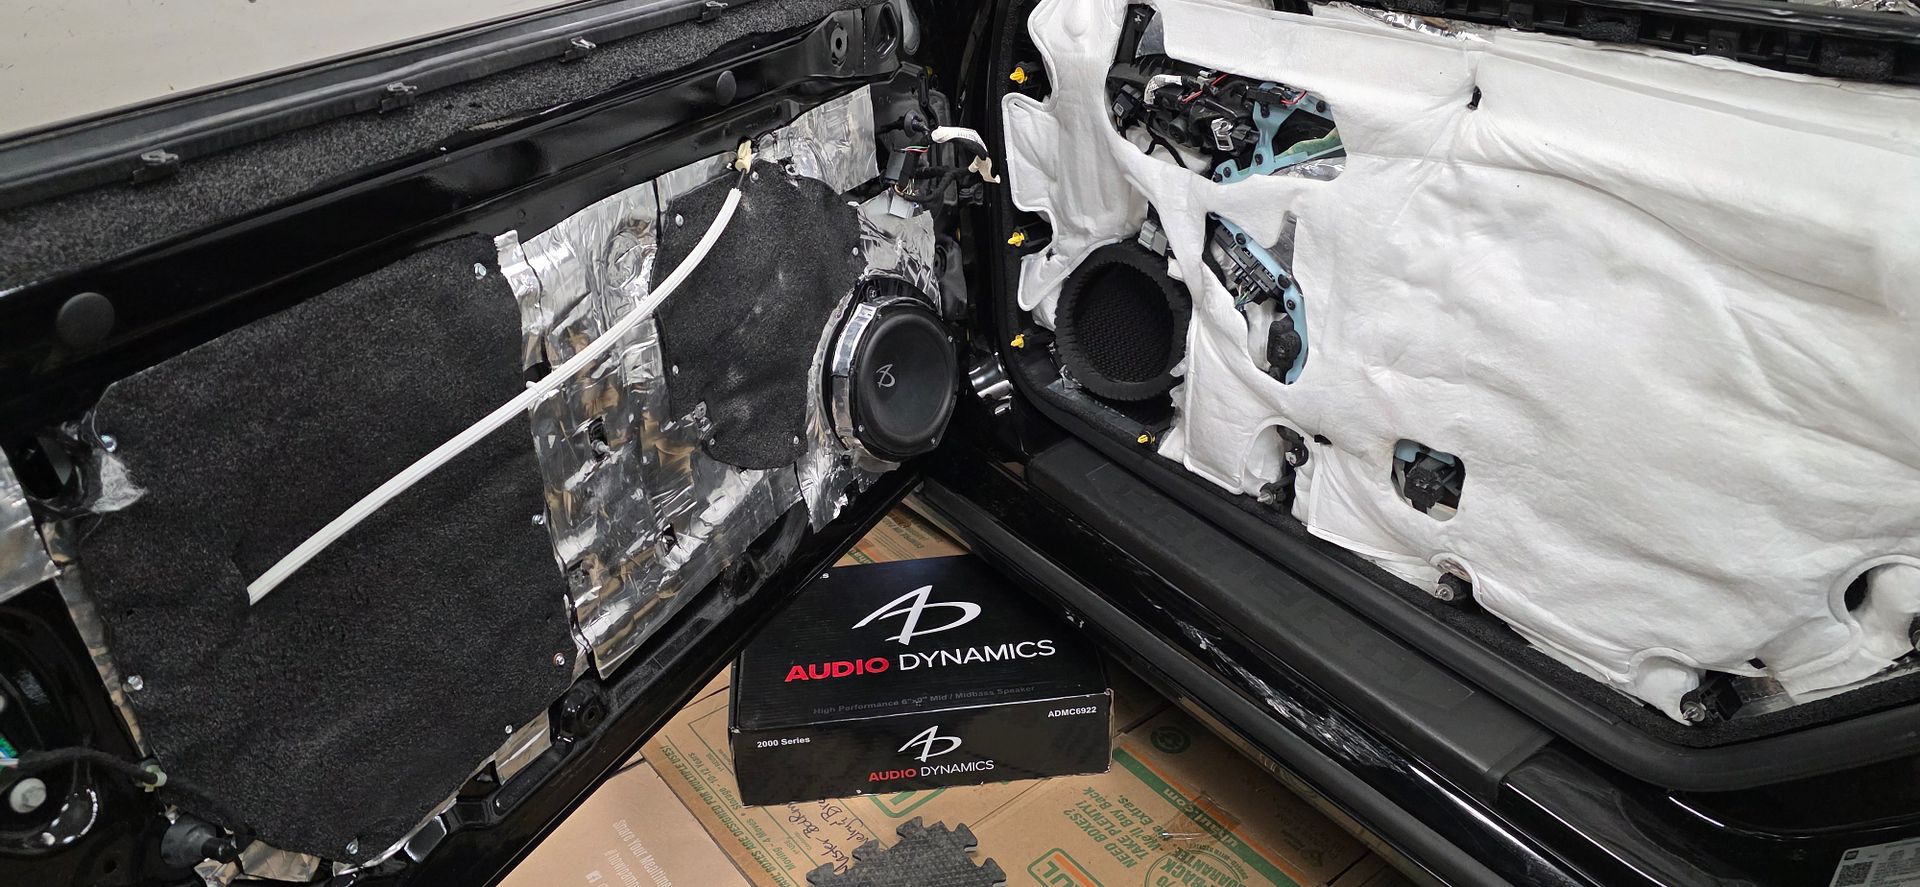 I moved the foam seal to the door panel since more speaker swaps will occur. 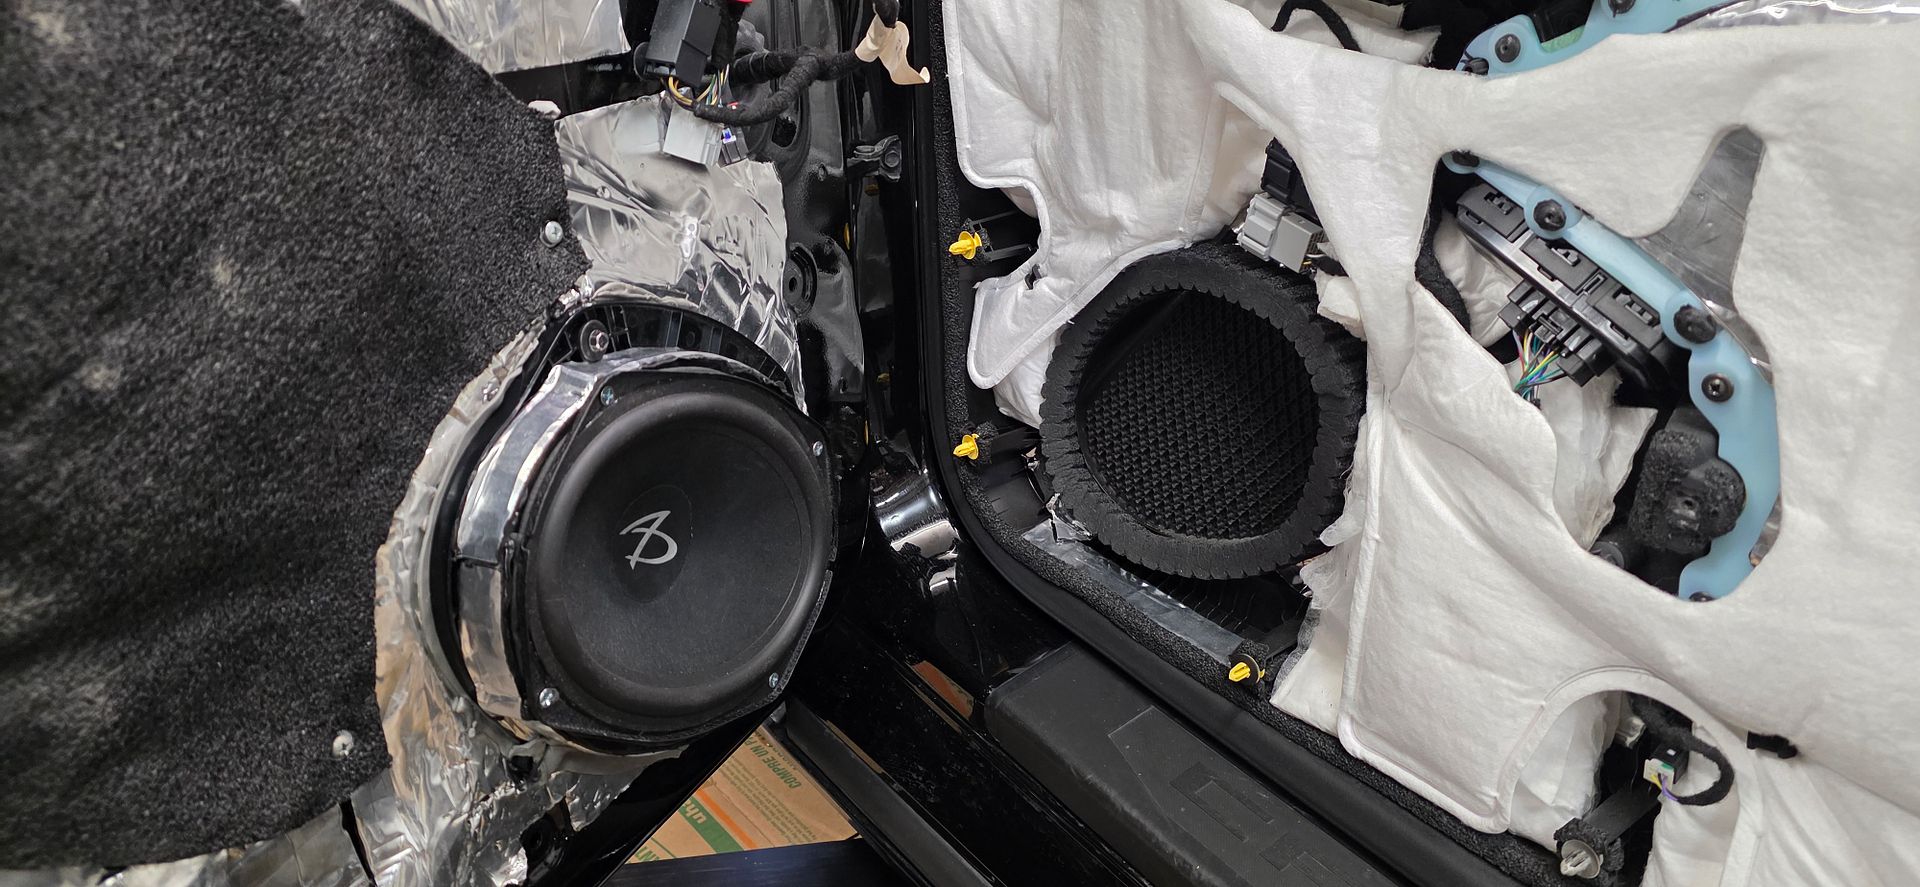
__________________
2023 1SS A10 Black H72/C2U/56W/NPP - Daily Driver
1100: 5/3/22 . . . . . . . 2000: 6/25/22 . . . . . .4000: 8/17/22 . . . . . . . 6000: 9/10/22 Daily Driver mileage update: 45k mi. @ Mar 2025 New Engine @ 22,600 mi. due to dealer confusing bad gas with a bad engine. Build Log: https://www.camaro6.com/forums/showt...6#post11353116 |
|
|
|
|
02-26-2026, 01:35 PM
|
#63 |
|
Electrical Engineer
Drives: 2023 1SS A10 Black Join Date: Apr 2022
Location: Illinois
Posts: 929
|
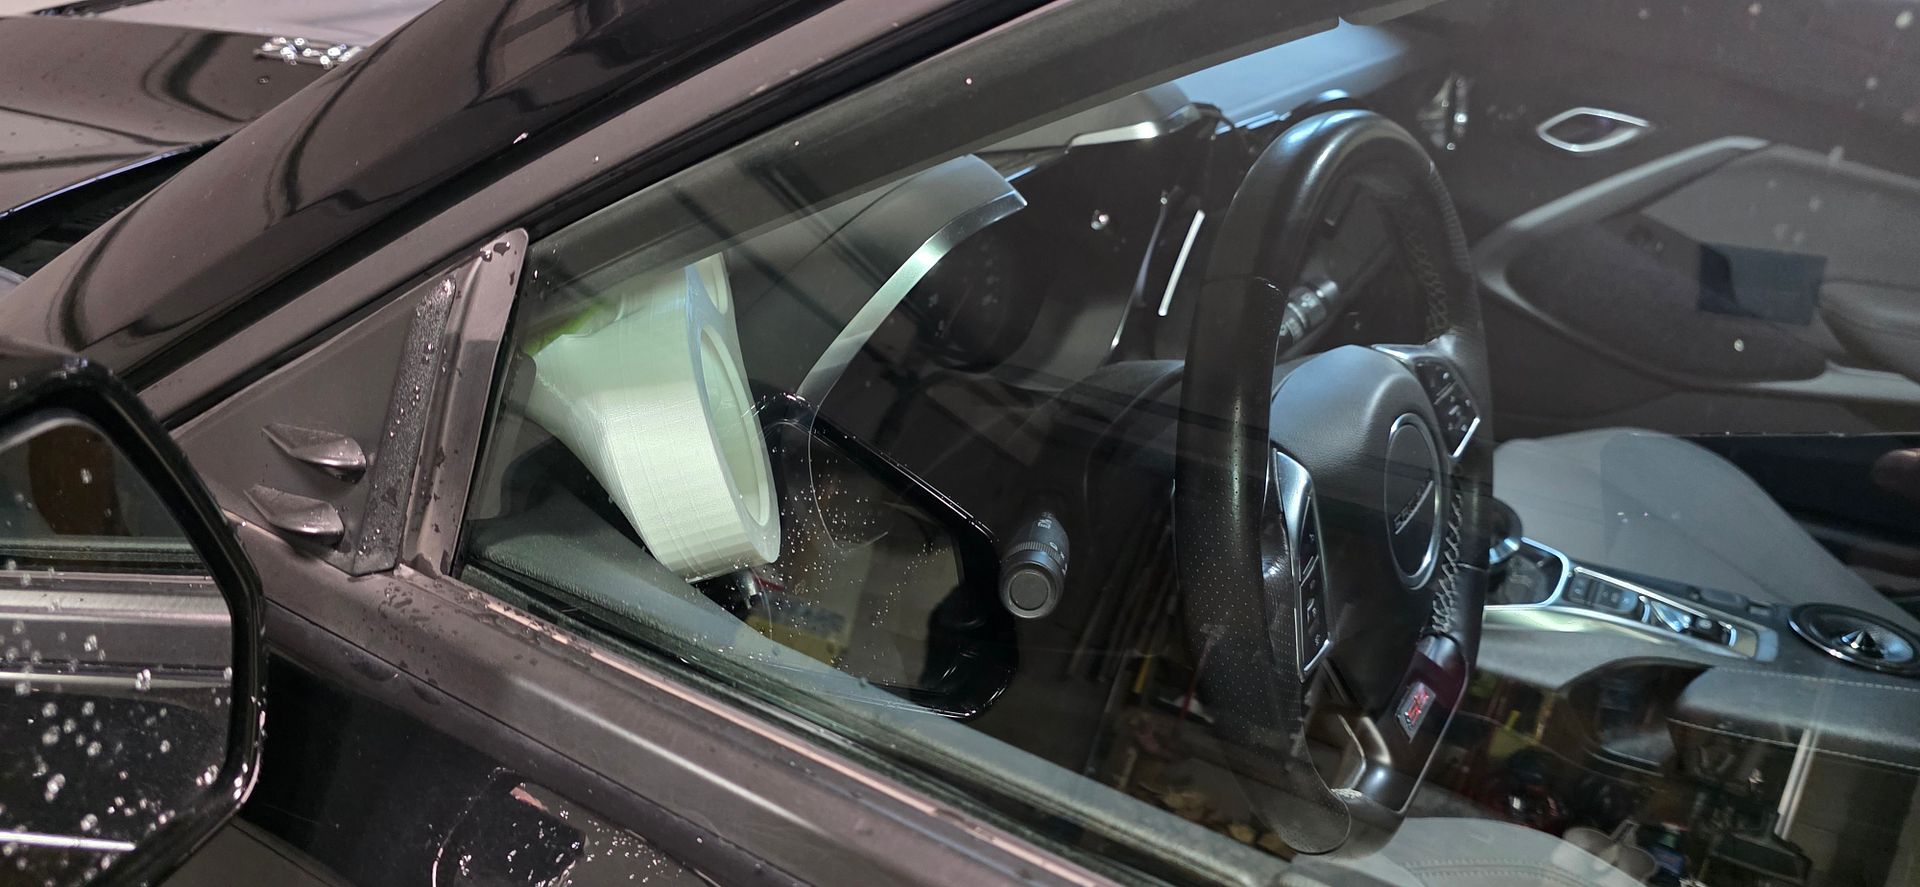
I designed and 3D printed mounting adapters for the dash wideband drivers, and installed my quick adapters.
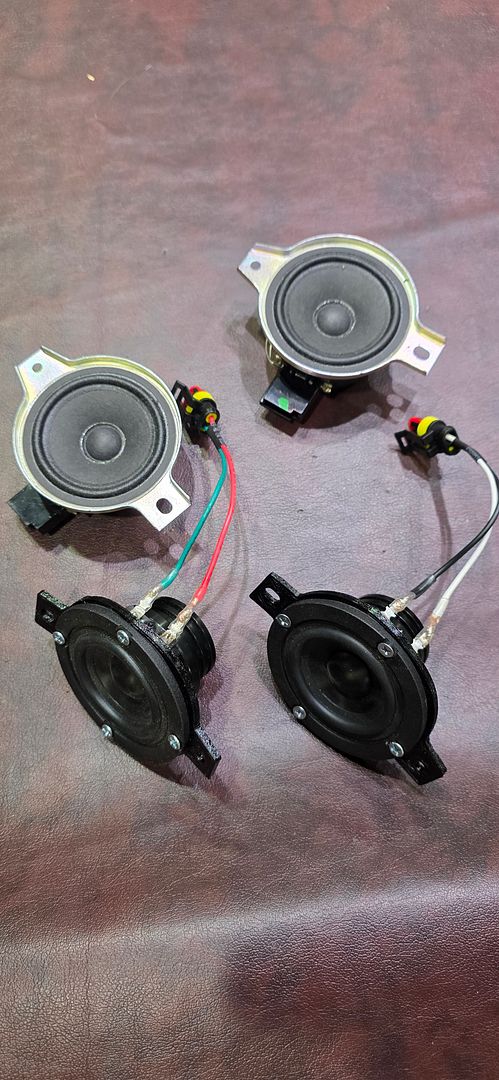  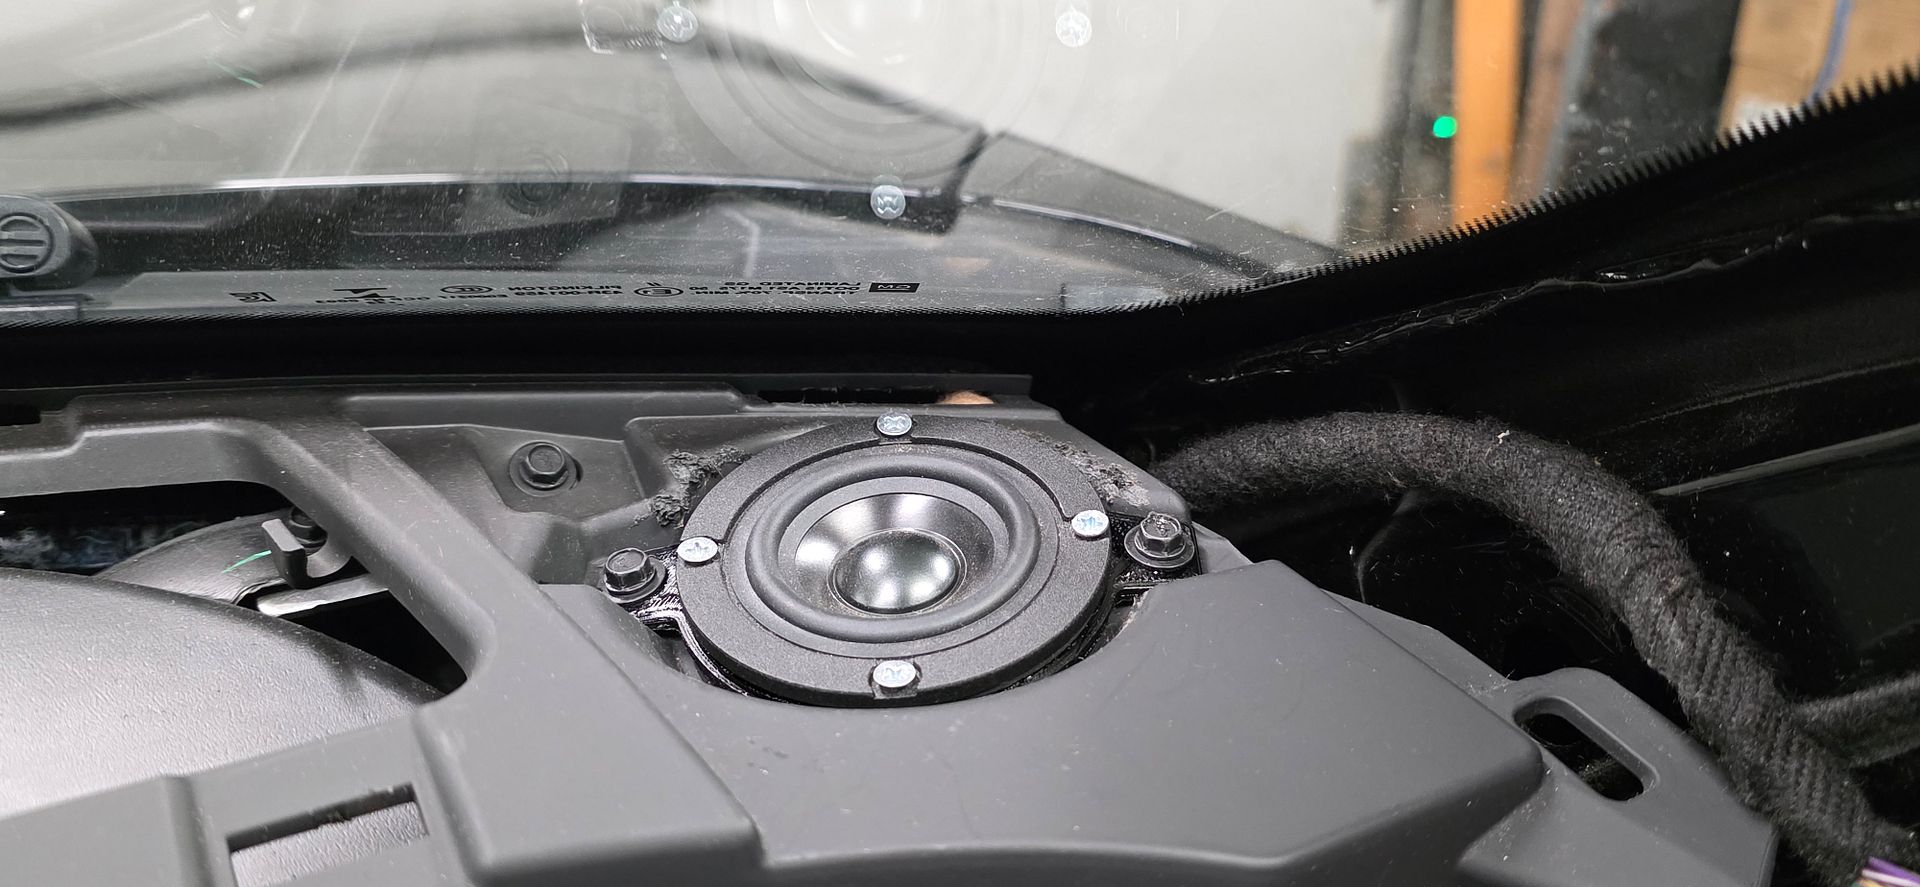 The result is ok, but not up to my standards. While a wideband driver is a clever solution that can perform well, I would like this build to be a bit more special. So I have a new set of speakers to install next! These are beautiful. 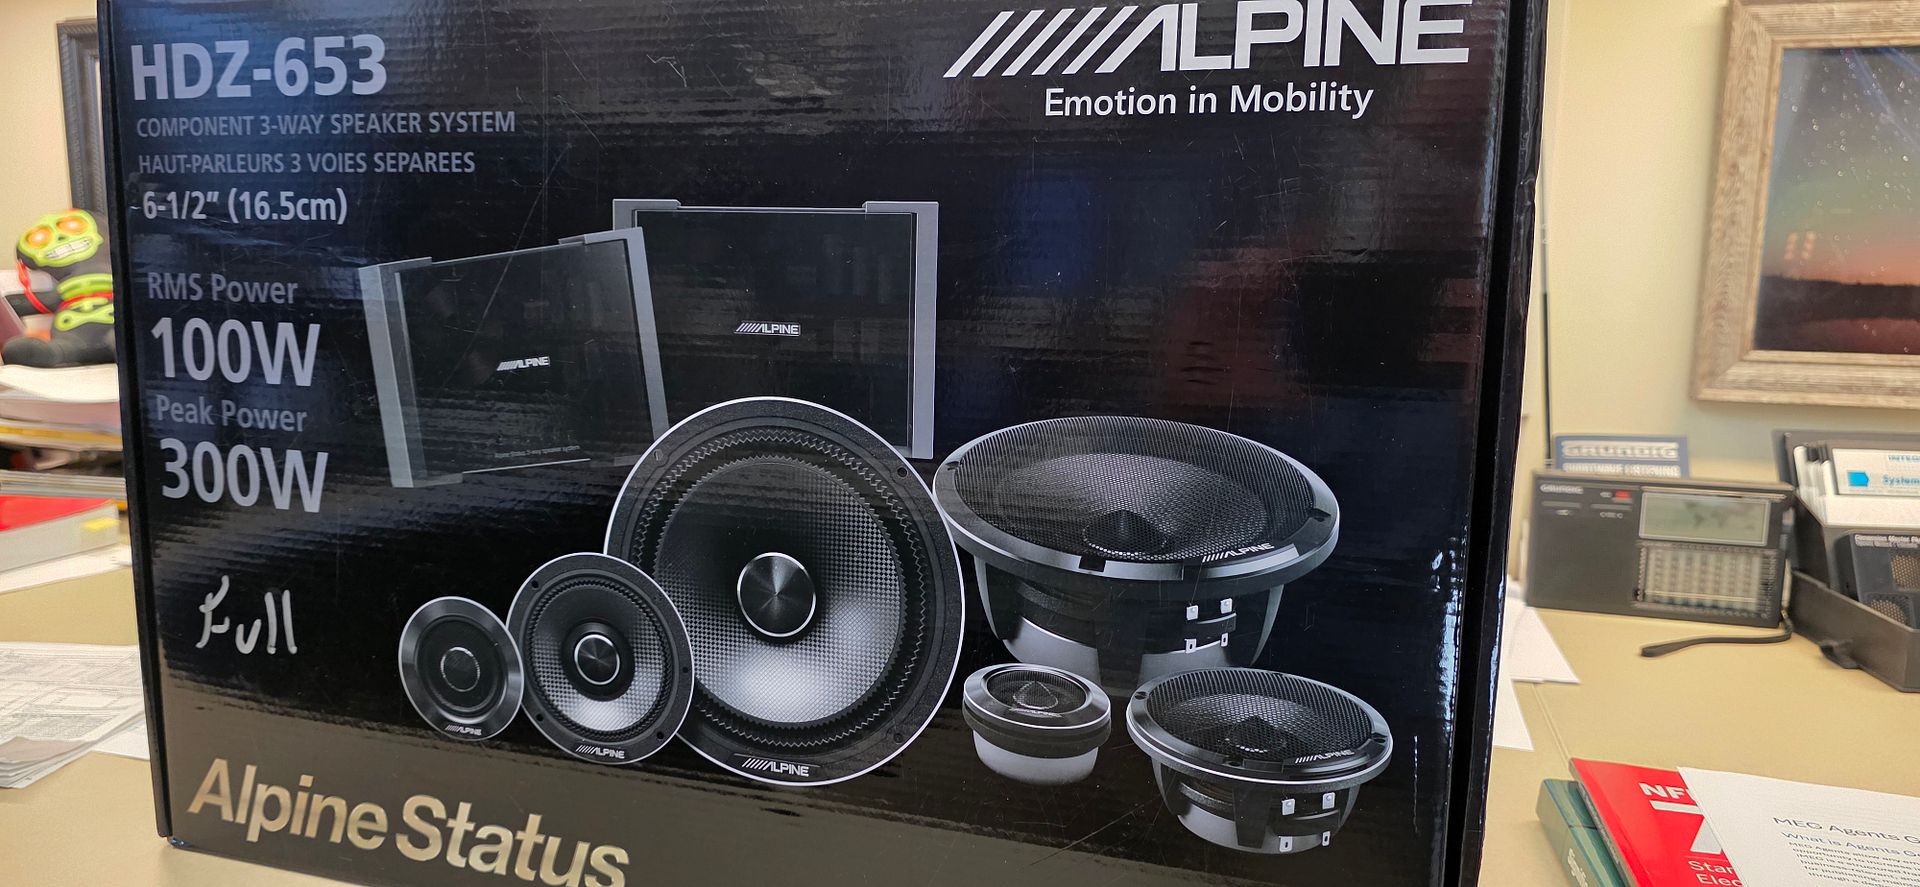 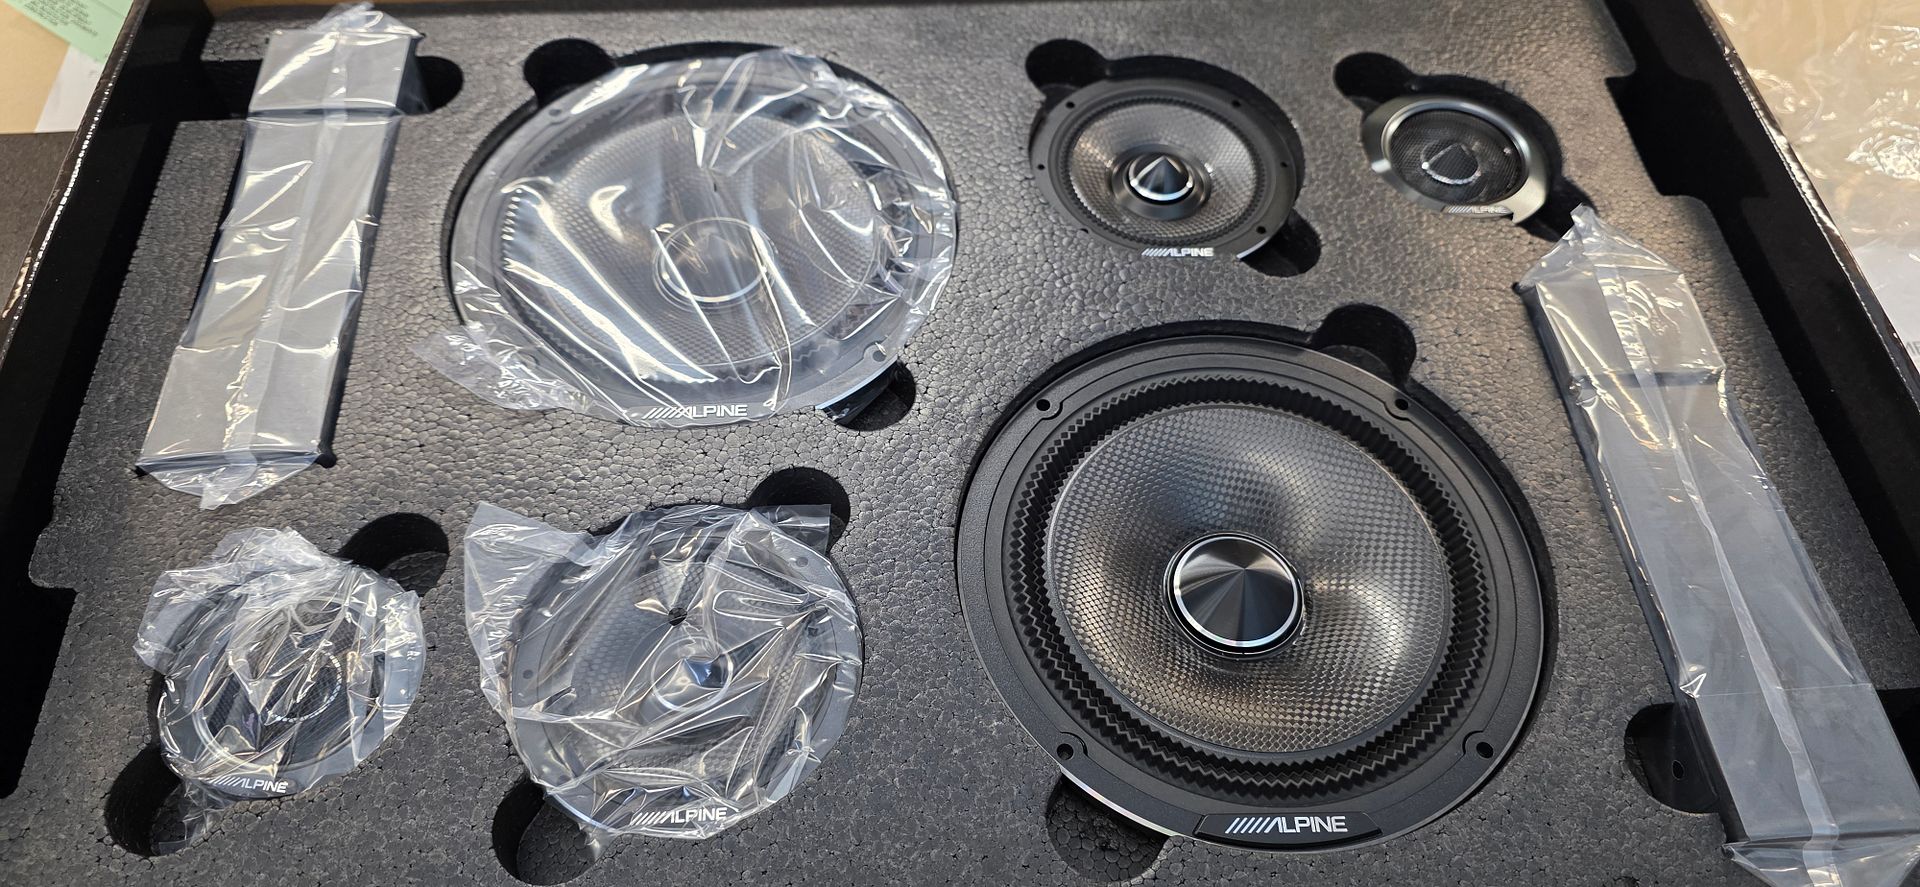 I will start designing pods for the mid and tweeter off the a pillar. This is tricky due to the dash and limited space on the drivers side. Normally, wed keep the mid/high as low as possible, closer to the dash. This wont allow that, so as they raise up, they also get closer. This will be a departure from the factory tuning and Ill need the cleanest signal to start with. I am moving from MVi amplifiers as well, likely, and am saving a JL VX600/6i that needed a new input connector. I decided to build my own connector. 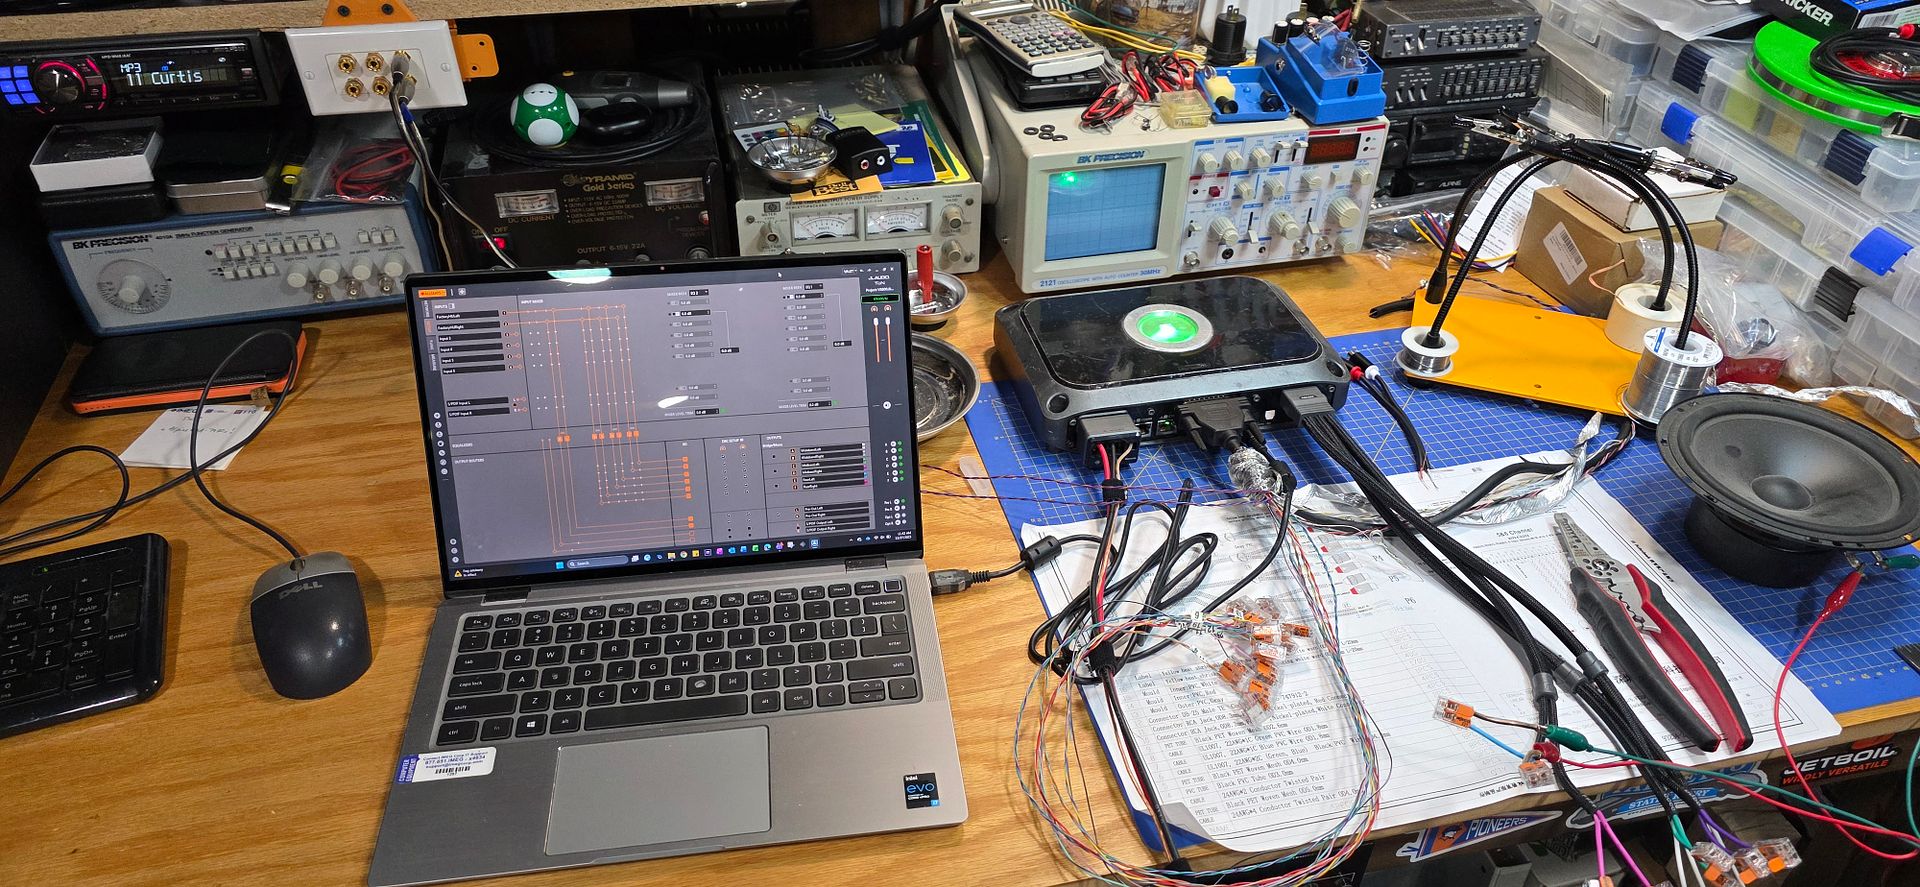 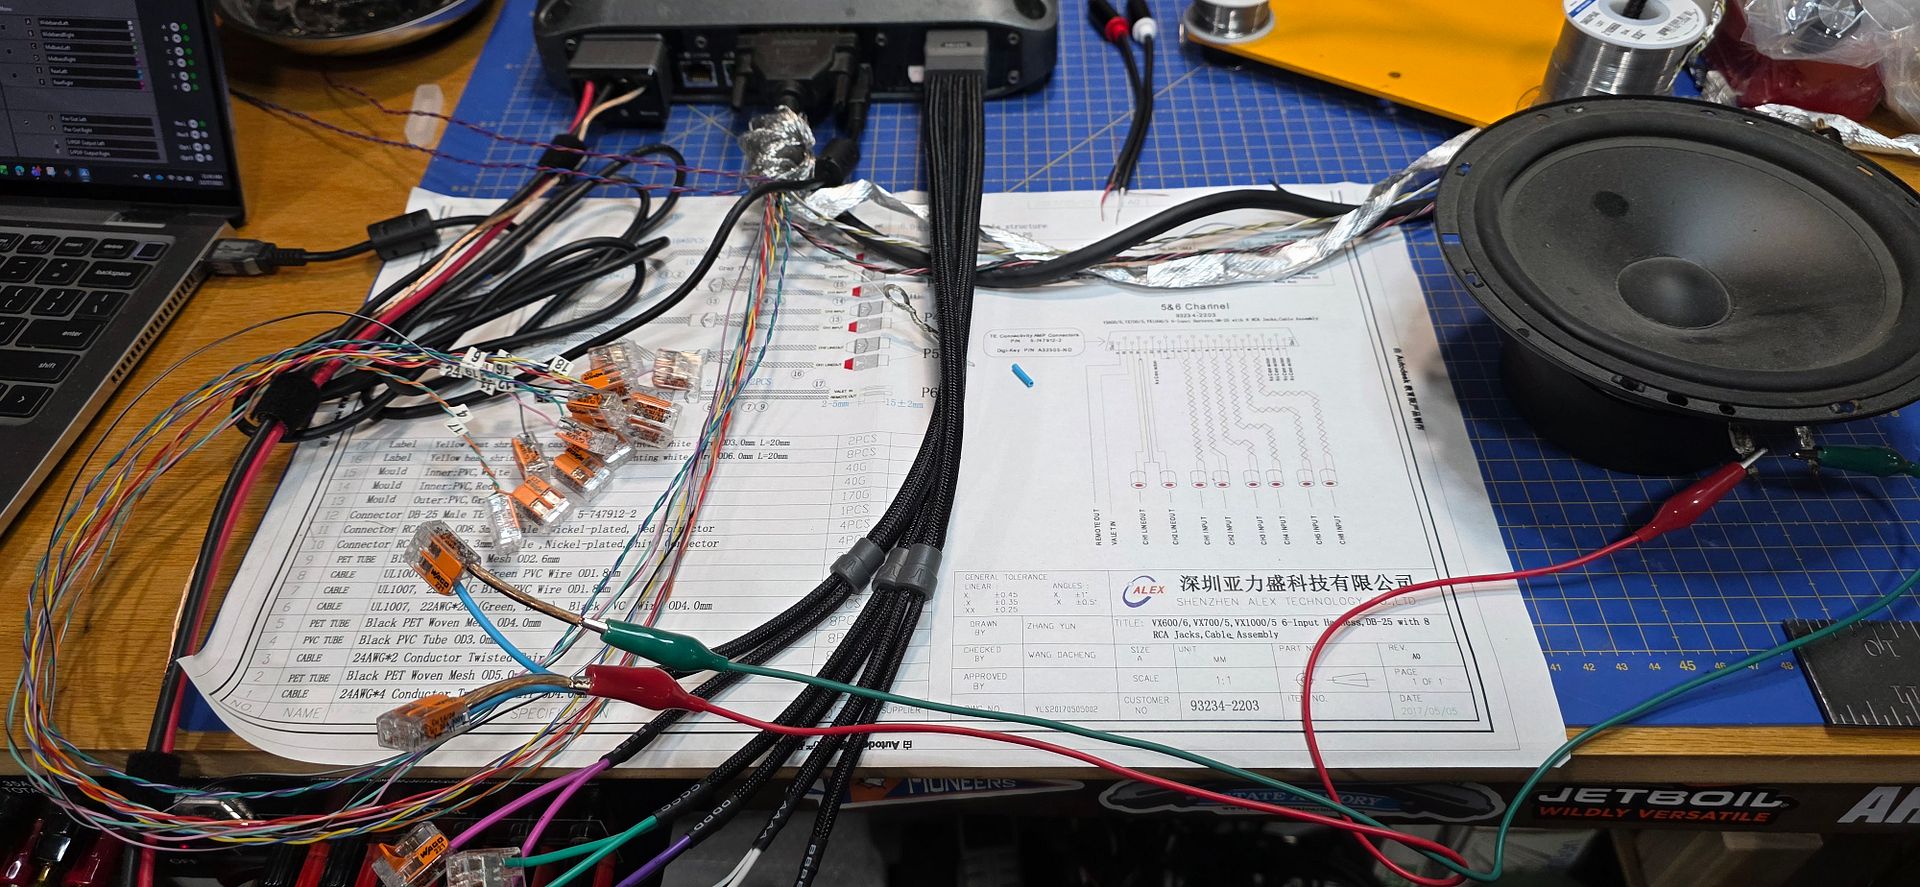 Another option is my pair of xtant 3300C amplifiers. These are 15lbs each and 22x10x6 at 60Wx2 and 180Wx1 old school power ratings. They are currently being restored then modded for daily use at 25+ years old. 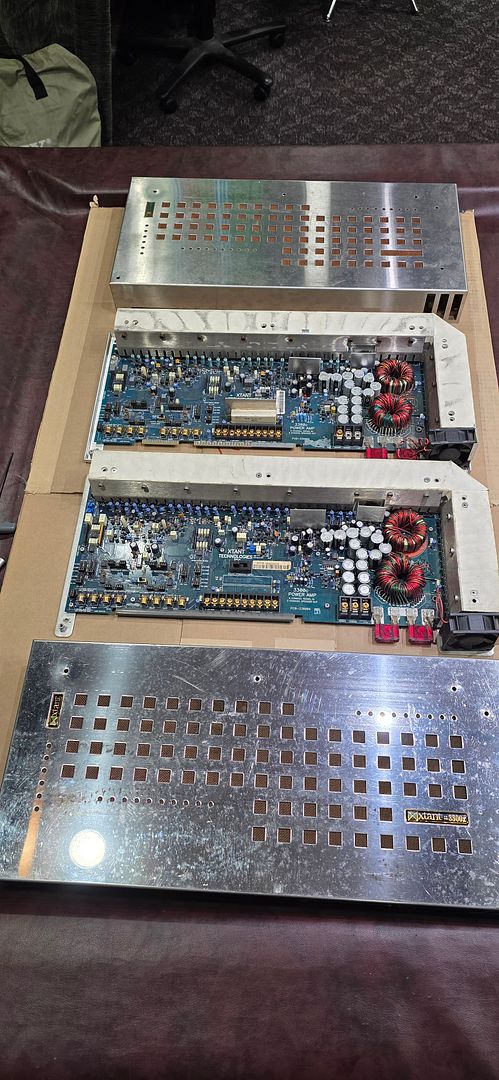 And to control those, I picked up an Alpine PXA-H800 processor that needs a bit of TLC. 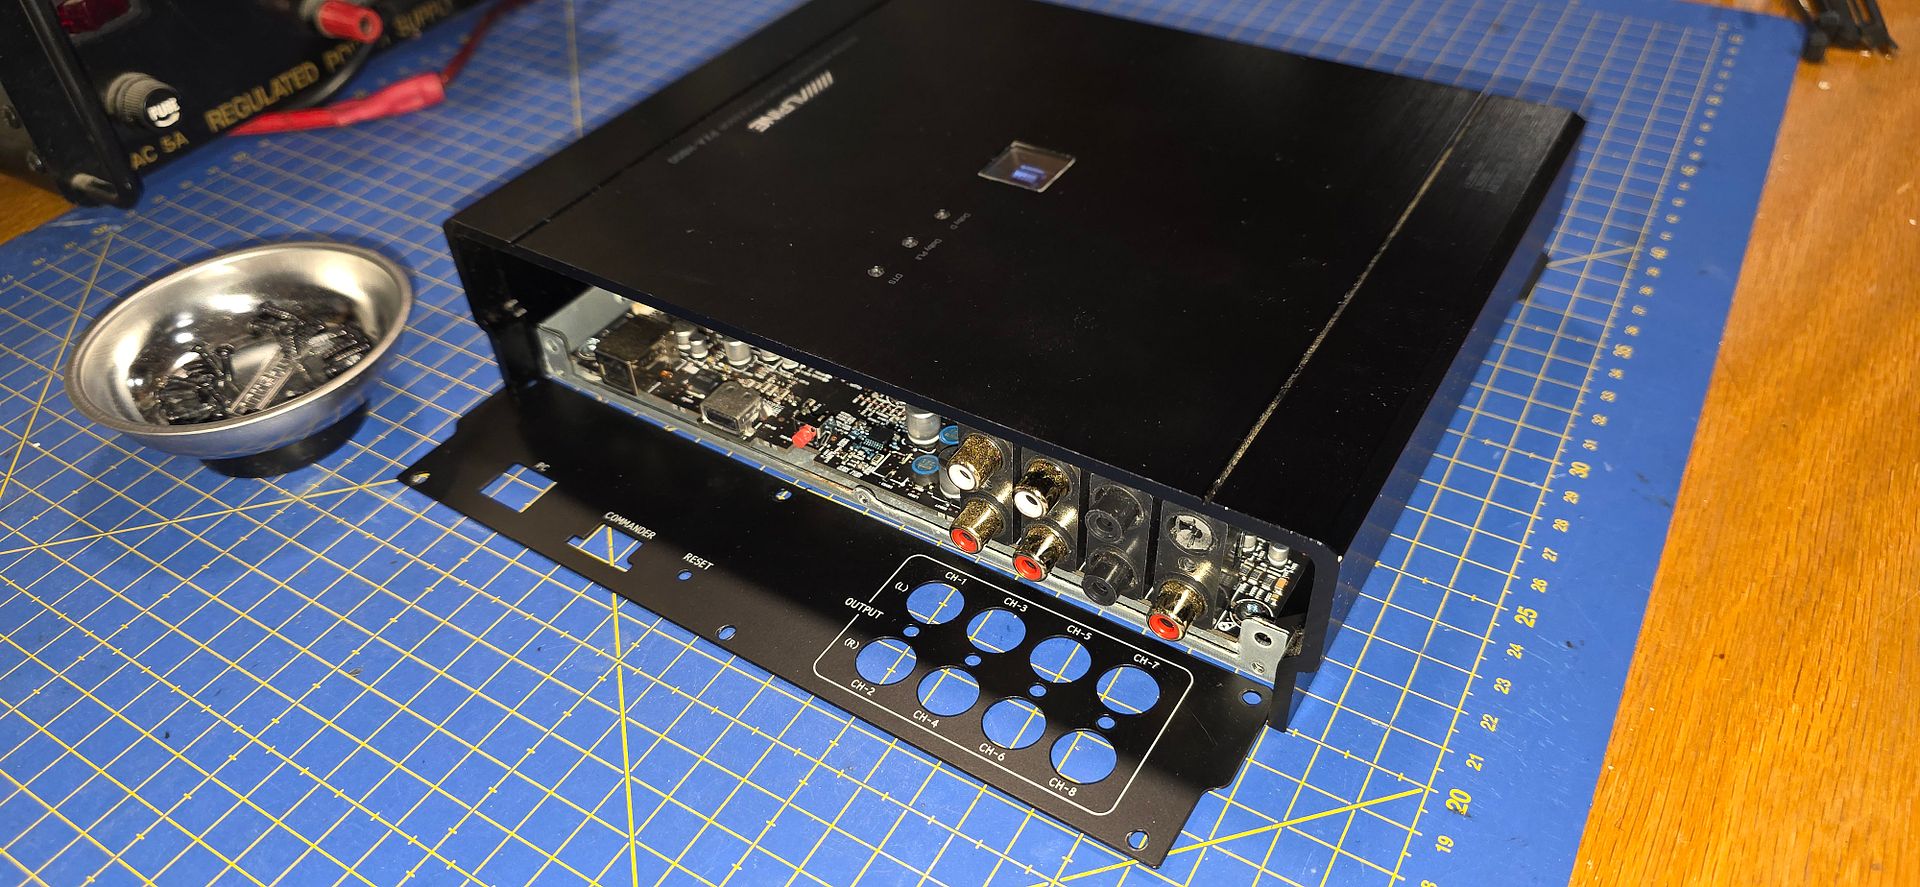 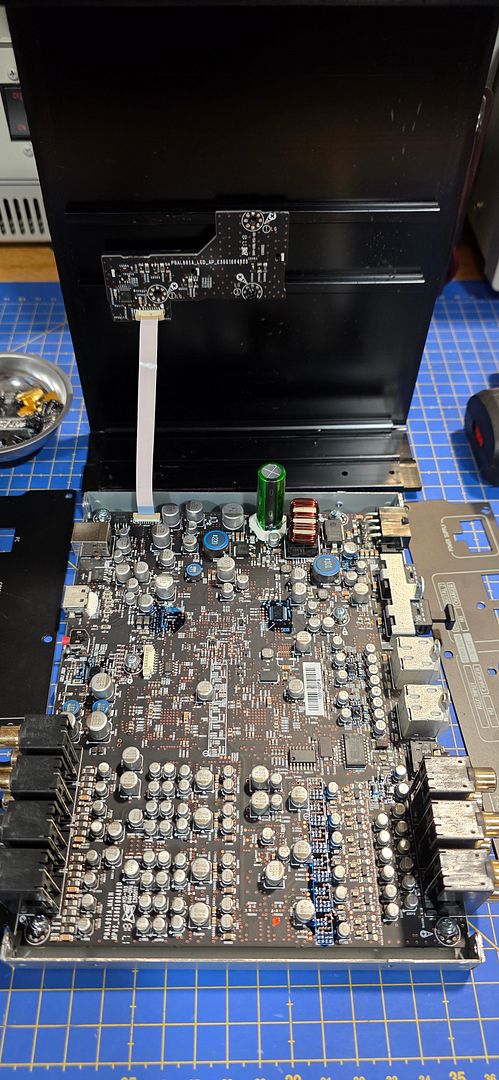 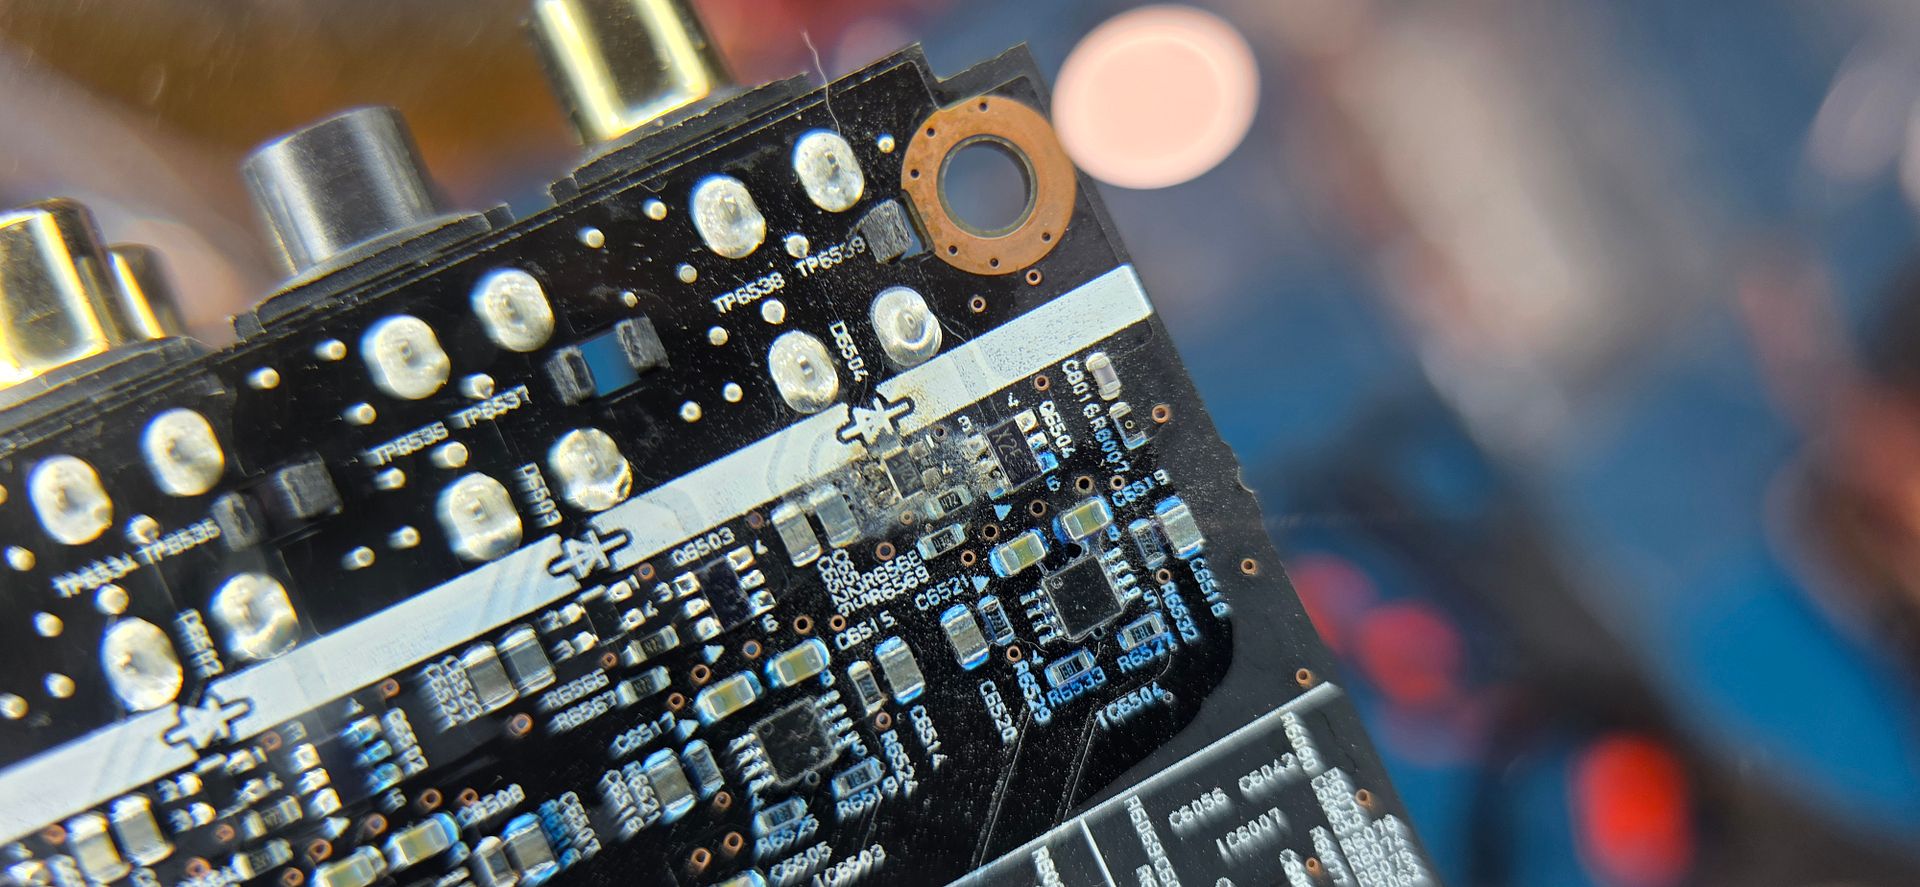
__________________
2023 1SS A10 Black H72/C2U/56W/NPP - Daily Driver
1100: 5/3/22 . . . . . . . 2000: 6/25/22 . . . . . .4000: 8/17/22 . . . . . . . 6000: 9/10/22 Daily Driver mileage update: 45k mi. @ Mar 2025 New Engine @ 22,600 mi. due to dealer confusing bad gas with a bad engine. Build Log: https://www.camaro6.com/forums/showt...6#post11353116 |
|
|
|
|
03-04-2026, 10:13 AM
|
#64 |
|
Electrical Engineer
Drives: 2023 1SS A10 Black Join Date: Apr 2022
Location: Illinois
Posts: 929
|
We want to run a 3-way active front stage whenever possible, this is challenging in most cars and the Camaro is no exception. I decided to use the PolyCam phone app on my Galaxy S25 Ultra to map the pillar areas. This is what the result of the scan looks like initially.
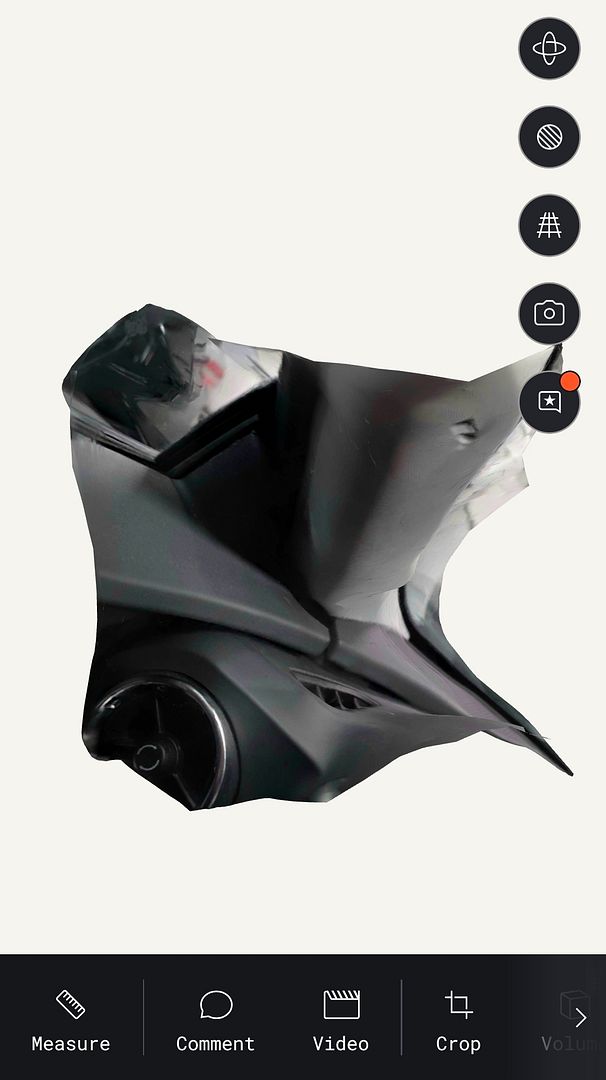 We export the scan as an OBJ (requires paid subscription) then import into our 3D modeling software. While I love Fusion 360, Im using OnShape since its free and I teach a 3D printing class and will be focusing on advanced techniques like this. In OnShape we import the scan then we model our pod faceplate and place where desired. 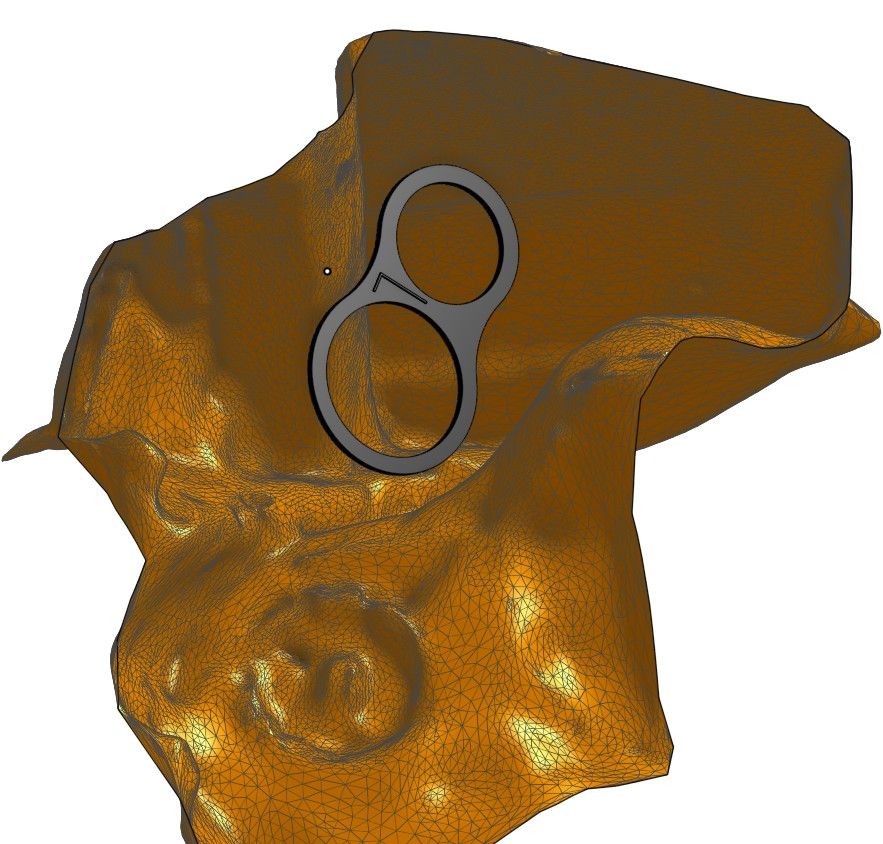 Then we use the scan to trace the pillar shape, then use the LOFT command to connect the pillar surface to the pod faceplate.  This process allows me to do virtual mockups and print a complete pod that secures to the face of the pillar which allows for testing and experimentation before landing on a final arrangement. Its likely the final configuration will still be a surface pod like this and not a traditional fiberglass pod into the pillar. 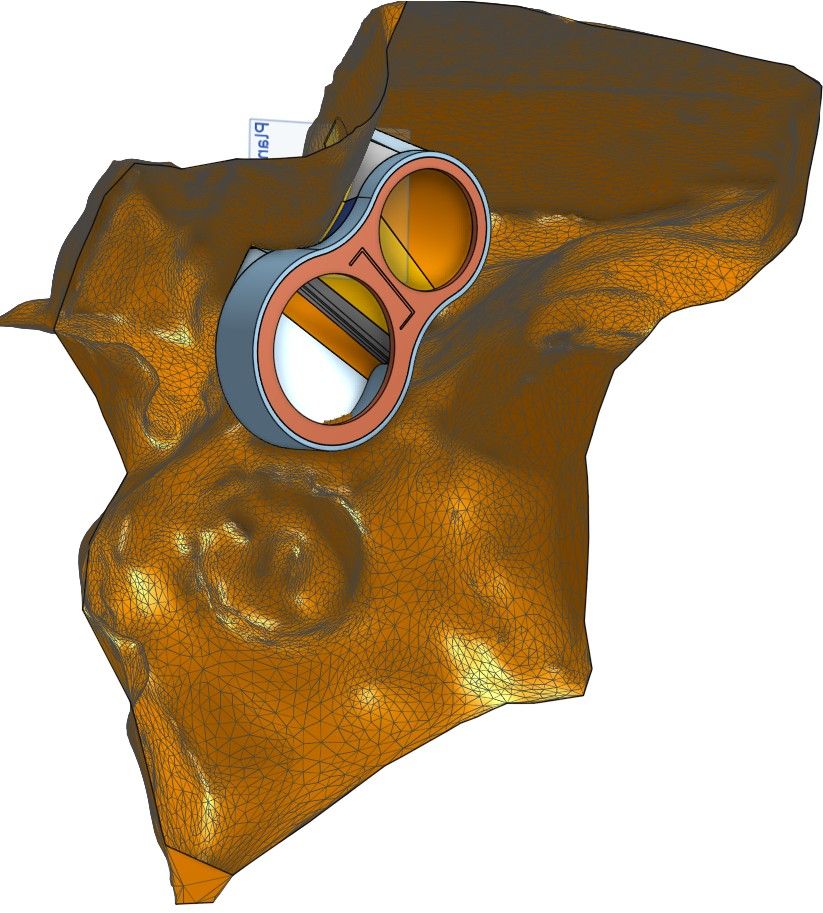 Prototype V1 is printing now and Ill see how it looks later tonight.
__________________
2023 1SS A10 Black H72/C2U/56W/NPP - Daily Driver
1100: 5/3/22 . . . . . . . 2000: 6/25/22 . . . . . .4000: 8/17/22 . . . . . . . 6000: 9/10/22 Daily Driver mileage update: 45k mi. @ Mar 2025 New Engine @ 22,600 mi. due to dealer confusing bad gas with a bad engine. Build Log: https://www.camaro6.com/forums/showt...6#post11353116 |
|
|
|
|
03-04-2026, 11:37 AM
|
#65 |
|
Drives: 2022 Camaro SS 1LE Join Date: Sep 2011
Location: Sugar Land TX
Posts: 36
|
I cant wait to see how the pillar mount turns out. Really good stuff!
__________________
Mark
Sugar Land TX 2022 VOM Camaro SS 1LE Last edited by mpride; 03-06-2026 at 11:50 AM. |
|
|
|
|
03-06-2026, 11:47 AM
|
#66 |
|
Electrical Engineer
Drives: 2023 1SS A10 Black Join Date: Apr 2022
Location: Illinois
Posts: 929
|
Version 1 had the right overall shape but the pods were too shallow for the speakers. It did let me verify placement and overall impact to visibility.
  The second version was deeper and fits the speaker perfectly. It needs sanding and finishing but is usable for actual in-car testing. 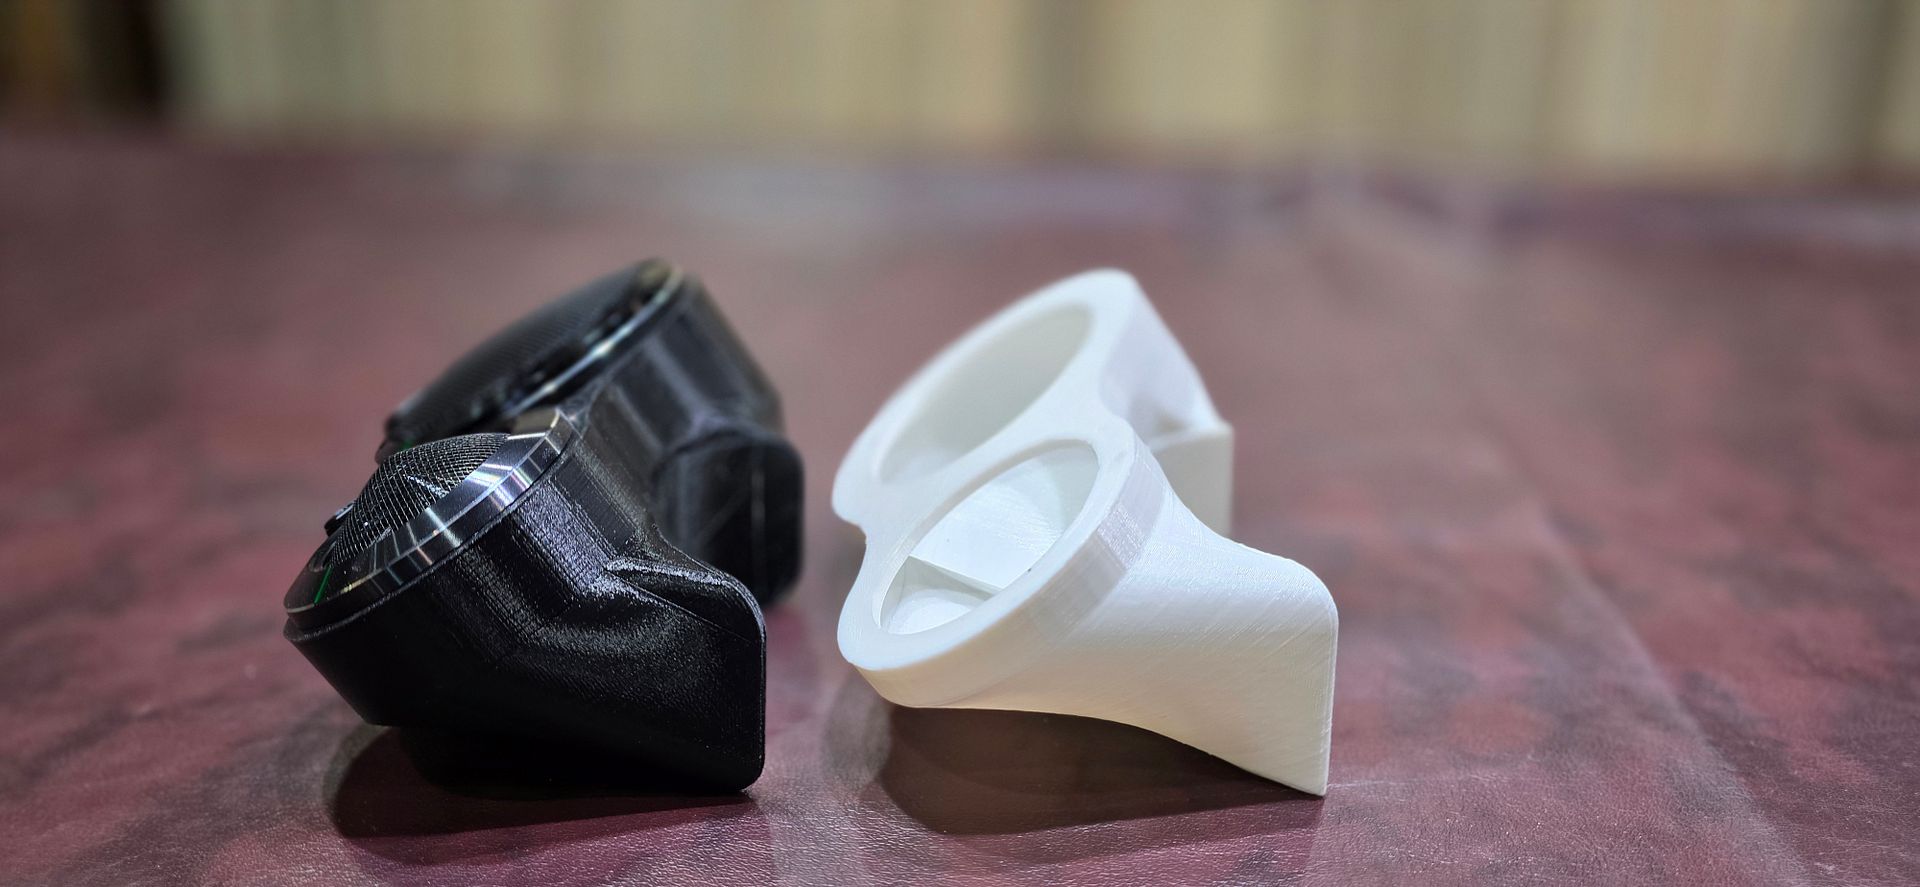 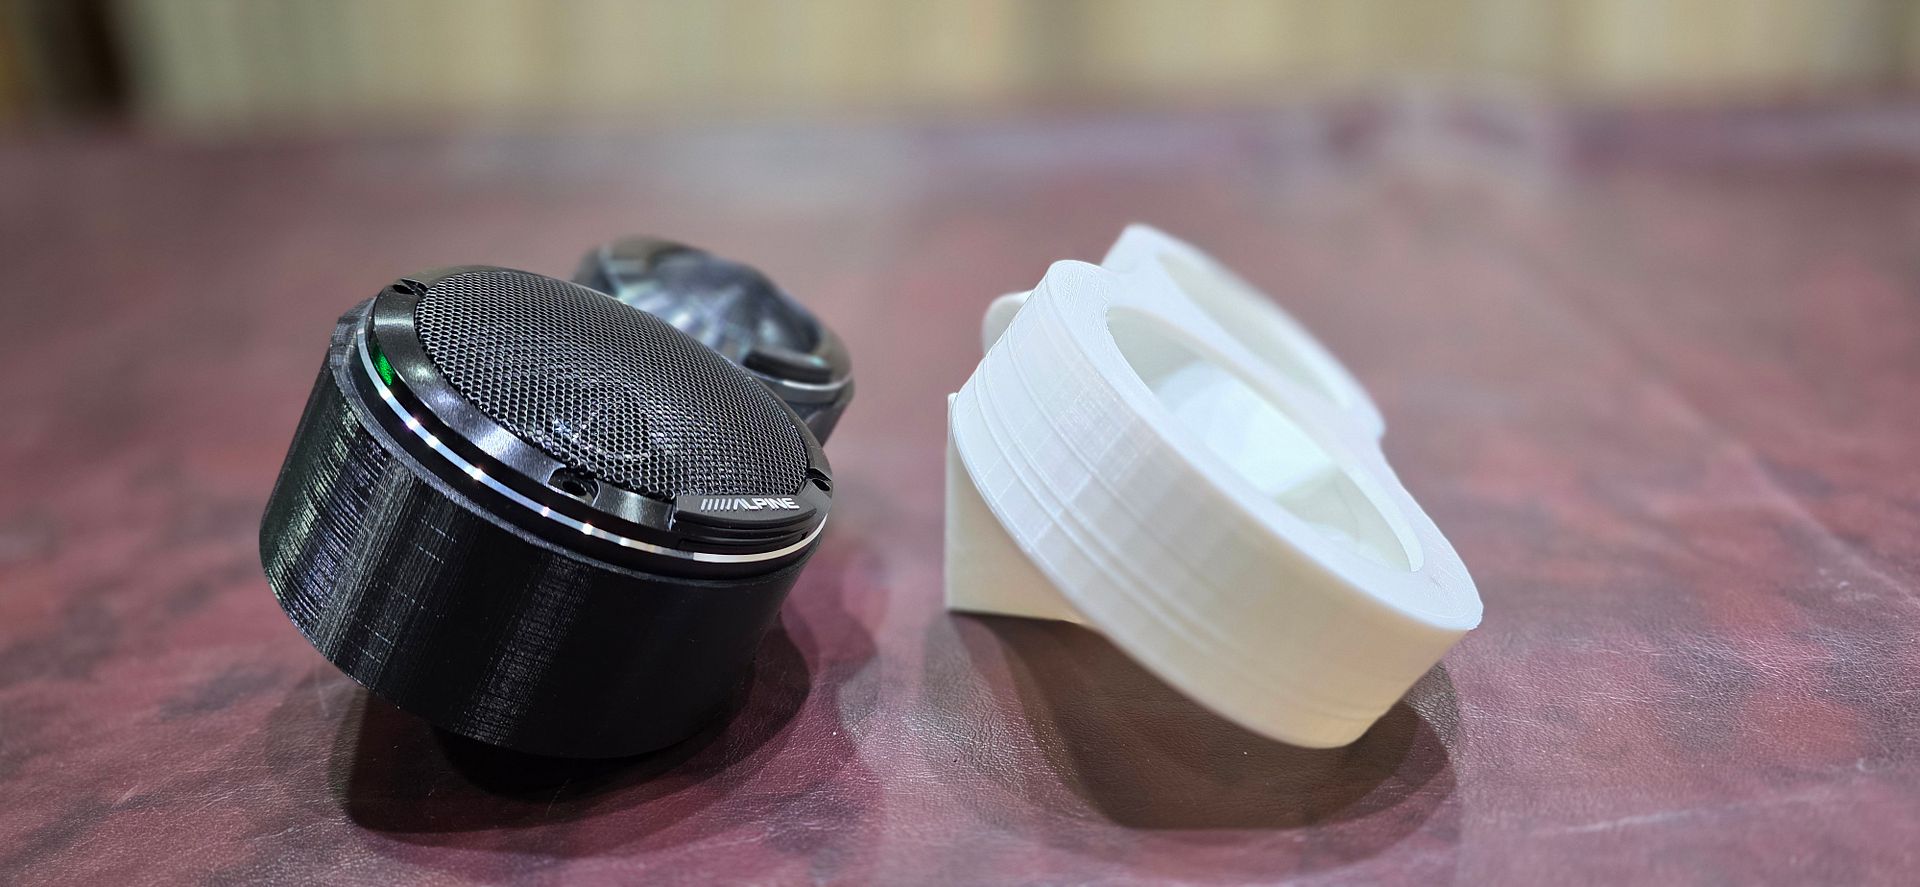 Overall aiming is as intended. I will design and print a third version that moves the tweeters to the outside, closer to the side mirror. This will move them away from the windshield and improve visibility. Im curious how the sound stage depth will be impacted with each arrangement. 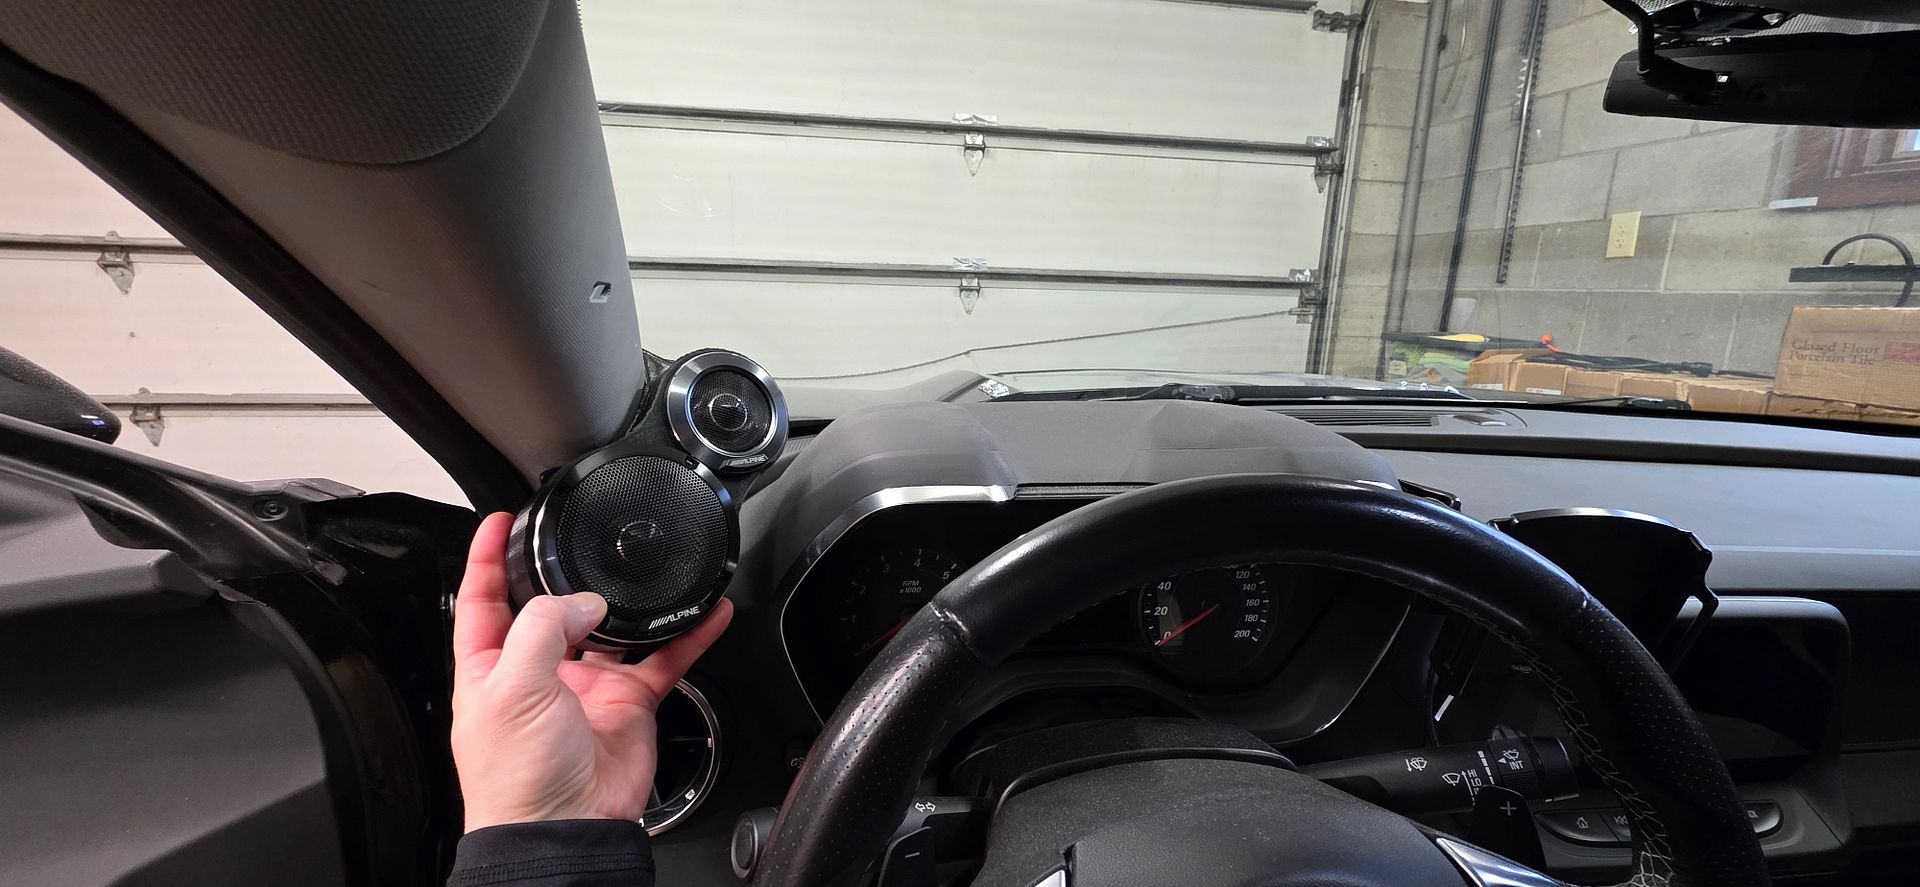
__________________
2023 1SS A10 Black H72/C2U/56W/NPP - Daily Driver
1100: 5/3/22 . . . . . . . 2000: 6/25/22 . . . . . .4000: 8/17/22 . . . . . . . 6000: 9/10/22 Daily Driver mileage update: 45k mi. @ Mar 2025 New Engine @ 22,600 mi. due to dealer confusing bad gas with a bad engine. Build Log: https://www.camaro6.com/forums/showt...6#post11353116 |
|
|
|
|
03-06-2026, 07:18 PM
|
#67 |
    
Drives: 2017 2ss 6mt Join Date: Mar 2024
Location: dallas
Posts: 1,480
|
How do the amps do with heat management when stacked like that?
|
|
|
|
|
03-07-2026, 05:29 PM
|
#68 |
 Drives: 2023 SS Join Date: Nov 2025
Location: Charleston SC
Posts: 123
|
you do some great work, neat to watch.
what did you use to clean the muck off the PCB in the amp, just solder cleaning Flux paste, or___? why not use a hole saw to put several holes in the rear seat, so it was still usable? I had a beretta with a rear cupholder that folded down, with a hard plastic rub in the seat, i sealed the sub box up against the rear seat panel, drilled several large holes (prolly used a deadbolt hole saw?)) and when you set in the back , you could feel the subs puffing thru the holes |
|
|
|
|
03-12-2026, 09:26 AM
|
#69 | |
|
Electrical Engineer
Drives: 2023 1SS A10 Black Join Date: Apr 2022
Location: Illinois
Posts: 929
|
Quote:
That said, I have air gaps all around them to allow for convection cooling. This is a better arrangement then stacking horizontally (also super common with amps like this) where heat rises from the bottom amp to the top amp. I've put the VXi and MVi amps under seats, in hidden areas, in closed areas, upside down, etc. They are super flexible. At $1k-$2k each, I'd hope they were durable!
__________________
2023 1SS A10 Black H72/C2U/56W/NPP - Daily Driver
1100: 5/3/22 . . . . . . . 2000: 6/25/22 . . . . . .4000: 8/17/22 . . . . . . . 6000: 9/10/22 Daily Driver mileage update: 45k mi. @ Mar 2025 New Engine @ 22,600 mi. due to dealer confusing bad gas with a bad engine. Build Log: https://www.camaro6.com/forums/showt...6#post11353116 |
|
|
|
|
|
03-12-2026, 09:32 AM
|
#70 | |
|
Electrical Engineer
Drives: 2023 1SS A10 Black Join Date: Apr 2022
Location: Illinois
Posts: 929
|
Quote:
Making holes in the seat foam is a great idea also. Certainly, that would let the seat be more usable. I considered leaving sections of foam. Since I didn't cut the covering, I can source a replacement rear seat in any color (i.e. black) and just replace the cover if I want to return to stock. But my new plan will have two IB subs instead of one so I need to open up the foam on the passenger side an will likely do holes since a rear passenger is possible on that side. In my past builds on my last 3 cars, I used the rear seat armest space (aka ski pass-thru). Two of those required I make my own pass-thru, while one had an actual door (2001 Accord).
__________________
2023 1SS A10 Black H72/C2U/56W/NPP - Daily Driver
1100: 5/3/22 . . . . . . . 2000: 6/25/22 . . . . . .4000: 8/17/22 . . . . . . . 6000: 9/10/22 Daily Driver mileage update: 45k mi. @ Mar 2025 New Engine @ 22,600 mi. due to dealer confusing bad gas with a bad engine. Build Log: https://www.camaro6.com/forums/showt...6#post11353116 |
|
|
|
|
|
|
|
|
|
Post Reply
|
| Tags |
| acoustic, audio, speakers, stereo, subwoofer |
|
|


