You are browsing camaro6 
 02-05-2019, 12:25 PM
|
#1 |
        Drives: 2016 2SS M6 Mosaic Blk Met-SOLD Join Date: Jun 2016
Location: KY
Posts: 2,934
|
How to access the tuner module
I searched the forum and youtube and I could never find a thread that really helped me access the OEM tuner module in order to install the PAC Advanced Amplifier Interface Select 2014-2019 GM With Bose AP4GM61.
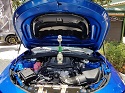
After tearing the dash apart, I can assure you, it's not as scary as it looks. First, disconnect the battery ground. The tuner module is located in the passenger side dash to the right of the glovebox. To access this panel, open the passenger door, pull back the rubber weatherstripping and use a trim tool to pop off the panel. It has 5 clips and just pops off. 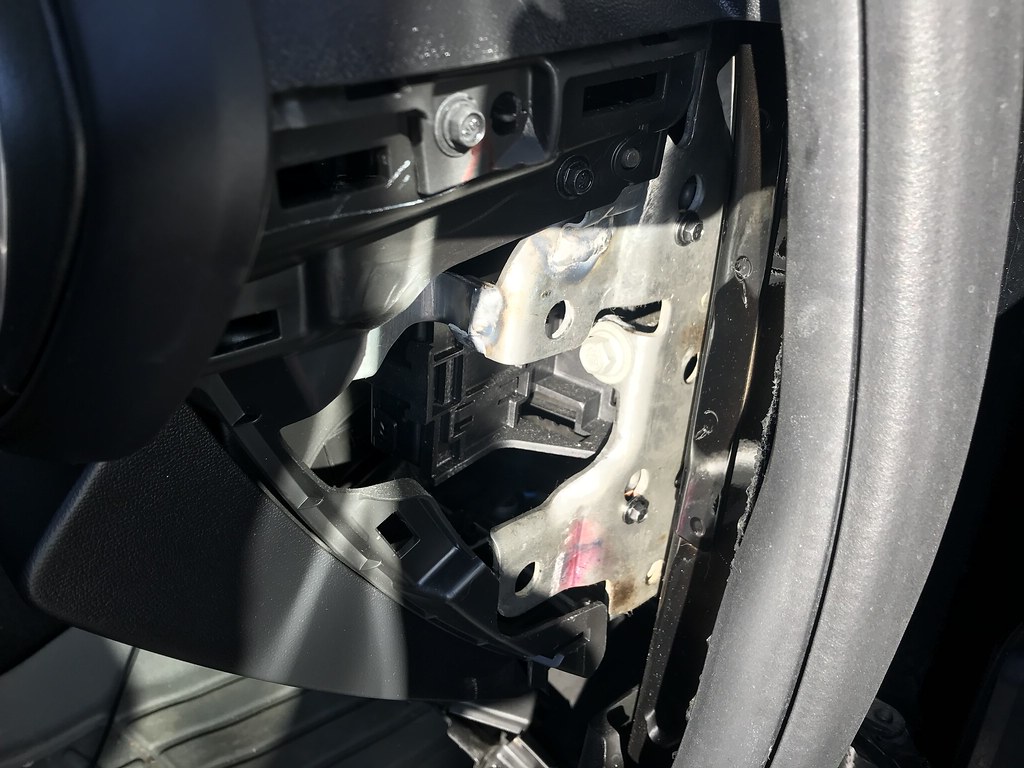 To get the amp out to access the plugs and install the harness, you have to remove a 7mm screw from the bottom of the amp tray and lift the amp out of the keyhole slots that hold it laterally. A keyhole slot is when the screw head goes thru a hole and then drops down into a slot that holds it in place. You do not remove the screws. 7mm screw is here:  To get to that 7mm screw, you have to drop the footwell kick panel tray. There are four 7mm screws holding the tray to the dash. The back 2 are tough to remove. That kick panel has 4 pieces of human interface equipment screwed or clipped into the tray. YOU DON'T HAVE TO REMOVE THE EQUIPMENT FROM THE TRAY, but it can make it a little easier to move the tray around. Loosen the screws in the keyhole slots. Lift the module out of the keyhole slots and wriggle it out of the dash and let it sit on the floor. 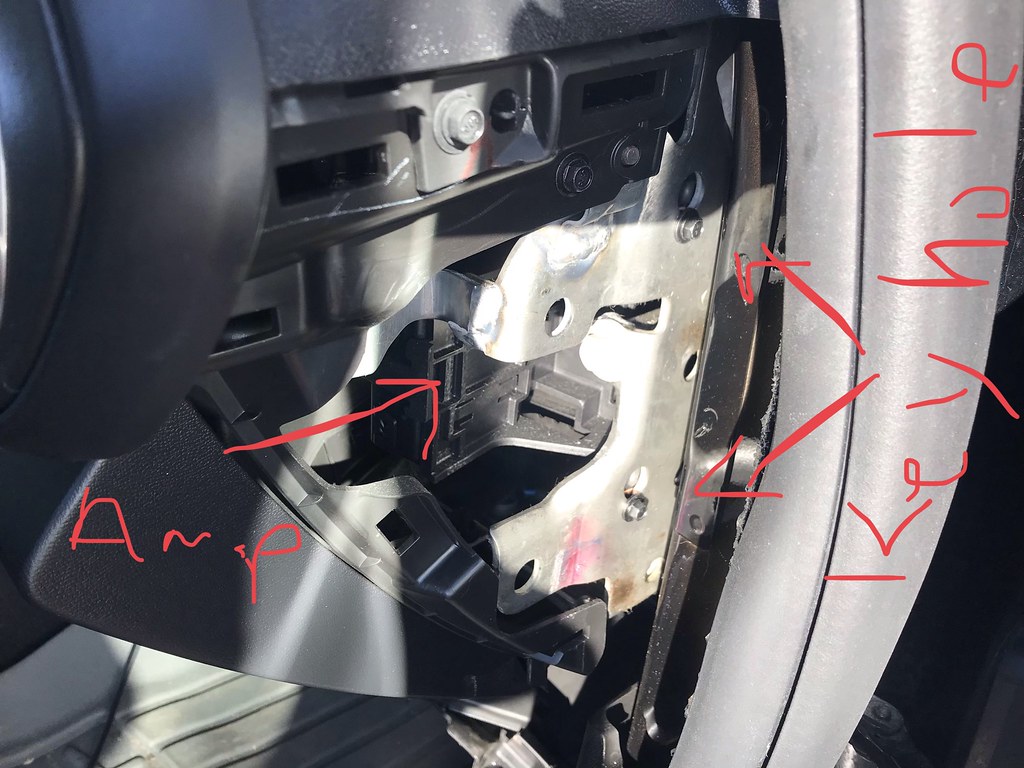 Remove the appropriate plugs and plug in the harness. Here is a pic of the tuner module on the right with harness attached and the human interface device out of the tray so i could move the tray easier. 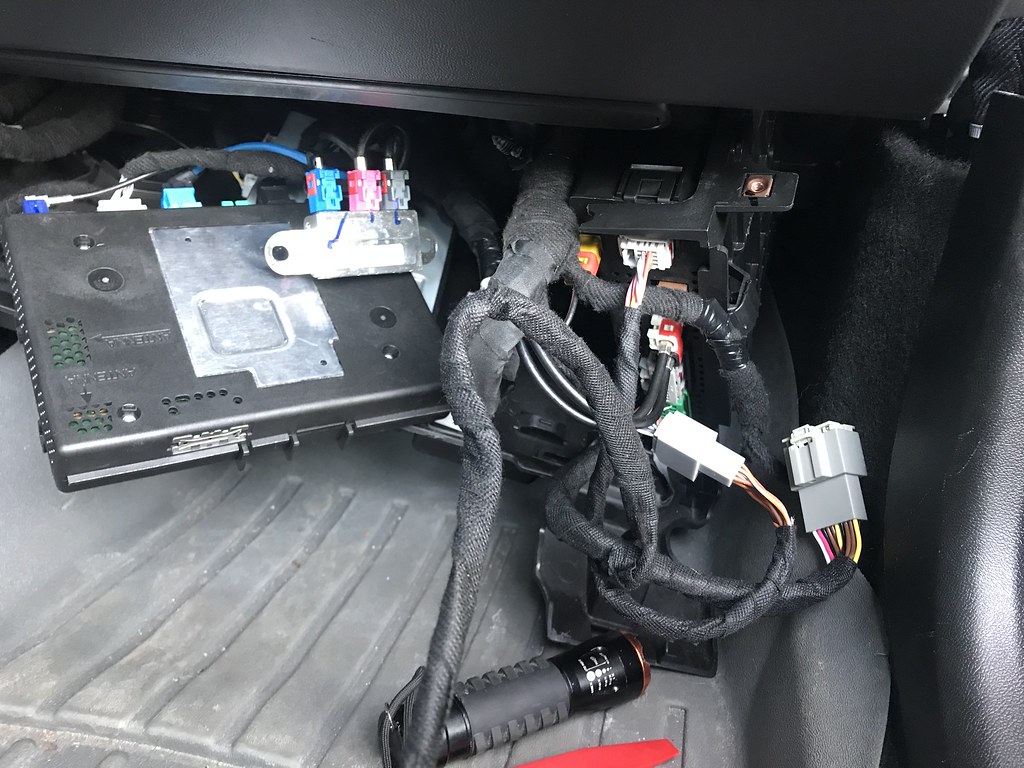 To re-install, wriggle the tuner module back into place (not as hard as you think), slip screws back into the keyhole slots and tighten them. Re-install the 7mm screw on the bottom of the tuner module. Reinstall the kick panel tray by putting the back in place first, then pushing the front lip of the tray behind the airbag. Reinstall the four 7mm screws. Hope that helps. Please feel free to reply or PM me with questions.
__________________
Official Detailer of CamaroFest 8 & 9
https://www.autogeekonline.net/forum...st-8-pics.html https://www.camaro6.com/forums/showt...=521655&page=1 https://www.camaro6.com/forums/showt...=547470&page=1 https://www.camaro6.com/forums/showthread.php?t=527474 No one on Earth has detailed more Camaros. http://KirkTheDetailer.com Last edited by KirkH; 04-25-2019 at 07:23 PM. Reason: accuracy |

|

|
|
03-05-2019, 11:28 AM
|
#2 |
 
Drives: 2016 Camaro 2SS Join Date: Sep 2015
Location: Cincinnati Ohio
Posts: 455
|
SO the 2 plugs needed to interface with...the grey one to the right of the yellow on on the top of the amp pic and the grey one that looks like it is above the green plug towards the bottom of the amp pic? Do you actually have to drop the oem tuner tray to access the plugs?
__________________
2016 Black 2SS A8 NPP Sunroof - Tinted Windows - Black Chrome Wheels - Custom Striping - ASC Sideskirts/Splitter - GM Lowering Kit - Complete Sound System - DD LED Sidemarkers
|
|
|
|
|
03-05-2019, 04:39 PM
|
#3 |

Drives: 2017 HBM 2LT RS Convertible V6 A8 Join Date: Jan 2018
Location: NJ
Posts: 654
|
What is the Advanced Amplifier Interface Select 2014-2019 GM With Bose AP4GM61? I thought there were 2 options, base system or Bose, and the Bose amp was in the trunk under the floor.
|
|
|
|
|
03-05-2019, 05:49 PM
|
#4 |
|
Drives: 2016 Camaro 2SS Join Date: Sep 2015
Location: Cincinnati Ohio
Posts: 455
|
This is the location of the OEM tuner module...thinking OP called it the radio amplifier..the PAC unit mentioned is to interface with the OEM tuner module to get a clean signal on the MOST50 bus...
__________________
2016 Black 2SS A8 NPP Sunroof - Tinted Windows - Black Chrome Wheels - Custom Striping - ASC Sideskirts/Splitter - GM Lowering Kit - Complete Sound System - DD LED Sidemarkers
|
|
|
|
|
03-05-2019, 06:42 PM
|
#5 | |
|
Drives: 2016 2SS M6 Mosaic Blk Met-SOLD Join Date: Jun 2016
Location: KY
Posts: 2,934
|
Quote:
__________________
Official Detailer of CamaroFest 8 & 9
https://www.autogeekonline.net/forum...st-8-pics.html https://www.camaro6.com/forums/showt...=521655&page=1 https://www.camaro6.com/forums/showt...=547470&page=1 https://www.camaro6.com/forums/showthread.php?t=527474 No one on Earth has detailed more Camaros. http://KirkTheDetailer.com |
|
|
|
|
|
03-05-2019, 06:43 PM
|
#6 | |
|
Drives: 2016 2SS M6 Mosaic Blk Met-SOLD Join Date: Jun 2016
Location: KY
Posts: 2,934
|
Quote:
__________________
Official Detailer of CamaroFest 8 & 9
https://www.autogeekonline.net/forum...st-8-pics.html https://www.camaro6.com/forums/showt...=521655&page=1 https://www.camaro6.com/forums/showt...=547470&page=1 https://www.camaro6.com/forums/showthread.php?t=527474 No one on Earth has detailed more Camaros. http://KirkTheDetailer.com |
|
|
|
|
|
04-15-2019, 09:50 PM
|
#7 |
|
waddupdgriff
Drives: Supercharged 2016 2LT RS Join Date: Sep 2017
Location: IG: waddupdgriff
Posts: 213
|
So any help with my overthinking would mean a lot to me:
I’m only adding an amplifier and subwoofer. After reading the instructions it doesn’t seem like I need to wire a 12v or ground for the aftermarket amplifier. Am i wrong in thinking that? 1. I’ve gathered that I access the module under the glove box, and hook the two Amp Pro connectors (20 pin and 8 pin) up to that. Oh, and the level knob. 2. I need to connect the remote turn on from the aftermarket amplifier to the Amp Pro harness remote turn on. 3. Next, I connect the Amplifer RCAs to a Y-connector for the 6th RCA hole in the Amp Pro which is the NF (non fading) hole. 4. Finally, I connect speaker wire from my subwoofer to the aftermarket amplifier and bang! That’s it (hopefully)... Am I missing anything? Please help lol
__________________
2016 Chevrolet Camaro 2LT RS
Edelbrock E-Force Stage 1 Supercharger Custom tune by Overkill Motorsports AFE Momentum GT Pro Dry Cold Air Intake MBRP SS Cat Back Exhaust iROC-z Wheels Nitto NT555 G2 Tires (275 fronts, 305 rears) |
|
|
|
|
04-15-2019, 09:56 PM
|
#8 | |

Drives: 23 2SS 1LE Join Date: Feb 2019
Location: GA
Posts: 568
|
Quote:
__________________
Instagram: RideWithDanger
Radiant Red 23' 2SS 1LE 1100: 11/14/22 | BUILT: 3/16/23 2000: 2/17/23 | 4200: 5/8/23 3000: 2/27/23 | 5000/6000: 5/15/23 Black on black 2019 3LT RS Camaro. 1100: 3/7/19 | 4200: 4/15/19 3100: 3/15/19 | 4800: 4/23/19 3400: 3/22/19 | 5000: 4/25/19 Built: 4/8/19 | Home: 4/26/19 |
|
|
|
|
|
04-16-2019, 05:41 AM
|
#9 |
Drives: 18 ZL1 A10 Join Date: Nov 2008
Location: South East, FL
Posts: 3,024
|
Hey Kirk. I would rename the thread, that's not the radio amplifier...

__________________
2017 ZL1 M6 Bog City, 2013 ZL1 M6, 2010 2SS M6
ZL1::J-E-T-S JETS JETS JETS  |
|
|
|
|
04-16-2019, 12:53 PM
|
#10 | |
|
waddupdgriff
Drives: Supercharged 2016 2LT RS Join Date: Sep 2017
Location: IG: waddupdgriff
Posts: 213
|
Quote:
__________________
2016 Chevrolet Camaro 2LT RS
Edelbrock E-Force Stage 1 Supercharger Custom tune by Overkill Motorsports AFE Momentum GT Pro Dry Cold Air Intake MBRP SS Cat Back Exhaust iROC-z Wheels Nitto NT555 G2 Tires (275 fronts, 305 rears) |
|
|
|
|
|
04-20-2019, 08:59 PM
|
#11 |
|
waddupdgriff
Drives: Supercharged 2016 2LT RS Join Date: Sep 2017
Location: IG: waddupdgriff
Posts: 213
|
Sooo I just did this yesterday. Took a little longer than I’d hoped for but it’s all working like a charm
if anyone has any questions, I’m here to help as wellAlso, my radio stopped working/wouldn’t turn on/light up. But that was because the PAC instructions confused me. There were two extra white clips on the harness (one male and one female) that the instructions made out to seem like they were only to be used for the extra harness you can buy seperately. Not the case, tu plug those into each other and everything worked fine lol. Kind of embarrassing but hope that helps someone
__________________
2016 Chevrolet Camaro 2LT RS
Edelbrock E-Force Stage 1 Supercharger Custom tune by Overkill Motorsports AFE Momentum GT Pro Dry Cold Air Intake MBRP SS Cat Back Exhaust iROC-z Wheels Nitto NT555 G2 Tires (275 fronts, 305 rears) |
|
|
|
|
04-21-2019, 10:01 AM
|
#12 | |
|
Drives: 2016 2SS M6 Mosaic Blk Met-SOLD Join Date: Jun 2016
Location: KY
Posts: 2,934
|
Quote:
__________________
Official Detailer of CamaroFest 8 & 9
https://www.autogeekonline.net/forum...st-8-pics.html https://www.camaro6.com/forums/showt...=521655&page=1 https://www.camaro6.com/forums/showt...=547470&page=1 https://www.camaro6.com/forums/showthread.php?t=527474 No one on Earth has detailed more Camaros. http://KirkTheDetailer.com |
|
|
|
|
|
04-21-2019, 12:51 PM
|
#13 | |
|
Drives: 18 ZL1 A10 Join Date: Nov 2008
Location: South East, FL
Posts: 3,024
|
Quote:
__________________
2017 ZL1 M6 Bog City, 2013 ZL1 M6, 2010 2SS M6
ZL1::J-E-T-S JETS JETS JETS |
|
|
|
|
|
04-22-2019, 08:26 PM
|
#14 | |
|
Drives: 2016 2SS M6 Mosaic Blk Met-SOLD Join Date: Jun 2016
Location: KY
Posts: 2,934
|
Quote:
__________________
Official Detailer of CamaroFest 8 & 9
https://www.autogeekonline.net/forum...st-8-pics.html https://www.camaro6.com/forums/showt...=521655&page=1 https://www.camaro6.com/forums/showt...=547470&page=1 https://www.camaro6.com/forums/showthread.php?t=527474 No one on Earth has detailed more Camaros. http://KirkTheDetailer.com |
|
|
|
|
|
|
|
|
|
Post Reply
|
|
|


