You are browsing camaro6 
 11-09-2019, 07:26 PM
|
#1 |
 
Drives: 2018 ZL1 coupe Join Date: Nov 2018
Location: Prescott, Arizona
Posts: 589
|
ADM Intercooler Reservoir installation
This afternoon I installed the ADM Intercooler Reservoir on our '18 ZL1. Installation is pretty simple, but it didn't come with instructions, and though the installation is discussed in a couple of threads here, the kit has changed over time, and there isn't a walkthrough for the complete installation with pictures.
I thought I'd post a quick thread on the reason for needing a reservoir, the ADM kit, my thoughts and the install. I purchased the kit in November 2019. First, a little background: In October, I had issues with full throttle surging at the track. I had heard of folks having issues with an intercooler system that was not properly bled, but I didn't expect the symptoms to feel like the surging I experienced. Some folks who are a lot smarter than I am figured out that if there is enough air in the intercooler system to cause the pump to cavitate, it shuts down for three minutes. No codes, no warning lights, no cooling. IATs spike, and the ECU compensates. After three minutes, the pump restarts, but it will do the same thing if an air pocket hits it again. This is what it looks/feels/sounds like when the ECU compensates. It's subtle on the first straight (passing the white Benz), but very noticeable at 00:30-36 after the chicane. The ECU's compensation for the high IATs was much more intrusive and violent than I expected, which caused me to look at other issues, but I came back to a poor IC system bleed at the factory. I made an appointment to have the dealer bleed the system and dropped the car off. When I picked the car up, they told me they didn't have the tool to bleed the ZL1 (a question I had specifically asked before dropping the car off), so they installed a ZO6 manifold fitting so they could bleed it. This left the return hose to the pump crimped. They said they were ordering the correct tool, but they're out of stock with GM, and I have a track event next weekend.  I decided to order the ADM reservoir in order to eliminate the need for the bleed fitting. Honestly, the car should have come with a high point reservoir from the factory so it could self bleed and none of the nonsense with the dealer would have been necessary. Maybe the factory monkeys could even get it filled right the first time.... So, the kit... https://lsa-conversion-store.myshopi...sivoir-upgrade ADM's kit includes an Edelbrock reservoir, two hoses, a mounting bracket, and some hardware.  The hose with the anti-abrasion cover, and 90* fitting is the upper hose which carries the coolant from the manifold to the reservoir. The hose with the 90* bend and the straight plastic fitting is the lower hose which runs from the reservoir to the stock hose (and to the IC pump). Tools... 10mm wrench/deep socket 8mm socket/ flat head screwdriver dental pick clamp/locking pliers channel lock/pliers zip ties rubber cap (~1/2-9/16") towel/paper towels funnel Dexcool As far as what I did... I'm a pretty decent wrench, been working on cars for close to 40 years. That doesn't mean I never screw up, and there were no instructions, so follow at your own risk, and YMMV.  I started by examining the reservoir for any defects, and making sure the molding flash on the hose fittings was deburred. One poster on a thread noted excessive flash caused a leak on his install, so do yourself a favor and check it on the bench before assembly. Deburr the flash, and any excess plastic in the openings.  Then assemble the reservoir and bracket. I determined it would go into place as an assembly on my install, but you might want to check first. It will be quite difficult to access the bolts and the hose clamp for the lower hose with the reservoir in place. Start with bolting the reservoir to the bracket. I used some blue loctite on the bolts. The upper hose barb points forward.  Next, attach the lower hose, which also points forward. I angled the hose toward the outboard side to assist with routing, and oriented the hose clamp to point to the rear on the inboard side. That seemed to be the only place to have any chance of getting to it with the reservoir installed if it ever needs attention.  Make sure you have the reservoir mounting bolts and lower hose clamp tight, and you can mount the reservoir assembly. It attaches to the bolt for the AC line bracket.  The kit comes with two nuts for this bolt, a flange nut (just like the stock one) and a jam nut, indicated for "racing applications". There were a couple complaints in threads that the bracket came loose on the track, and I think that's the reason for the jam nut.  I re-used the stock nut, but ended up putting a few washers under the bracket to relieve interference with the strut tower brace and AC line. I did use the jam nut over the top of the stock nut. Reservoir assembly installed... note the lower hose indicated by the red arrow. I also used a short piece of adhesive backed weather strip to cushion contact between the reservoir and the brace.  Next, it's time to get wet... if you're careful, not much Dexcool will spill, but it's a good idea to have a towel, or some paper towels to stuff in under the connections to soak it up. It helps to remove the airbox at this point to have room to maneuver. In preparing to remove the hose connected to the manifold, I first moved the stock hose clamp down on the hose to get it out of the way. Next, I used a needlenosed locking plier to clamp the hose to minimize leakage. You can also use a small clamp for this. Note in the photos that the bleed fitting on my car comes straight out from the manifold... this is the ZO6 fitting. The ZL1 fitting has a 90* outlet that points down. Stock ZL1 fitting: 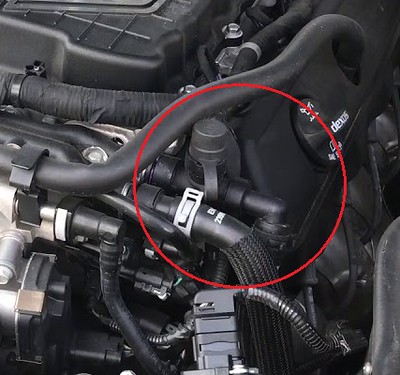 My car (after the dealer screwed with it):   I used a rubber cap over the bleed fitting to keep it from draining while I was working with the hose. When you disconnect the hose, keep it pointed up, undo the clamp, and attach the hose to the straight plastic fitting on the hose that connects to the bottom of the reservoir. Move the clamp back into position.  Now you can pour some Dexcool into the reservoir, just enough to cover the bottom. Manipulate the lower hose to let the air flow into the reservoir until all the bubbles stop. Next, route that hose along the inner fender and zip tie in place. Make sure to leave room for the rear corner of the airbox. In this pic, you can see the cap on the bleed fitting.  Now it's time to deal with the upper hose. The hose included with the current ADM kit has a factory style fitting installed. You need to remove the original fitting from the manifold before you can install the hose. Use a dental pick to pull the purple retainer clip out of the fitting.  Push the reservoir end of the ADM hose loosely onto the reservoir inlet and with the other end ready to install, pull the stock fitting, and push the ADM hose on. If you do this quickly, you'll only lose a few drops of Dexcool. Install the purple clip back into the new fitting to lock it in place. The upper hose dumps Dexcool into the reservoir, so it's not critical you get the air out, but I used a funnel to fill the hose most of the way before permanently attaching it to the reservoir. Make sure to position a hose clamp on the hose before attaching it to the reservoir. Upper hose installed:  The upper hose is one place I think this kit could be improved... things are a little cramped at the manifold end, and a straight fitting with the appropriately shaped hose would simplify things and avoid the unnecessarily convoluted routing of the current setup. At this point, reinstall the airbox, double check all your connections and bolts. Fill the reservoir with Dexcool up to the bottom of the top hose connection. Loosely install the cap. Start the engine. Other threads have mentioned that the pump has a slow start, and turns on 10 seconds after engine start. I'm not sure if it's true, as by the time I made it from the driver's seat to the engine compartment the pump was running. In any case, check that you have flow into the reservoir from the top hose and out the bottom. If you have flow in, and it's not overflowing, you're good. Check all connections for leaks. Fill the reservoir, not quite full, tighten the cap and get the car up to temp. Check the reservoir after the car cools, and top off if necessary. The system should self-purge any air into the reservoir as the Dexcool flows through. Just check it periodically and keep it topped up.  Hopefully, having all of this info in one place will help some folks out. See you at the track! 
|

|

|
|
11-09-2019, 10:59 PM
|
#2 |
         
Drives: 2017 Camaro ZL1 Coupe Join Date: May 2016
Location: Georgia
Posts: 5,809
|
Thanks Rodan for the install info and pics! Haven’t decided if I’m going to order one for my ZL1 yet as I don’t do any track events or drag racing! Don’t know if it’s necessary for just street driving and will send Andy at ADM an email to get his opinion/advice.
__________________
ZL1 Coupe, PDR, Exposed carbon fiber hood insert, My Link with Nav, M6 6 speed and Silver Ice Metallic. Mods done: ceramic window tint, GM Accessories Camaro floor mats and Roto-Fab CAI.
|
|
|
|
|
11-10-2019, 07:09 AM
|
#3 |
|
Drives: 2018 ZL1 coupe Join Date: Nov 2018
Location: Prescott, Arizona
Posts: 589
|
Having a reservoir for the IC cooling circuit isn't really necessary, even for drag or road racing. As long as the system is properly filled and bled to eliminate air pockets there's no problem.
Unfortunately, GM doesn't seem to be very good at doing this at the factory, given all the ZO6 and ZL1s that have had issues. In addition, with the factory setup, it's difficult if not impossible for the average owner to DIY the fill/bleed and the dealer techs, if not clueless, need special tools that they may not have. In a non-warranty situation, you're going to be spending $150+ to have a dealer do the job. Having a surge reservoir at a high point in the system allows it to purge air in normal operation, and allows checking/filling the system without special equipment. It should have been designed that way from the factory. |
|
|
|
|
11-10-2019, 09:06 AM
|
#4 |
|
AXLERODZL1

Drives: 2019 Riverside blue ZL1 Camaro Join Date: Dec 2018
Location: Carrollton, VA
Posts: 205
|
My top hose leaks on the ADM reservoir ...it might be the mold flash as you stated.
__________________
'19 ZL1 A10 Riverside Blue PDR/Nav/Sunroof
Kong ported blower/snout Roto-Fab Big gulp 103 TB Lingenfelter Lower Pulley(9.17) 1 7/8 ARH headers and Exhaust Meth injection(single nozzle) 733whp/788tq |
|
|
|
|
11-28-2019, 06:15 AM
|
#5 | |
|
Drives: Anything I want Join Date: Oct 2008
Location: DfW - Texas
Posts: 5,405
|
Quote:
|
|
|
|
|
|
11-28-2019, 08:30 AM
|
#6 | |
 
Drives: 2017 Camaro ZL1 Join Date: Nov 2019
Location: al
Posts: 93
|
Quote:

__________________
2017 ZL1 M6
Youtuber - https://www.youtube.com/c/projectzl1 |
|
|
|
|
|
11-28-2019, 08:57 AM
|
#7 |

Drives: 2019 ZL-1, Shadow Gray, Sold Join Date: Jan 2019
Location: Fredericksburg, VA
Posts: 1,390
|
Good Luck with that one!
|
|
|
|
|
11-28-2019, 09:30 AM
|
#8 | |
|
Drives: 2017 Camaro ZL1 Join Date: Nov 2019
Location: al
Posts: 93
|
Quote:
__________________
2017 ZL1 M6
Youtuber - https://www.youtube.com/c/projectzl1 |
|
|
|
|
|
06-28-2020, 02:27 PM
|
#9 | |

Drives: 2019 ZL1 Riverside Join Date: Apr 2020
Location: Charlotte, NC
Posts: 1,138
|
Quote:
|
|
|
|
|
|
|
|
|
|
Post Reply
|
| Thread Tools | |
|
|


