You are browsing camaro6 
 01-31-2016, 09:54 PM
|
#1 | |
|
The Dogfather
Drives: #1 off the line for a customer. '16 Join Date: Oct 2015
Location: Andover, KS
Posts: 2,621
|
How To De-Badge (removal of badges, any car)
I've kept typing this as a reply to threads, especially early on and never got around to actually post up some pictures and what not... Keep in mind that the pictures will be for the SS wing but the technique I used on those is THE same technique on how I remove badges.
edit: Thank you Glen for the suggestions! I am definitely incorporating that into the guide as it is a much more efficient way of doing it! Approximate time needed: 5 minutes Person(s) needed: 1 TOOLS/ITEMS NEEDED: Wax Goo Gone Popsicle sticks (updated) Fishing Line (best) OR Dental Floss (updated) Paper towels with some water (to clean Goo Gone) Mechanic gloves (only for holding the fishing line or dental floss, if using fishing line MUST USE GLOVES) Water (100 ml is enough, 1/5th of a 500ml water bottle) Quote:
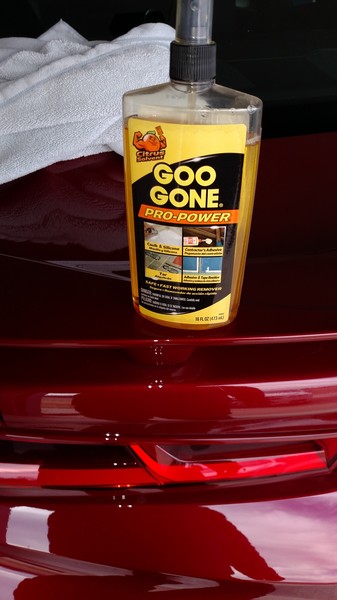 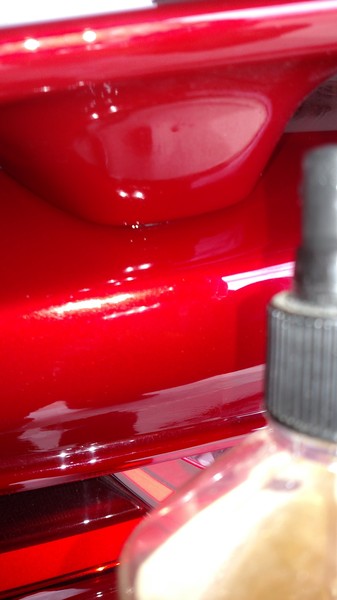 STEP 2: Grab the dental floss / fishing line, cut a good 4 inches longer than the badge you are removing. If you are using dental floss, you will have to get a couple long lines going as it will break. Fishing line will NOT. And do NOT use fishing line WITHOUT gloves. After you wrap each side of the line/floss, slide it under the badge and do a saw cutting motion, left to right and right to left. You WILL see the line going through the adhesive that is behind the badge and see the progress of it. 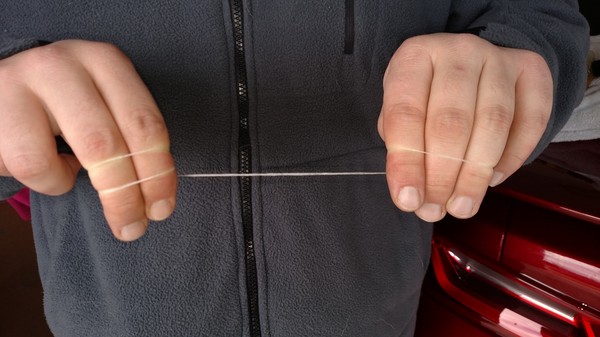 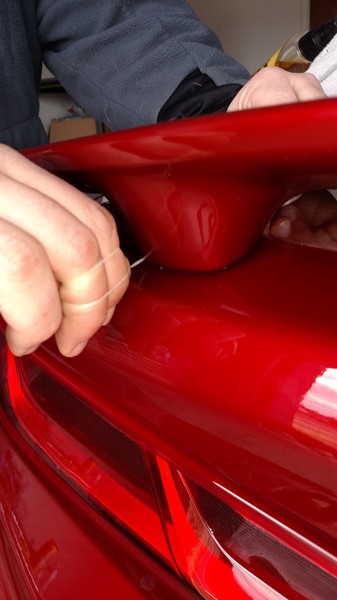 STEP 3: After you've gone through the back side of the badge with the floss/line, it'll just drop on the ground. You can also simply remove it with your hand when you are close to the end. STEP 4: IF there are any adhesive residue, just spray/apply some more Goo Gone and take off the rest of the residue. Before Goo Gone: 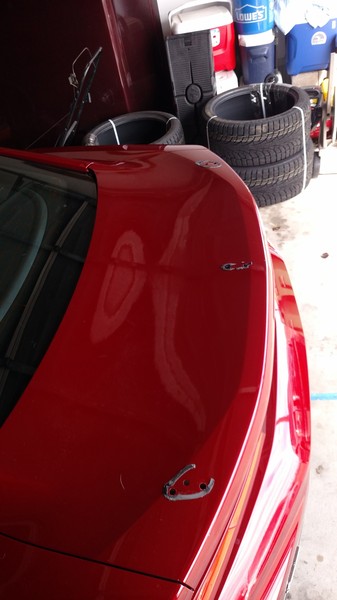 After Goo Gone: 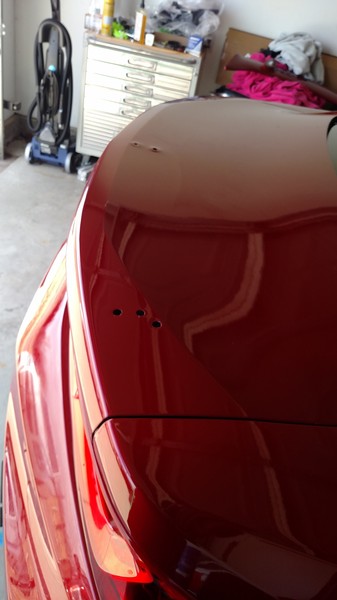 STEP 5: After all residue is gone, splash some water and wipe off ALL shiny Goo Gone. Once you do, wax the location where the badge used to be to bring out the shine of the paint and you are good to go!
__________________
Last edited by Tr6; 02-22-2016 at 08:21 PM. |
|

|

|
|
01-31-2016, 10:02 PM
|
#2 |
|
Retired from Car mfrs....

Drives: 2LT RS/HR-V Join Date: May 2013
Location: /Fort Lauderdale
Posts: 10,048
|
Excellent write up, i would just add two tips:
1. Use two popsicle sticks to wrap the floss around so you make a saw, quicker and easier to use than your hands. 2. If you are at wally world, pick up some of this below for 6 bucks. It cuts much faster than floss and doesn't break, you can saw harder, and that's important on this type of adhesive on the Chevy, it's a tough black VHB tape. B careful, itll cut skin too. 
|
|
|
|
|
01-31-2016, 10:11 PM
|
#3 | |
|
The Dogfather
Drives: #1 off the line for a customer. '16 Join Date: Oct 2015
Location: Andover, KS
Posts: 2,621
|
Quote:
Thank you for the tips Glen! |
|
|
|
|
|
02-02-2016, 02:31 PM
|
#4 |
    
Drives: 2015 Tiger XCX,2016 Camaro 1SS,LBZ! Join Date: Sep 2015
Location: Palm Coast, FL
Posts: 1,311
|
Very cool write up and tips! Most people are intimidated by doing small little things like this. When it is really easy.
|
|
|
|
|
02-03-2016, 11:52 AM
|
#5 |
Drives: 16 Summit white, Ceramic white 2SS Join Date: Jan 2016
Location: Places
Posts: 419
|
Awesome! What do you plan on doing with the lid? Filling the holes or putting on a blade?
|
|
|
|
|
02-03-2016, 02:54 PM
|
#6 | ||
|
The Dogfather
Drives: #1 off the line for a customer. '16 Join Date: Oct 2015
Location: Andover, KS
Posts: 2,621
|
Quote:
Quote:
|
||
|
|
|
|
02-04-2016, 09:34 AM
|
#7 | |
|
Camaro Fan

|
Quote:
At least you were able to return it with no problems! Where did you order from Cultrag?
__________________
Ordered: Garnet Red Tint coat 2016 Chevrolet Camaro 1SS, Auto, NPP
1100 Status: 8/6/15 3800 Status: 10/13/15 VIN #116519 4200 Status: 12/19/15 Delivered : 12/28/15 |
|
|
|
|
|
02-04-2016, 01:03 PM
|
#8 | |
|
The Dogfather
Drives: #1 off the line for a customer. '16 Join Date: Oct 2015
Location: Andover, KS
Posts: 2,621
|
Quote:
|
|
|
|
|
|
06-08-2016, 11:54 AM
|
#9 |
 
Drives: 2016 Camaro 2SS Join Date: Dec 2015
Location: Tampa, FL
Posts: 243
|
Awesome guide! I am going to be removing and painting badges this weekend so this is amazing.
I was wondering if anyone has removed the SS logos from the rear bumper and front grille yet though. I noticed the rear SS had a pad behind the logo. Should you remove the whole thing or just the SS from the pad. As far as the front logo goes, I know there are two straight pins on the logo, but I didn't know if anyone had any tips on removing it cleanly. Thanks in advance! |
|
|
|
|
06-08-2016, 12:45 PM
|
#10 | |
|
The Dogfather
Drives: #1 off the line for a customer. '16 Join Date: Oct 2015
Location: Andover, KS
Posts: 2,621
|
Quote:
The rear SS badge is literally slapped on with a double sided exterior tape that you can find at any store, if you just follow the guide you will take it off. As for the front, there are a few methods. I haven't done any of them personally which is why I haven't made a how to for it. Some use a drilling method (where you drill exactly where the clips on the inside of the bowtie is), some use fishling line and goo gone to get the double sided tape off then wiggle and break off the clip ends, some take the entire bumper off to get the upper front grill off and do it. So it really is up to you on how to do it. To get it off WITHOUT breaking, I would STRONGLY recommend that you take off the bumper and do it which adds a lot more time and effort into. Also, for the front bowtie make sure you have a interior trim removal set so you don't use a flathead screw driver or anything that will scratch the hell out of the grill that the front bowtie sits on when you pry it off. You can get an entire trim removal set from amazon for like 10 bucks which you can use in the future too so it's nice having it in the garage. |
|
|
|
|
|
06-08-2016, 01:29 PM
|
#11 | |
|
Drives: 2016 Camaro 2SS Join Date: Dec 2015
Location: Tampa, FL
Posts: 243
|
Quote:

|
|
|
|
|
|
06-08-2016, 01:33 PM
|
#12 |
|
Retired from Car mfrs....
Drives: 2LT RS/HR-V Join Date: May 2013
Location: /Fort Lauderdale
Posts: 10,048
|
The front SS logo AND ITS BASE, easily snap disconnect from the grille, leaving the grill nice and clean. Get the trim tools from amazon, a flashlight, some WD40 and look closley- unsnaps in 10 secs....
|
|
|
|
|
06-08-2016, 01:41 PM
|
#13 | |
|
Drives: 2016 Camaro 2SS Join Date: Dec 2015
Location: Tampa, FL
Posts: 243
|
Quote:
|
|
|
|
|
|
10-17-2016, 02:49 PM
|
#14 |
 Drives: 2016 2SS A8 Convertible Join Date: Oct 2016
Location: Maryland
Posts: 85
|
Glen (or anyone)
With the Ice Braid is there any chance of damaging the paint on the car? Or is it completely safe to hack away at the badges with it? I am keen to remove my own logos but if there is a skill/technique then my Camaro would be an expensive place to make my first mistake Thanks Mark |
|
|
|
|
|
|
|
|
Post Reply
|
|
|


