You are browsing camaro5 

|
 03-13-2024, 03:04 PM
|
#141 |
Drives: 2012 Chevrolet Camaro l99 Join Date: Aug 2020
Location: Austin, TX
Posts: 2,105
|
Looks good sir.
__________________
DSS FX Forged Pistons, Eagle ESP L19 Forged Rods, ARP Head and Main Studs, TSP PRC 260 CNC Ported Heads milled .030, Cometic .040 Head Gaskets, GPI SS3 VVT Camshaft, GM Performance Racing Lifters, CHE Trunnions , Molly Pushrods, Melling 10355HV Oil Pump, Cold Air Inductions CAI, Fast LSXR Intake Manifold, Nick Williams 103 TB, TSP 1 7/8" Longtubes with 3" TSP Exhaust, ZL1 Fuel Pump, Mishimoto Radiator, Mishimoto Oil Cooler, Tru Cool 40k Tranny Cooler, 3600 Circle D Converter, Fluid Dynamics Balancer
Build Thread https://www.camaro5.com/forums/showthread.php?t=609817 |

|

|
|
03-13-2024, 05:30 PM
|
#142 |
|
Big Un's doing that mod, awesome. Once you cut, no going back. Measure 3 K times, then cut. Love that rear Quarter mod, is it still available?.
|
|
|
|
|
03-13-2024, 06:00 PM
|
#143 | |||

|
Quote:
Quote:
 Quote:
 According to ACS's website, they are still available. |
|||
|
|
|
|
03-25-2024, 09:46 PM
|
#144 |
|
|
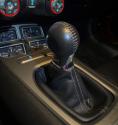
Its hard to believe, but my car turned 15 years old yesterday (3/24).
 With that, along with winter wanting to stick around a bit longer, I figured I would take some time to knock out one more side project. A few months ago, I picked up a roll of VViViD+ carbon fiber vinyl with the plan to get rid of the rest of the silver trim pieces. So I popped out the shifter trim and brought it inside to work on wrapping it. First up was to remove the traction control button, cigarette lighter, and 4-pack gauges. With that, along with winter wanting to stick around a bit longer, I figured I would take some time to knock out one more side project. A few months ago, I picked up a roll of VViViD+ carbon fiber vinyl with the plan to get rid of the rest of the silver trim pieces. So I popped out the shifter trim and brought it inside to work on wrapping it. First up was to remove the traction control button, cigarette lighter, and 4-pack gauges.Although I had a basic idea of what to do, this was my first time I ever attempted to wrap an interior piece. My wife was kind enough to lend me her Dyson hairdryer (which has an incredible warm-up time). I then mistakenly assumed that I could do the entire trim in one sheet. It started out very beautiful and the vinyl was easy to work with. I started clearing out the shifter opening but as I began the final stretch at the gauges, tragedy struck. There were just too many dips, curves and angles to contend with. Once I made the slits to open the gauges everything needed to go in different directions so I came up short. At that point, I decided that I couldnt save it. Although in hind sight I probably could have. Regardless, I ended up taking everything off to start fresh. Instead of attempting a single piece, I figured I should do it in two. However, this time I first put some inlays on the slope where the bottom gauges go as well as a piece on the bottom of the cigarette lighter. I got into a groove and didnt stop to take many pictures, but heres one after the first piece was done. I used a scrap piece to cover the traction control button separately. I just lined up the pattern of scrap piece with the main pattern, applied some heat and stretched the vinyl. And heres one of the entire piece finished. I should mention that I also cut a few small pieces where the triangles are along the back as they are visible when inside the car. Although it was tempting at first to leave the gauges in silver, I knew it wasnt how I wanted it to look. So I began the tedious process of piecing together the carbon fiber around the bezels. I do realize there is a bit of silver at the bottom of each gauge. However, I already was planning to get bezel trim to finish it off. But for now, heres how it looks back in the car. |
|
|
|
|
03-25-2024, 10:09 PM
|
#145 |

Drives: 2014 2SS/RS 6SP Ashen Grey Join Date: Aug 2021
Location: NY
Posts: 1,264
|
I am not a huge fan of carbon fiber on the interior, but I do think when done right and not covering everything it looks nice as is the case here. Nice Job.
__________________
GM 3.91/TrueTrac OEM ZL1 Rims, Brakes & Side Skirts.ACST4 Splitter/Deflectors NPP M2W,GM Short Throw,Remote Clutch reservoir
GPI Ported Rod Mod,BO White PTB,CAI/JRE Scoop, Moroso Catch Can GC Aluminum DS Stainless Works Ceramic LTH/HiFlo Cats SCT X4 Dynosteve, Hotckis 1" Springs & Chassis Max Brace BMR Adjustable Swaybars,Trailing Arms, Adjustable Toe Rod, LCA & Z28 UCA Bushings Hendrix Solid Cradle Bushings Pedders Radius Rod Inserts Strut tower brace Hero Smoked Tail and 3rd Brake Light, Diode Dynamic SL1 Fog Lights AeroForce Dual gauge/Autometer pillar mount. |
|
|
|
|
03-26-2024, 12:53 AM
|
#146 |
|
Drives: 2012 Chevrolet Camaro l99 Join Date: Aug 2020
Location: Austin, TX
Posts: 2,105
|
Looks really good. Nice job!
__________________
DSS FX Forged Pistons, Eagle ESP L19 Forged Rods, ARP Head and Main Studs, TSP PRC 260 CNC Ported Heads milled .030, Cometic .040 Head Gaskets, GPI SS3 VVT Camshaft, GM Performance Racing Lifters, CHE Trunnions , Molly Pushrods, Melling 10355HV Oil Pump, Cold Air Inductions CAI, Fast LSXR Intake Manifold, Nick Williams 103 TB, TSP 1 7/8" Longtubes with 3" TSP Exhaust, ZL1 Fuel Pump, Mishimoto Radiator, Mishimoto Oil Cooler, Tru Cool 40k Tranny Cooler, 3600 Circle D Converter, Fluid Dynamics Balancer
Build Thread https://www.camaro5.com/forums/showthread.php?t=609817 |
|
|
|
|
03-26-2024, 08:20 AM
|
#147 |
|
That stuff can be a pita to work with! you did a great job of adapting and getting it looking really good!
__________________
2014 Camaro SS L99, Ashen Grey w/Black Leather - Build thread - http://www.camaro5.com/forums/showthread.php?t=491561
Mods - GPI 416 w/Custom Grind Cam, Ported Heads & Tuned by Ben, Holley Dominator ECU, Mag Heartbeat, ZL1 Fuel Pump & DSX Aux Pump, NW 103 TB, FIC 1650's, Alky Meth, Circle D 3600 Triple Disc, Kooks Headers, Viking Coil Overs & all the BMR Goodies in the rear, Zl1 3.23 Diff, DSS Axles, Gulfcoast Driveshaft, Hendrix Offset Diff Bushings, AFE Solid Subframe Bushings, 875HP/843TQ 5FDP |
|
|
|
|
03-26-2024, 01:15 PM
|
#148 | |||
|
|
Quote:
Quote:
Quote:
|
|||
|
|
|
|
03-26-2024, 02:09 PM
|
#149 |

Drives: 2010 2SS/RS A6 Join Date: May 2019
Location: Hki.Finland
Posts: 952
|
Nice job.
|
|
|
|
|
04-20-2024, 11:40 AM
|
#150 |
|
|
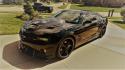
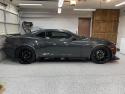
I got a little bogged down the last few weeks with some yard work. However, I took a couple days off earlier this past week to finally get the car out. The first order of business was to give it a good wash to get rid of all the dust and pollen. I did confirm that the water drains very quickly out of the rear quarter panel ports. After that, I broke out the orbital polisher for some minor paint correction and then threw on a fresh coat of wax. For good measure, I also used glass sealer on all the windows and put paint sealant on the wheels.
I then headed over to a local cruise night. I probably should have taken a picture from a different angle, because now that Im looking at this one it makes it seem like they blocked the entire parking lot section off just for me.  However, there were well over a hundred cars in the show. However, there were well over a hundred cars in the show.Anyway, the main reason for this post is I wanted to provide some feedback on the Dynamat as this was the first time I drove the car since installing it. I didnt get up on a highway, and it wasnt a long drive by any means but I can say it did significantly reduce the amount of vibrations. The best thing is I didnt hear the annoying sound of the rear deck resonating, which is really what I wanted to eliminate. The remaining vibrations appear to be coming from the doors and center console areas, but they are now back within my tolerance range. Since I have plenty of Dynamat leftover, I will probably put some on the doors next. The center console is mostly from the cupholder switch panel. That is held on with double sided tape, which was fine until I had to remove it at one point to rewire the panel. Since then, the tape doesnt hold as well so it has been prone to vibrate even before the motor mounts were swapped. |
|
|
|
|
04-22-2024, 10:19 AM
|
#151 | |
|
Anthony S

Drives: 2011 chevrolet camaro 2ss/rs Join Date: Apr 2021
Location: Chiefland, FL
Posts: 842
|
Quote:
__________________
Follow me on instagram @The_bald_eagle_machine
https://www.camaro5.com/forums/showthread.php?t=600181 Mods: Texas Speed 2 inch headers, high flow cats, and X-pipe. Custom mid-pipe, Borla Xr1 mufflers. Torqstorm Supercharger, 3.1" pulley, ZL1 fuel pump. MGW Shifter, Mcleod RST clutch, Tick master cylinder and Tick Billet bushing reinforced slave cylinder. DSS One-piece 3.5" Driveshaft, Metco Driveshaft safety loop, BCRacing Coilovers. BMR Poly Diff bushings, Poly Rear cradle bushings, Sub-frame connectors, Lower control arms, camber arms, and toe links. |
|
|
|
|
|
04-22-2024, 09:48 PM
|
#152 |
Drives: 2012 Camaro SS Join Date: May 2023
Location: KY
Posts: 78
|
Honestly I’ve never been a huge fan of yellow, but your car looks sick! Awesome job
__________________
2012 Camaro 2SS LS3 M6
|
|
|
|
|
04-23-2024, 10:39 PM
|
#153 | ||
|
|
Quote:
Quote:
|
||
|
|
|
|
04-24-2024, 06:07 AM
|
#154 | |
|
It dont come easy.

|
Quote:
This! 
__________________
 |
|

|
|
|
|
|
|
 |
|
|


