You are browsing camaro5 

|
 06-17-2013, 09:15 AM
|
#1 | ||
 
|
Voice Activated Halos (Talking Camaro Project)
Originally this was going to be a custom Halo setup but I didn't want to spend money on something I knew I could program myself. So I bought a new Arduino and it all began.
If you don't know what an Arduino is, it will be easier for you to google what an arduino is instead of me explaining. What to build this at home? First, You'll need an arduino: Arduino Mega: https://amzn.to/34Uiubo Arduino ADK: https://amzn.to/2YlgsyP Exhaust if you're interested: https://amzn.to/2DP2Wd7 Exhaust Forum: http://www.camaro5.com/forums/showthread.php?t=138109 __________________________________________________ ____ New Video added 08/1/2013 This video shows: -voice commands and the responses -The startup and shutdown sequence -the RPM match I added a lot of responses and made the logic a little more intelligent than the last time i made a video. Next step is installing the outdoor speakers so the sound wont come through the android but from behind the grill. __________________________________________________ __ Here's a quick clip of where I'm at now. Everything works BUT there is still SOO much more i can do. Her name is Shak1ra. __________________________________________________ __ Currently I can connect with any android device running the application i wrote to communicate with the arduino. The arduino is inside the glove compartment and is connected to my OBD2 for power and current vehicle readings... I actually spliced the wires behind the obd2 and only used the wires that i need. So i can still connect my obd diagnostics stuff to it without any harm or having to unplug anything... My Arduino can read ANY information that obd currently supports. Right now I'm using it to have a halo boot sequence whenever the car starts and and shut down sequence whenever i shut off the car. Also if I want i can tell it to have the halo react to me revving the engine. The higher the rpm the brighter the white or red lights will get. The way i connected the Arduino to the halos is through a custom circuit board i had to make. It allows the 5v arduino to control the 12v halo's using separate TIP102 transistors. I have had it running for the past two months straight with no hiccups. So, i'm about to start V2 which will begin communicating with my home server and change aspects of my house based on how my car is doing... For example if i'm low on gas I want my car to wake me up 15 minutes earlier so i will have time to stop at the gas station... If she senses another car is parked next to her she will notify my through my smart TV... I also want her to be able to politely ask people to be careful with their doors when they park next to me to avoid door dings... There are MANY more ideas which I do not want to give away just yet but I've been dying to get this out for you guys to see what you think. __________________________________________________ _____ How I did it First off I followed this tutorial to retrofit the headlights: http://www.camaro5.com/forums/showthread.php?t=201133 ^ That is a GREAT thread that completely helped throughout the whole process... 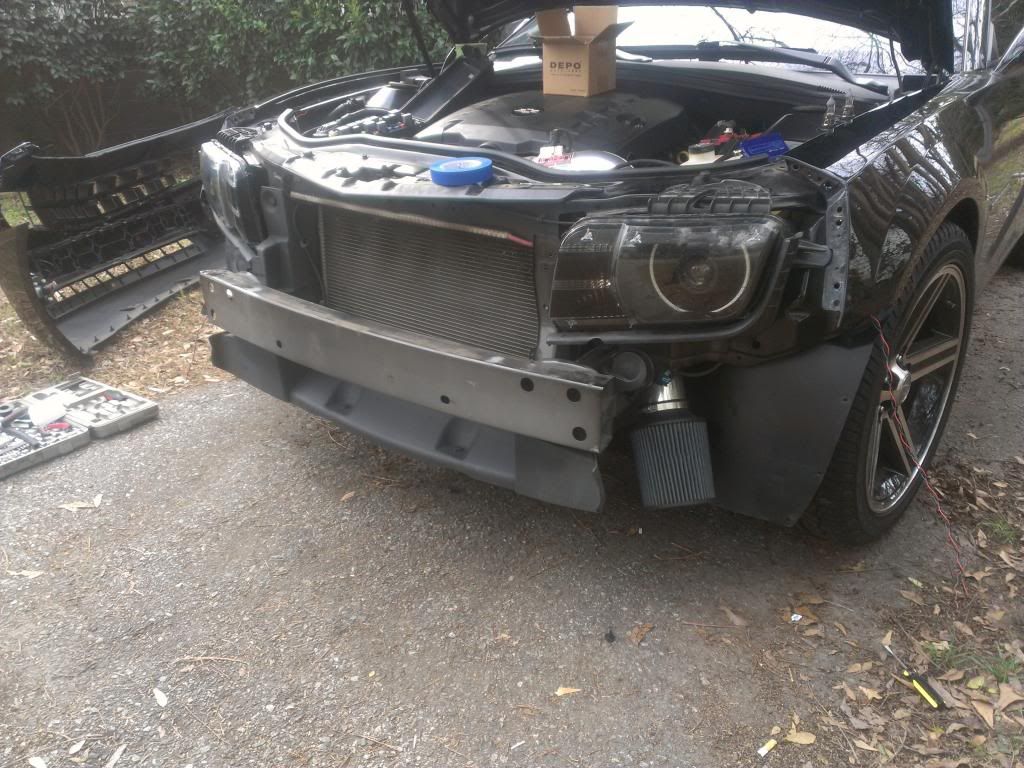 HEADS UP::: This plug for some reason didn't fit the factory plug and needed to be shaved down... if that happens to you don't worry 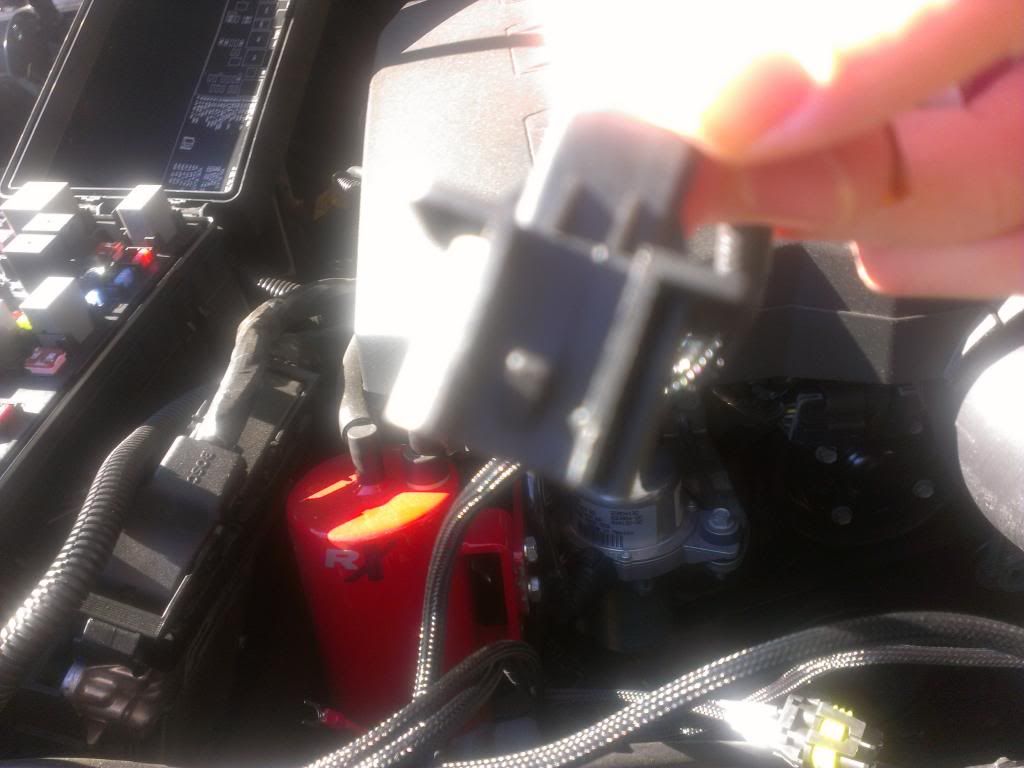 Here's the diagram of how I wired the halos to the Arduino and battery. This is for one pair of halos which includes the red and white... I wired the two headlights up together and the two foglight halos together... Each halo does not have its own(Which would have been cool and definitely would recommend it if you can handle it). 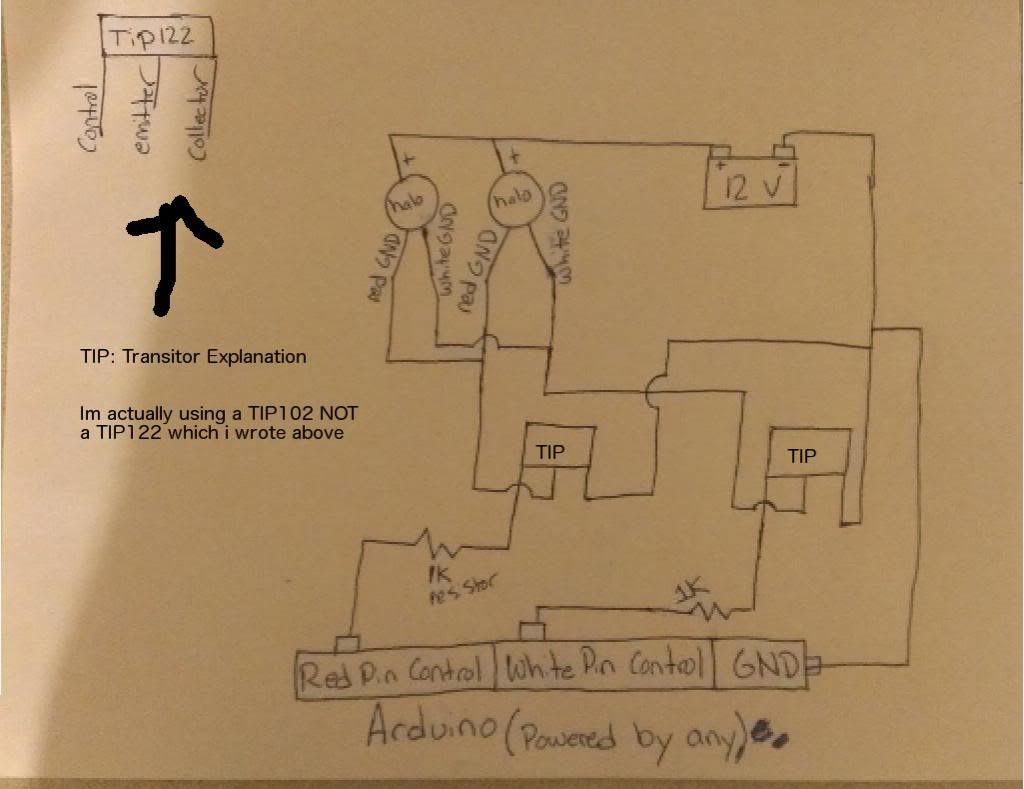 Heres a closup of the finished circuit: The green wires are the feeds in from the arduino... From top to bottom they are 1) Headlight Red halos 2) Headlight White halos 3) Foglight Red Halos 4 Foglight White Halos 5) Interior lights (So I can have all on same circuit board to be controlled from phone... Probably stupid to have interior lights on this... Thinking about changing it) 6) GROUND (The entire system needs to share the same ground... Obviously) The orange wires are all Grounds too.. The purple wires are all feeds from the transitors EMITTER to the Yellow wire which then connects to the grounds on the Halo. The thick red cable I have is going back inside the car to another circuit board i have that originally was converting 12v to 5v... I DO NOT RECOMMEND DOING THIS... I also ended up using OBD2 for power but forgot until I just looked at it again that i ended up connecting a cigarette lighter to the 12v cable and using a prebuild USB to convert to 5v... Please just use this way. I have tried all the different way and this is just easier and more reliable. 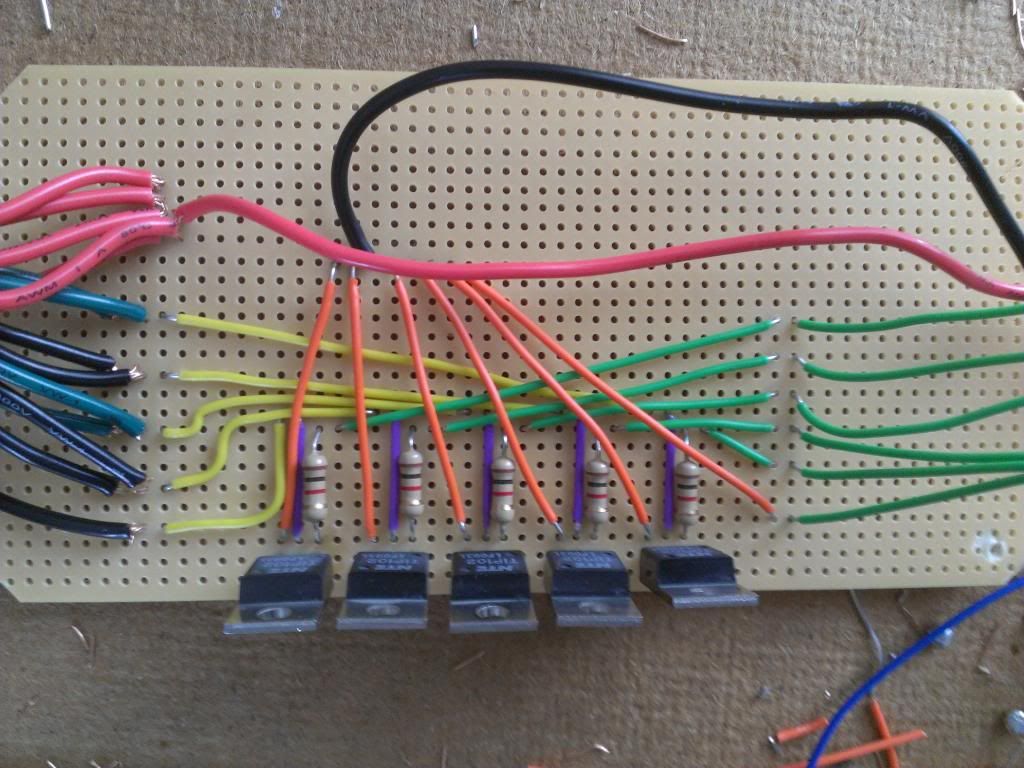 NOTE that in this image I have the circuit connected to an Arduino UNO but it is currently connected to an Arudino MEGA ADK This gives more Serial connections (Which is how bluetooth and OBD2 communicated with it.) 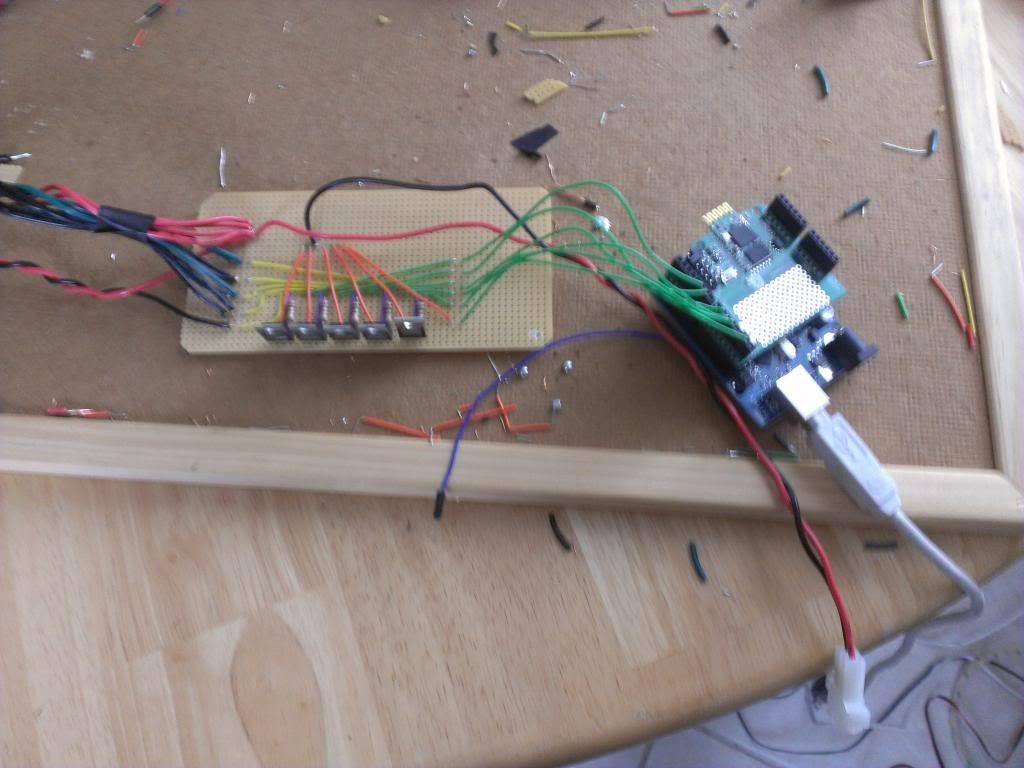 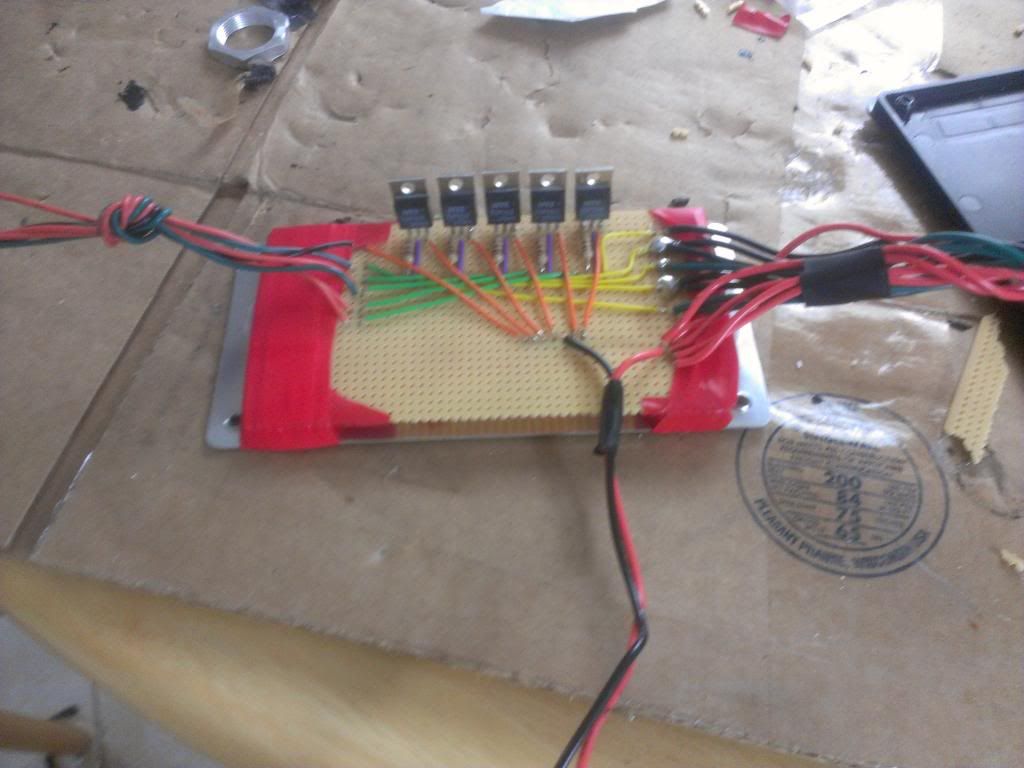 Box from radioshack to hold the circuit 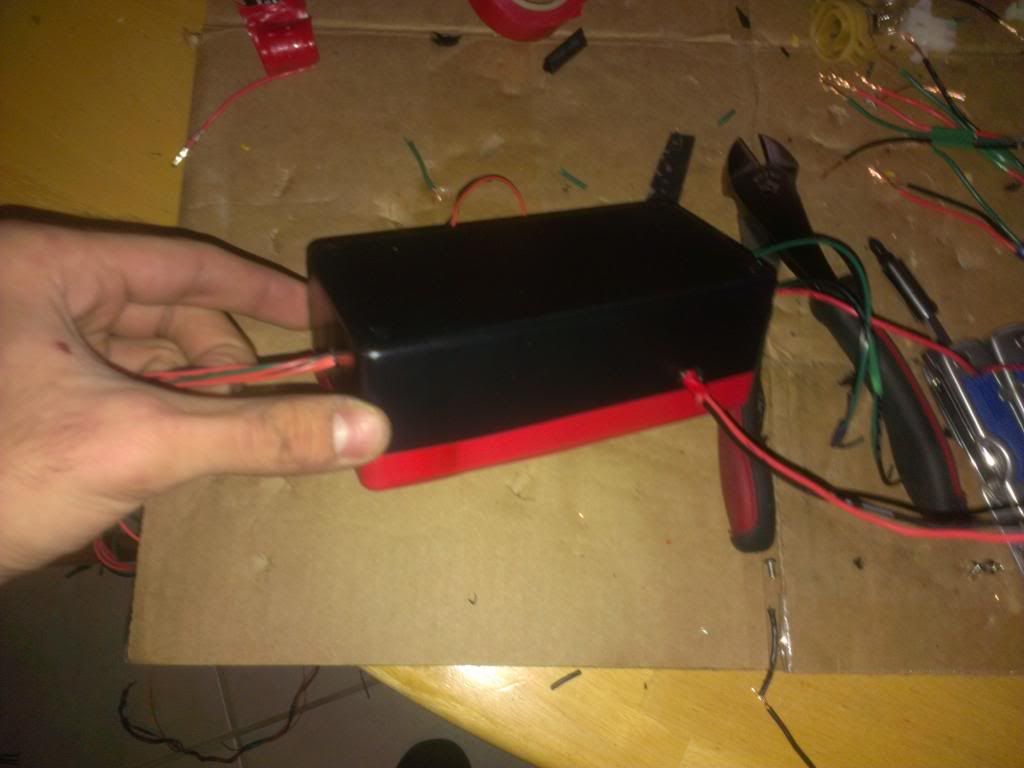 I places the board in the back left under the hood (Standing in front looking at the car) This can go through a small hole inside where the cabin air filter is... I didn't want to drill a hole in the firewall so I used this way to get under the hood. 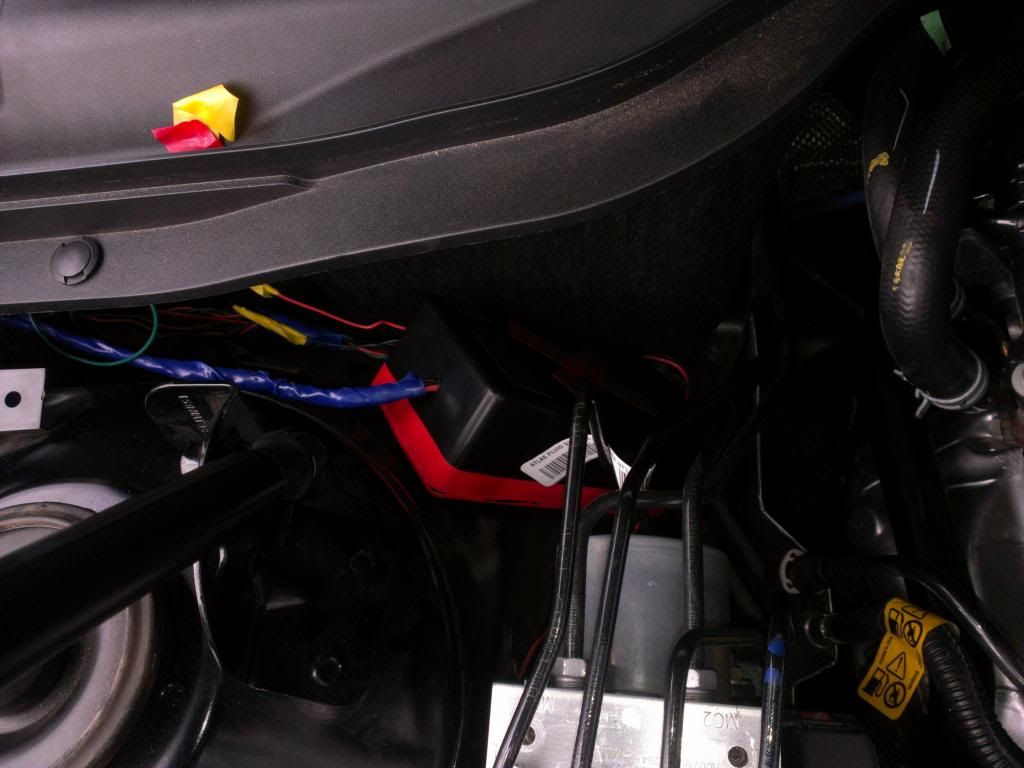 The cables will come out under the glove compartment which is where i have the arduino located... The pic below shows a little GUI I made to display what halo state I'm in while driving so i don't have to look at my phone BUT it looks stupid so I replaced it with a tablet. Since im using an Arduino ADK it has a preinstalled USB port for android communication. Im using MicroBridge instead of the ADK from google. So, to explain a little better... I have a bluetooth connecting to me cellphone which i can control it wirelessly but when i'm in the car I can control it through the tablets controls. I don't use the tablet that much because I haven't figured out a way to charge it while its hooked up yet... I might end up replacing the tablet with my old Evo which will charge while being used. 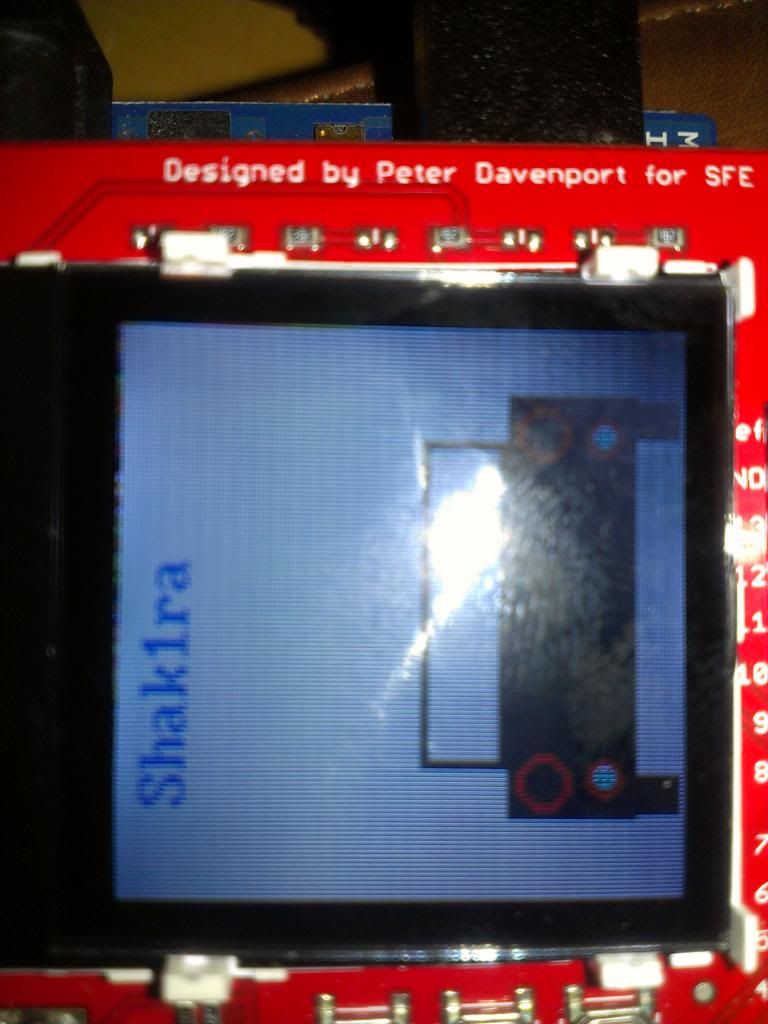 The end product: 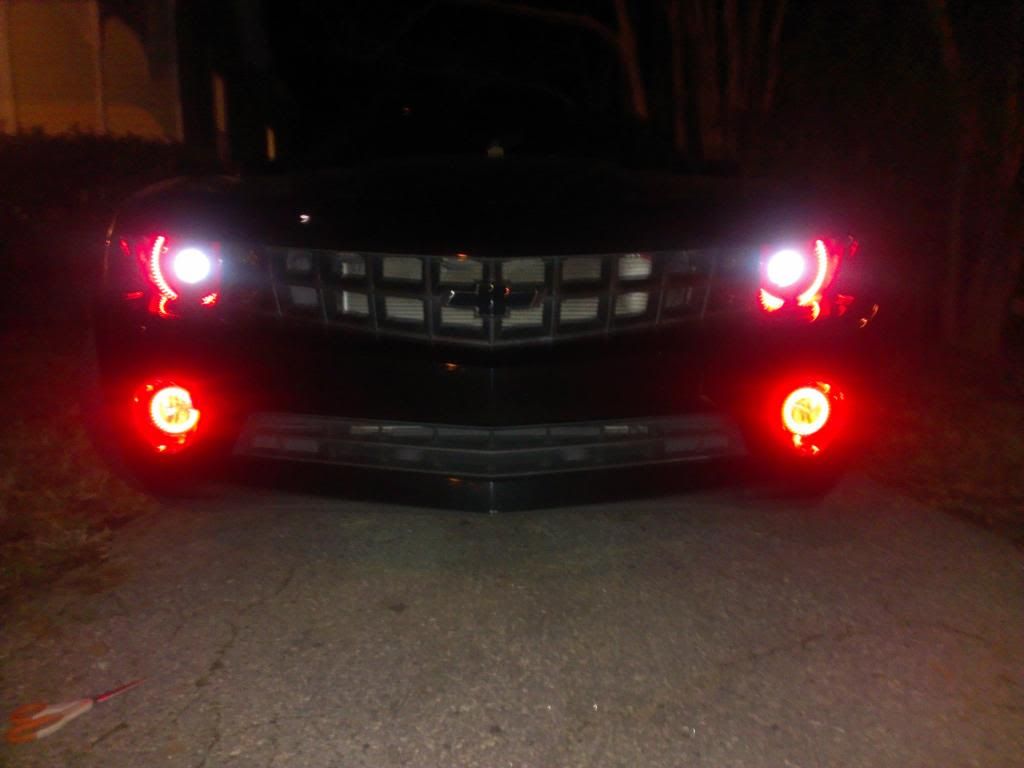 I want to add a control for my Knight rider lights and have a PA so the car will talk back instead of having to talk back through the phone I took a lot of pics so if there's anything else you guys wanna see just let me know! __________________________________________________ __
__________________
 Shak1ra - 2011 Camaro LS Jessica(The Black Pearl) - 2001 Camaro Last edited by Thewall279; 12-05-2019 at 09:19 AM. Reason: Amazon Links |
||

|

|
|
06-17-2013, 09:28 AM
|
#2 |
 
|
I believe you may be onto something here. Anyway that you can upload the code for your arduino? I have an old one that I was using for a sequence tail light project but I'm liking this project much more. Keep us updated on your progress. I may try to fiddle with mine to see if I can come up with something. Do you mind explaining a little more on how you have the arduino wired in? Thanks.
Sent from my iPhone |
|
|
|
|
06-17-2013, 09:42 AM
|
#3 |
|
COTW 12/3/12

Drives: 2012 Ashen Gray ZL1 Join Date: Aug 2011
Location: Glen Carbon, IL
Posts: 3,279
|
Wow! I have to say that is very unique and pretty cool. Nice job on a very creative mod!
__________________
 |
|
|
|
|
06-17-2013, 10:21 AM
|
#4 |
    
Drives: 2014 Summit White 2SS/RS M6 Join Date: Aug 2012
Location: @ ur moms house in VA
Posts: 1,405
|
i think i want this.
__________________
 |
|
|
|
|
06-17-2013, 10:50 AM
|
#5 | |

|
Quote:
Mind controlled by Cerebro
__________________
I solve problems for a living. Either accept my advice or go figure it out on your own.
|
|
|
|
|
|
06-17-2013, 11:01 AM
|
#6 |
|
Nobody of Interest

|
Very slick...
|
|
|
|
|
06-17-2013, 11:09 AM
|
#7 |
|
Drives: 2014 Summit White 2SS/RS M6 Join Date: Aug 2012
Location: @ ur moms house in VA
Posts: 1,405
|
i just hope that is not a self learning computer or what ever it is, that eventually will start to nag like the wife.

__________________
|
|
|
|
|
06-17-2013, 11:13 AM
|
#8 |
|
Drives: 2011 Camaro SS Join Date: May 2012
Location: Oxford, Mi
Posts: 78
|
I want this.
|
|
|
|
|
06-17-2013, 11:20 AM
|
#9 | |
|
|
Quote:
__________________
Shak1ra - 2011 Camaro LS Jessica(The Black Pearl) - 2001 Camaro |
|
|
|
|
|
06-17-2013, 01:05 PM
|
#10 |
|
Camaro CRAZY

|
Freaking AWESOME!!! Very nice system and sounds like it can do a lot more things. Some smart people here on C5
 
|
|
|
|
|
06-17-2013, 02:20 PM
|
#11 |
|
Drives: 2012 Summit White 1Ls Join Date: Jan 2012
Location: Diamond Bar, Cali
Posts: 898
|
Very nice work!!

|
|
|
|
|
06-17-2013, 02:52 PM
|
#12 |
|
US Veteran

Drives: 2011 Silver Ice Metallic 2SS/RS A6 Join Date: Jan 2011
Location: Bossier City, La
Posts: 1,407
|
That is crazy cool!
Is the car talking or the phone? It's hard to tell with the video.
__________________
Dear Lord, give me the strength to carry on despite my Camaro addiction!
JRE iTSX tune, full cat-less Dynatech exhaust, CAI intake, Stillen Slotted/Drilled Rotors, RB braided brake lines, BMR lowering springs, (reserved for definite future MODS) |
|
|
|
|
06-17-2013, 06:34 PM
|
#13 | |
|
|
Quote:
__________________
Shak1ra - 2011 Camaro LS Jessica(The Black Pearl) - 2001 Camaro |
|
|
|
|
|
06-17-2013, 06:44 PM
|
#14 |

Drives: '14 SIM 2LT/RS Vert Join Date: Aug 2010
Location: Concord, NC
Posts: 1,412
|
Very cool!
__________________
 |
|
|
|
|
|
|
|
 |
| Tags |
| arduino, halos, talking car |
|
|


