You are browsing camaro5 

|
 09-25-2010, 12:00 AM
|
#57 |
|
Madman
|
keep up the good work... and thanks for providing info and all to those that may want/need it..
Rick Last edited by Alfieboy; 09-25-2010 at 12:00 AM. Reason: spelling |

|

|
|
09-25-2010, 12:01 AM
|
#58 |
                  
|
wow, that looks awesome, I like it.
__________________
Jannetty Racing JRE Street Package
 |
|
|
|
|
09-25-2010, 11:31 AM
|
#59 |
|
I am the Stig

Drives: Black w/ IOM stripe 1SS Join Date: Jan 2010
Location: Saskatoon, SK, CAN
Posts: 1,312
|
thanks Alfie Thats what forums are for! when I built my first v8 s10 a few years ago I learned pretty much everything I needed to know from a forum. So I try to contribute things I come across whenever I can.
 I also got my street scene billet grill and I picked up a stock one as well to muck around with. It's starting to get cold though, I'm not sure if I'll be able to take a crack at the grill setup before winter hits. we'll see though.
__________________
2010 Camaro - 1SS, Black w/ Orange stripes
 |
|
|
|
|
09-25-2010, 05:20 PM
|
#60 |
|
I am the Stig
Drives: Black w/ IOM stripe 1SS Join Date: Jan 2010
Location: Saskatoon, SK, CAN
Posts: 1,312
|
Ok so I made a bit of progress today. Got the billet piece trimmed to fit between the lights, so I popped off my bowtie and sat it in place. Then broke out the cardboard and masking tape and started to plan out the shape for the trim piece I'm going to make to go around the bottom and side of the grille. My hope is that this piece will tie in the lights to the grill with a nice transition and mimick the look of the heritage grill (or a weak homage anyway haha)
my plan is to take the extra stock grille I've got and trim out the center so I can set the billet piece INTO it. making the billet flush with where the stock grill would sit. Then make a trim piece to curve around the lights, and bottom of the billet section as a transition. This picture is a bit misleading because the billet piece will be set back further (probably about 1/2" to 3/4") so the bottom of the trim piece will extend more towards the center of the car. I plan to follow the line that the bottom of the headlight makes until it intersects with the grille. This was just a first crack at looking at shapes to see what sort of lines will work and what doesn't. Let me know what you guys think. I'm a little bit closer! haha
__________________
2010 Camaro - 1SS, Black w/ Orange stripes
|
|
|
|
|
09-25-2010, 05:22 PM
|
#61 |

Drives: 2014 Z/28 #82+#192, 18ZLE 66Nova Join Date: Oct 2008
Location: By the lake in AZ
Posts: 15,719
|
Looking good.
|
|
|
|
|
10-16-2010, 02:52 AM
|
#62 | |
|
Faith Keeper

Drives: 2012 Silverado LTZ, 2010 2SS/RS Join Date: Nov 2008
Location: Saskatoon, Saskatchewan Canada
Posts: 2,764
|
Very Nice!
__________________
Quote:
|
|
|
|
|
|
11-19-2010, 01:42 PM
|
#63 |
|
I refuse to go smurfy

Drives: 2009 Challenger SRT8, 2010 Camaro Join Date: Nov 2009
Location: MD
Posts: 1,311
|
I like it (used to own a E46 4 door
 ), just needs that finishing touch on the inside edge...time to hone your fiberglassing skills!!! Then you can market a kit ), just needs that finishing touch on the inside edge...time to hone your fiberglassing skills!!! Then you can market a kit 
__________________
 -Bill...the Camaro was my wifes, now she's got a minivan Challenger- 2009 Dodge Challenger SRT8 Procharger D1 Supercharger: 10.895 @ 126.720 MPH |
|
|
|
|
11-22-2010, 11:58 AM
|
#64 |
|
I am the Stig
Drives: Black w/ IOM stripe 1SS Join Date: Jan 2010
Location: Saskatoon, SK, CAN
Posts: 1,312
|
Thanks folks!
well unfortunately I didn't get to it in time, and have no heated garage. She's asleep for the winter now but it'll be the first thing I get crackin' on in the spring.
__________________
2010 Camaro - 1SS, Black w/ Orange stripes
|
|
|
|
|
05-08-2011, 04:35 PM
|
#65 |
|
I am the Stig
Drives: Black w/ IOM stripe 1SS Join Date: Jan 2010
Location: Saskatoon, SK, CAN
Posts: 1,312
|
SO, I've made some progress and I thought I'd update this thread because I've had a few people message me for some advice on how I did this so it may come in handy for them.
Finally settled into the new house and lovin' the garage. Over the last couple of weekends I've had a couple hours to spare to work on my grille. First I took the billet grille and trimmed it to the size I needed. Then took a spare stock grille and cut out the middle, then grafted the two together. The top bar is screwed/bolted together, and the bottom bar is epoxied. I thought that was the best way to graft them together because it turned out very solid, and I'm still utilizing all the stock mounting points from the stock setup. (i.e. if I ever wanted to change back I could.) Here's what my hybrid grille system looks like.  Then the next step was to fit it on the car. This only took about a half hour because it's just like doing a stock replacement, no more modifications needed to the fascia. I'm getting rather quick at taking this front fascia off since I've done it about 50 times now haha. here's the new grille mounted on the car. 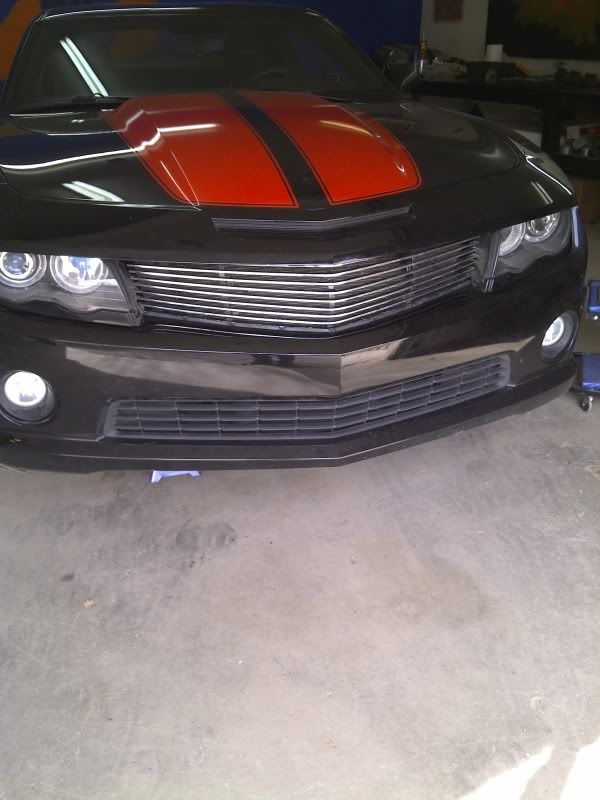 Now don't freak out (I know someone out there is) this still isn't done. haha but it looks pretty good so far I think. This morning I had a chance to get to mocking up the piece I'm going to add to the fascia. I put the emblems in place, they're just sitting there for now with tape, but it looks like they're going to be very easy to mount. piece of aluminum across the back with a screw will do nicely to hold them in. The cowl is made from cardboard right now and is still rough. I had some black paint laying around so I painted it just so I could get a better idea of what I was working with. So here's what it will look like in the end. (just imagine the cardboard is shiny black fibreglass) 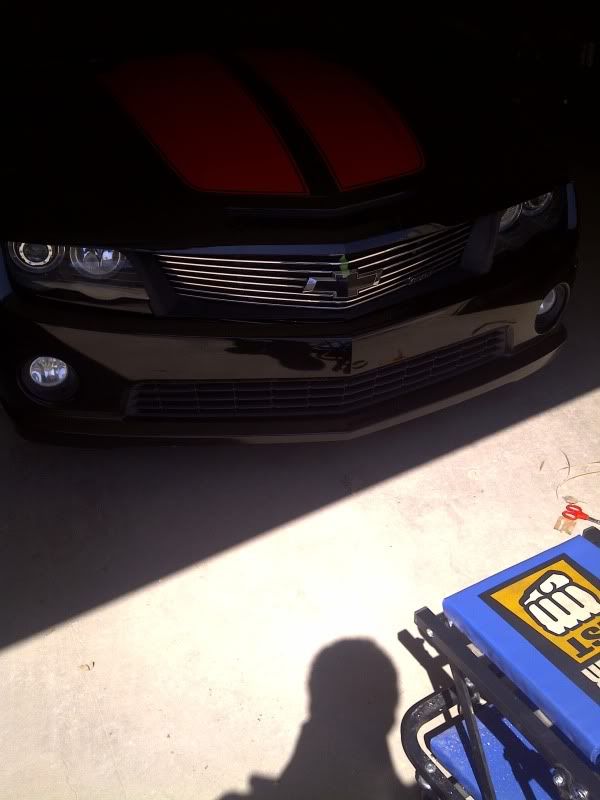 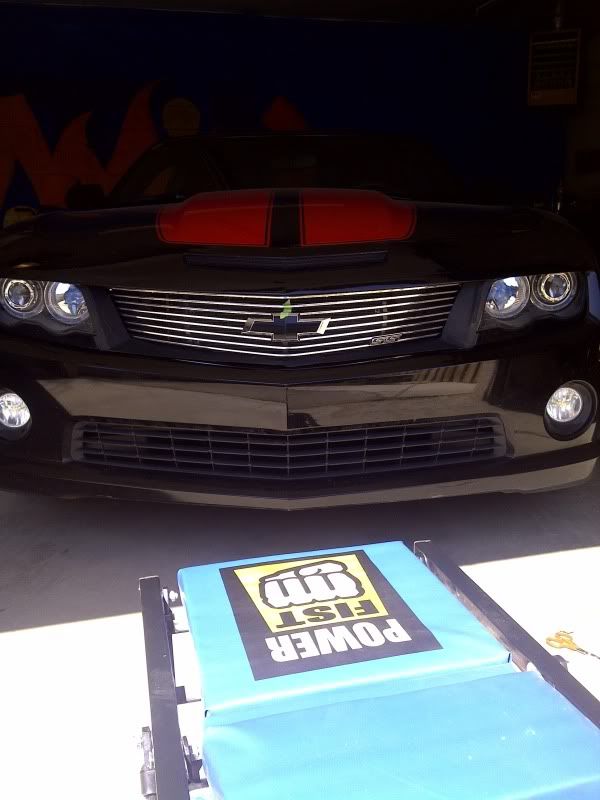 Next step is to turn that cardboard prototype into a fibreglass piece. Bondo and paint it and it's done!! Getting closer every day. Thanks for all the comments and PM's with your support!
__________________
2010 Camaro - 1SS, Black w/ Orange stripes
|
|
|
|
|
05-08-2011, 04:39 PM
|
#66 |

Drives: RS (11/15/10) Join Date: Mar 2010
Location: Baton Rouge,LA
Posts: 574
|
OH my god,... it s beautiful amazing work
__________________
TEAM LLT
Nov.15th 2010 -- Check out my build thread http://www.camaro5.com/forums/showthread.php?t=116235 |
|
|
|
|
05-08-2011, 04:52 PM
|
#67 |
|
I am the Stig
Drives: Black w/ IOM stripe 1SS Join Date: Jan 2010
Location: Saskatoon, SK, CAN
Posts: 1,312
|
Thanks man!
this one is taking me alot longer than I wanted to finish it, but I think it'll be worth the wait. Knowing there's not a single other camaro out there that looks like this makes me very happy haha.
__________________
2010 Camaro - 1SS, Black w/ Orange stripes
|
|
|
|
|
05-08-2011, 04:53 PM
|
#68 |
|
Account Suspended
Drives: 2010 Camaro 2SS/RS 6MT Join Date: Apr 2010
Location: Westchester, New York
Posts: 3,715
|
Definitely looks better with the grille extended forward to match how much they stick out.
|
|
|
|
|
05-08-2011, 08:09 PM
|
#69 |
|
Airborne Pathfinder

Drives: Camaro ZL575 Join Date: Nov 2009
Location: San Benito, TX
Posts: 1,139
|
that does look pretty good, was getting kinda worried. The dual headlights look nice on the camaro.
__________________
2010 Camaro Indy 500 Pace car, LS3-ZL575
Other cars are- 95 BMW 325 sedan- AA exhaust, AA CAI, AA Strut bar, AA chip, M3 rotors and calipers, racing clutch, oversized injectors, upgraded M3 interior- Audi A4 SLine, with black out optics |
|
|
|
|
05-08-2011, 09:14 PM
|
#70 |
|
Mark it ZERO!

|
Looking good
__________________
 |
|
|
|
|
|
|
|
 |
|
|
 Similar Threads
|
||||
| Thread | Thread Starter | Forum | Replies | Last Post |
| Restoring Headlights with Headlight Armor Lighting Protection | HeadlightArmor | Cosmetic Maintenance: Washing, Waxing, Detailing, Bodywork, Protection | 3 | 01-12-2016 11:58 AM |
| Headlight conversion completed!! change your Non RS headlights to a RS Bi-Xenon!! | ottobody | Cosmetics and Lighting Modification Discussions | 150 | 10-28-2010 09:13 PM |
| LT headlight to RS/SS headlight conversion? | SDCamaro10 | Cosmetics and Lighting Modification Discussions | 3 | 06-29-2010 07:25 PM |
| NON-RS to RS headlight conversion kit | ottobody | Exterior Parts & Accessories | 31 | 05-19-2010 11:23 AM |


