You are browsing camaro6 
 04-26-2016, 03:53 PM
|
#57 |
|
The Dogfather
Drives: #1 off the line for a customer. '16 Join Date: Oct 2015
Location: Andover, KS
Posts: 2,621
|
I have used the dashcam hardwire kit from the dashcamstore, I did not install it myself but the guy installing it said that it harder to pull things apart and put it back together than installing it haha. It is a 4k camera however I recorded this @ 1080p due to being able to record more than double the time with it haha. I can also record it with no audio OR just roll up my windows, the wind noise ruins the videos, so I am just sharing the one with less wind noise:
https://youtu.be/zWVUHcrlUTc |

|

|
|
05-01-2016, 09:19 AM
|
#58 | |
 Drives: Camaro 2016 2SS Join Date: Feb 2016
Location: Pittsburgh PA
Posts: 129
|
Quote:
|
|
|
|
|
|
05-08-2016, 04:48 PM
|
#59 |
 
|
if anyone is interested Ive found a pretty clean way to install a Escort RD with their hardwired smartcord. Possibly even easier than the mirrortap/console way.
|
|
|
|
|
05-08-2016, 04:59 PM
|
#60 | |
       
Drives: Wife's 14' IS 250 Join Date: Mar 2014
Location: PSL, FL
Posts: 2,207
|
Quote:
Post info here, or a link of your post.
__________________
2016 Camaro HBM A8, 2SS, NPP, Sunroof, Kalahari Interior/kneepads, Black bowties, 56v:
-11% tint all around Ordered 2/06/16 Built on 3/22/16 Adopted 4/07/16 Sold on 2/05/16: 2014 Camaro SW L99, 2SS, RS, NAV, Inferno Orange Interior: -Borla ATAK catback -Range AFM delete -15% tint all around -Red LED interior bulbs -55k white Cree LED fogs -License plate LED bulb swap -12" Sub Kit, BA amp swap -Oracle ghosted LED sidemarkers |
|
|
|
|
|
05-08-2016, 07:17 PM
|
#61 |
|
|
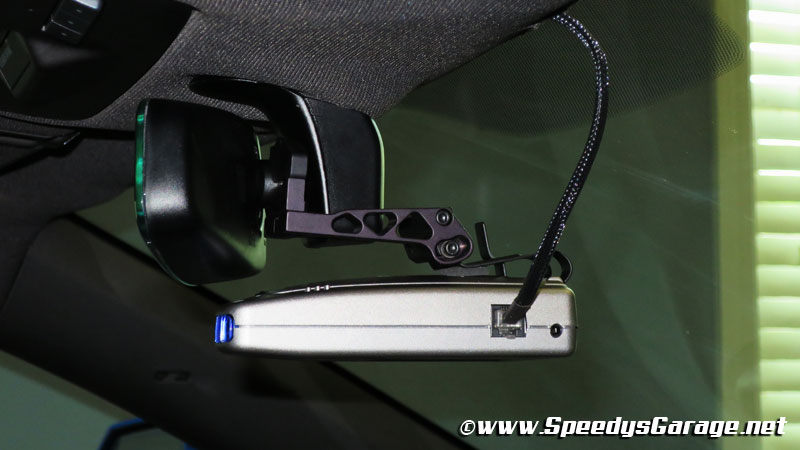
Installing a hardwired Escort RD is pretty easy with their smartcord. Its pretty nice to have a button located other than the top of the windshield, which is the main reason going this route.
The most difficult part was finding a switched wire near the kickpanel. Im used to a fuse box being located around there never the less, there is one. First thing I started with was finding a good location to mount the Mute button. I found the best spot was just below the push start button under the small step there. for the cleanest install, unscrew the mute button housing, and pull the shell apart. Take care in doing so as the decal in front is attached to both sides. once apart find the location you want to attach under the step there and drill a small 1/8th hole through the top shell, and the step in the dash. If you want to remove it later, there will be no visible mark, being located under the step.    with a small screw (i used a small panhead) attach the top of the shell to the dash. put the button and bottom shell back together and replace the single screw. route the wires into the dash by the right side of the steering wheel. the ground wire is run to where the hood release is. there is a screw holding the plastic to the subframe, remove that and put the ring of the ground wire there in between the plastic and subframe. replace screw.  for the power wire, the switched 12v one I found is the green with purple stripe wire coming out of the black connector (in the picture its the one with the purple snap connector attached)  Next run the "telephone" wire up the a-pillar on the door side. Its relatively easy to pull the weather stripping back and push the wire in. At the top of the a-pillar, push the headliner in to snake the wire to the other side of the a-pillar. lastly run the wire by way of the headliner to where ever you place your RD. Push leftover wire under the headliner.  If you have any questions let me know. |
|
|
|
|
05-12-2016, 01:50 AM
|
#62 |
|
Drives: '16 2SS Join Date: Nov 2009
Location: Orange County CA
Posts: 699
|
These aren't cheap but they look awesome. I don't see the frame-less On-star mirror in their GM offerings but maybe they can do it.
   Would be a nice solution for people who want to use a detector and dash cam.
__________________
My Intro Post | My Order | My Ordering Guide
TJCR2Q | 2SS Red Hot|Adrenaline Red|MX0 A8|56R Wheels|5ZU Blade Spoiler|NPP Exhaust|F55 MRC|IO6 Nav 4/06/16 1100 Ordered (waiting for 5ZU acceptance) 4/19/16 2000 Accepted with 5ZU 4/23/16 3000 TPW:5/16/16 5/06/16 3100 5/13/16 3400 Broadcast Sheet 5/24/16 3800 Vehicle Produced 5/25/16 4B00 Bayed 5/27/16 4300 Intermediate Delivery 7/9/16 Delivered! |
|
|
|
|
05-18-2016, 10:08 AM
|
#63 |
 Drives: 2016 Camaro 2SS Join Date: May 2016
Location: Tampa, FL
Posts: 10
|
CME73: Your install looks great. How did you know to use the green with purple striped wire for your hot connection? Do you know what that wire is connected to? I am hesitant to connect to an unknown wire, for fear of causing a problem somewhere else. I am trying to find the wire that goes to the accessory (cigarette lighter) socket, but cannot locate any wiring diagrams online. Thanks.
|
|
|
|
|
05-18-2016, 11:34 AM
|
#64 |
|
Sure, why not?

Drives: 2016 Camaro 2SS, Jeep JKU Rubicon Join Date: Mar 2015
Location: SE Mass
Posts: 1,538
|
CME73, great info! Thanks!
 I can't contribute much to this, except to offer a link to the kind of wire taps that I like and have used on various motorcycles where they have withstood much more bad weather and vibration than one would have inside a Camaro. Everything I have tried from these folks has been excellent. No connection, just a happy customer: http://www.posi-products.com/
__________________
This is that witty and clever statement that makes you chuckle.
|
|
|
|
|
05-19-2016, 08:22 PM
|
#65 | |
|
|
Quote:
|
|
|
|
|
|
05-26-2016, 01:51 PM
|
#66 |

|
CME73: Just finished your install. The included green snap connector that came with my install was to big for the gauge of wire so I had to modify it a little. Was that purple snap the one that came with yours?
__________________
Adrenaline Red
20" 5 Spoke Black Black Side Spear Dual Mode Exhaust MRC Splash Guards  1G1FG1R74G0124089 |
|
|
|
|
05-28-2016, 09:45 PM
|
#67 | |
|
|
Quote:
|
|
|
|
|
|
06-12-2016, 12:19 PM
|
#68 |
|
FASTER!

Drives: Challenger Hellcat, 2SS Camaro Join Date: Apr 2008
Location: Middle Tennessee
Posts: 2,245
|
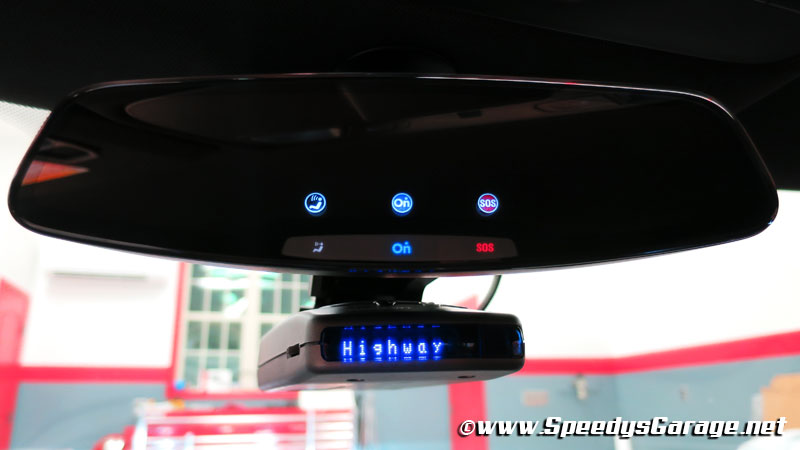
Got mine done last night. Thanks for the tip on the wires to get power and ground. Saved me some time poking around with the MM. Really surprised there were now 12V sources at the mirror connection.
__________________
-Speedy
2016 Go Mango Challenger Hellcat (PB E.T. in 1/4 Mile 9.83 @ 140MPH) |
|
|
|
|
07-21-2016, 02:03 PM
|
#69 | |

Drives: 2017 1LE SS Join Date: May 2014
Location: Las Vegas, NV
Posts: 621
|
Is that the 8500 ? I have my blend mount kit sitting on kitchen table. Was wondering if it was worth buying the Smart Cord live direct wire and incorporating that as well, so as to get the real time reporting also. Looks sharp!
Quote:
__________________
'If one day the speed kills me, don't cry. Because I was smiling.' - Paul Walker
|
|
|
|
|
|
07-21-2016, 05:09 PM
|
#70 |
|
FASTER!
Drives: Challenger Hellcat, 2SS Camaro Join Date: Apr 2008
Location: Middle Tennessee
Posts: 2,245
|
It is the 8500. I made my own cable for about $2. I posted a video on the forum somewhere.
__________________
-Speedy
2016 Go Mango Challenger Hellcat (PB E.T. in 1/4 Mile 9.83 @ 140MPH) |
|
|
|
|
|
|
|
|
Post Reply
|
|
|


