You are browsing camaro6 
 04-24-2017, 07:55 PM
|
#15 | |
  Drives: New : 2017 SS 1LE Old: 2012 TTRS M6 Join Date: Oct 2015
Location: Calgary/Vancouver
Posts: 810
|
Quote:
Gen5.... Would love a solution ... I think a fair few folks would pay good $$$ for a kit... My installer needs more info to proceed... 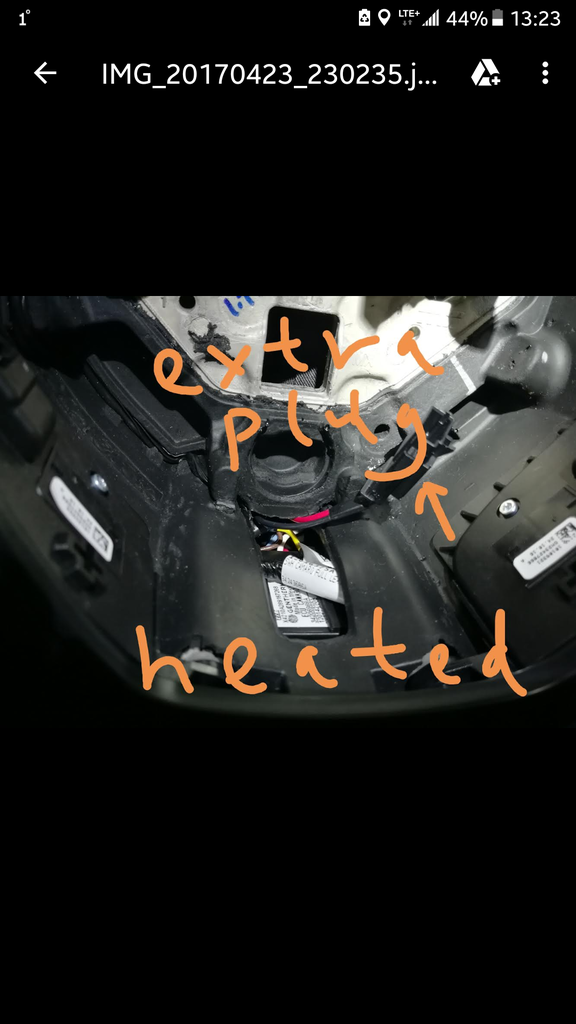 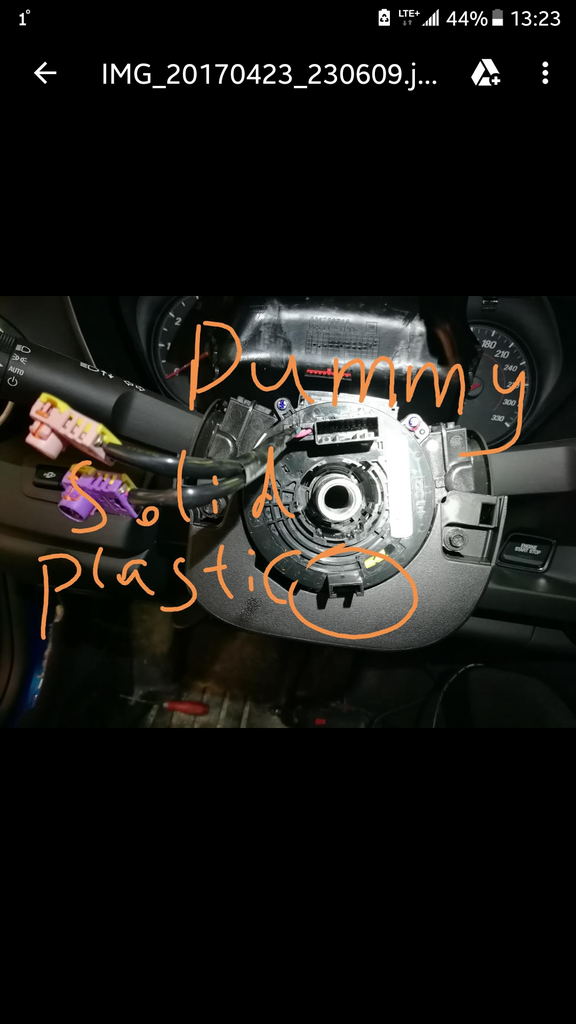 http://i206.photobucket.com/albums/b...424-132312.png 
__________________
.
. https://www.wheelwell.com/profile/56...ed9c3a/garage/ . . Project 1LE Wraith: http://www.camaro6.com/forums/showthread.php?t=474068 |
|

|

|
|
04-25-2017, 02:28 PM
|
#16 |

Drives: 2014 Z/28 #82+#192, 18ZLE 66Nova Join Date: Oct 2008
Location: By the lake in AZ
Posts: 15,719
|
Did you know you will need a 7.5 amp fuse to make this work, maybe.
Last edited by 2SSRS@Gen5diy; 04-25-2017 at 04:51 PM. |
|
|
|
|
04-27-2017, 09:02 AM
|
#17 | |
 
Drives: 2017 1SS 1LE Join Date: Jun 2016
Location: Detroit, MI
Posts: 1,001
|
Quote:
DO NOT do anything to the wires/connectors shown in your 3rd pic. The black one is all of your other steering wheel controls, and the yellow one is your airbag. You will for sure want the new clock spring that has the proper connections and will allow you to turn the wheel while without risk of breaking any wires. Another note to anyone who installs the new clock spring: MAKE SURE THE CLOCK SPRING IS NOT ALLOWED TO ROTATE PRIOR TO INSTALLING!!!! If the clock spring is not at it's centered position when installed, it will break the connection inside the clock spring if the wheel is turned between the two steering stops. This means that you will have no airbag and no steering wheel controls.
__________________
2017 SS 1LE.
Last edited by Alpha1BC; 04-27-2017 at 10:09 AM. |
|
|
|
|
|
04-27-2017, 02:23 PM
|
#18 |
|
Drives: 2014 Z/28 #82+#192, 18ZLE 66Nova Join Date: Oct 2008
Location: By the lake in AZ
Posts: 15,719
|
We ordered all the part on Monday, they will be here next week, we think we can do it with out replacing the clock spring, will let you know soon.
|
|
|
|
|
04-30-2017, 11:10 AM
|
#19 | |
|
Drives: 2017 1SS 1LE Join Date: Jun 2016
Location: Detroit, MI
Posts: 1,001
|
Good news! I was able to confirm that it is indeed just 12V that needs to be supplied to the heater connector.
Quote:
__________________
2017 SS 1LE.
|
|
|
|
|
|
05-01-2017, 03:34 PM
|
#20 |
|
Drives: 2014 Z/28 #82+#192, 18ZLE 66Nova Join Date: Oct 2008
Location: By the lake in AZ
Posts: 15,719
|
We got the parts in, and you will need to upgrade the clock spring, it has the 2 wires needed to supply both 12+ and ground for the heater, PS on the colome side in the new harness coming out of the clock spring, is a fuss holder for the new fuss, its built inline, not all that is needed is to get the connector and run the wires back to power and ground.
|
|
|
|
|
05-02-2017, 03:35 PM
|
#21 | |
|
Drives: 2014 Z/28 #82+#192, 18ZLE 66Nova Join Date: Oct 2008
Location: By the lake in AZ
Posts: 15,719
|
Quote:
GM got smart and installed a lock out clip to keep you from doing that. |
|
|
|
|
|
05-29-2017, 04:43 PM
|
#22 |
 
Drives: 2016 1LT V6 6MT Convertible Join Date: Aug 2016
Location: New York City
Posts: 95
|
Anyone know if you can install a heated wheel on a non-heated car? I have a suede wheel that I want to install on my 1LT, but the suede wheel is heated.
I don't need the heat to work, I just want to install the suede wheel. Do all the plugs match up? Do I need a different airbag? |
|
|
|
|
05-29-2017, 05:48 PM
|
#23 | |
|
Drives: 2016 1LT V6 6MT Convertible Join Date: Aug 2016
Location: New York City
Posts: 95
|
Quote:
|
|
|
|
|
|
05-29-2017, 09:16 PM
|
#24 |
|
Drives: 2016 1LT V6 6MT Convertible Join Date: Aug 2016
Location: New York City
Posts: 95
|
Bump
Bump
|
|
|
|
|
05-31-2017, 07:14 AM
|
#25 | ||
|
Drives: 2017 1SS 1LE Join Date: Jun 2016
Location: Detroit, MI
Posts: 1,001
|
Quote:
Quote:
From there, it's just a matter of plugging everything else in.
__________________
2017 SS 1LE.
|
||
|
|
|
|
06-09-2017, 04:30 PM
|
#26 | |
|
Drives: 2016 1LT V6 6MT Convertible Join Date: Aug 2016
Location: New York City
Posts: 95
|
Quote:
Thanks for confirming. Getting heat to work would be nice, but it's good to know that I can get the.wheel installed just fine. Last edited by ny tdi; 07-07-2017 at 08:33 AM. |
|
|
|
|
|
04-13-2021, 03:07 PM
|
#27 |
|
Patriot

Drives: 2019 Camaro 1SS 1LE Join Date: Sep 2020
Location: Texas
Posts: 136
|
Reviving an old thread for some help. So I’m trying to use one of my rev match paddles as a two step momentary switch. I’ve already confirmed this will work. Simply looking for a way to route two wires for the two step through the steering column to connect to the paddle switch. Any ideas or solutions.
|
|
|
|
|
11-14-2021, 05:24 PM
|
#28 |
 
Drives: 2016 Camaro LT V6 Join Date: Oct 2021
Location: West Covina
Posts: 25
|
Interesting post. I have a 2016 LT with the V6 and when I looked at the fuse box I had fuses for a sunroof and heated wheel although my car has none of these. Maybe I can simply swap for a heated wheel since the fuses are already there and I can see they have connections in the fuse box because there is metal where the fuses are to power them up already s
|
|
|
|
|
|
|
|
|
Post Reply
|
|
|


