You are browsing camaro6 
 08-29-2023, 06:42 PM
|
#1 |
|
Electrical Engineer

Drives: 2023 1SS A10 Black Join Date: Apr 2022
Location: Illinois
Posts: 775
|
Welcome to the audio and acoustic build log for my 2023 SS Camaro. This will be long, with a lot of photos, because that is how all of my build logs are. �� Here are some pics of the car, I went with a black exterior with gray rally stripes and a gray interior:
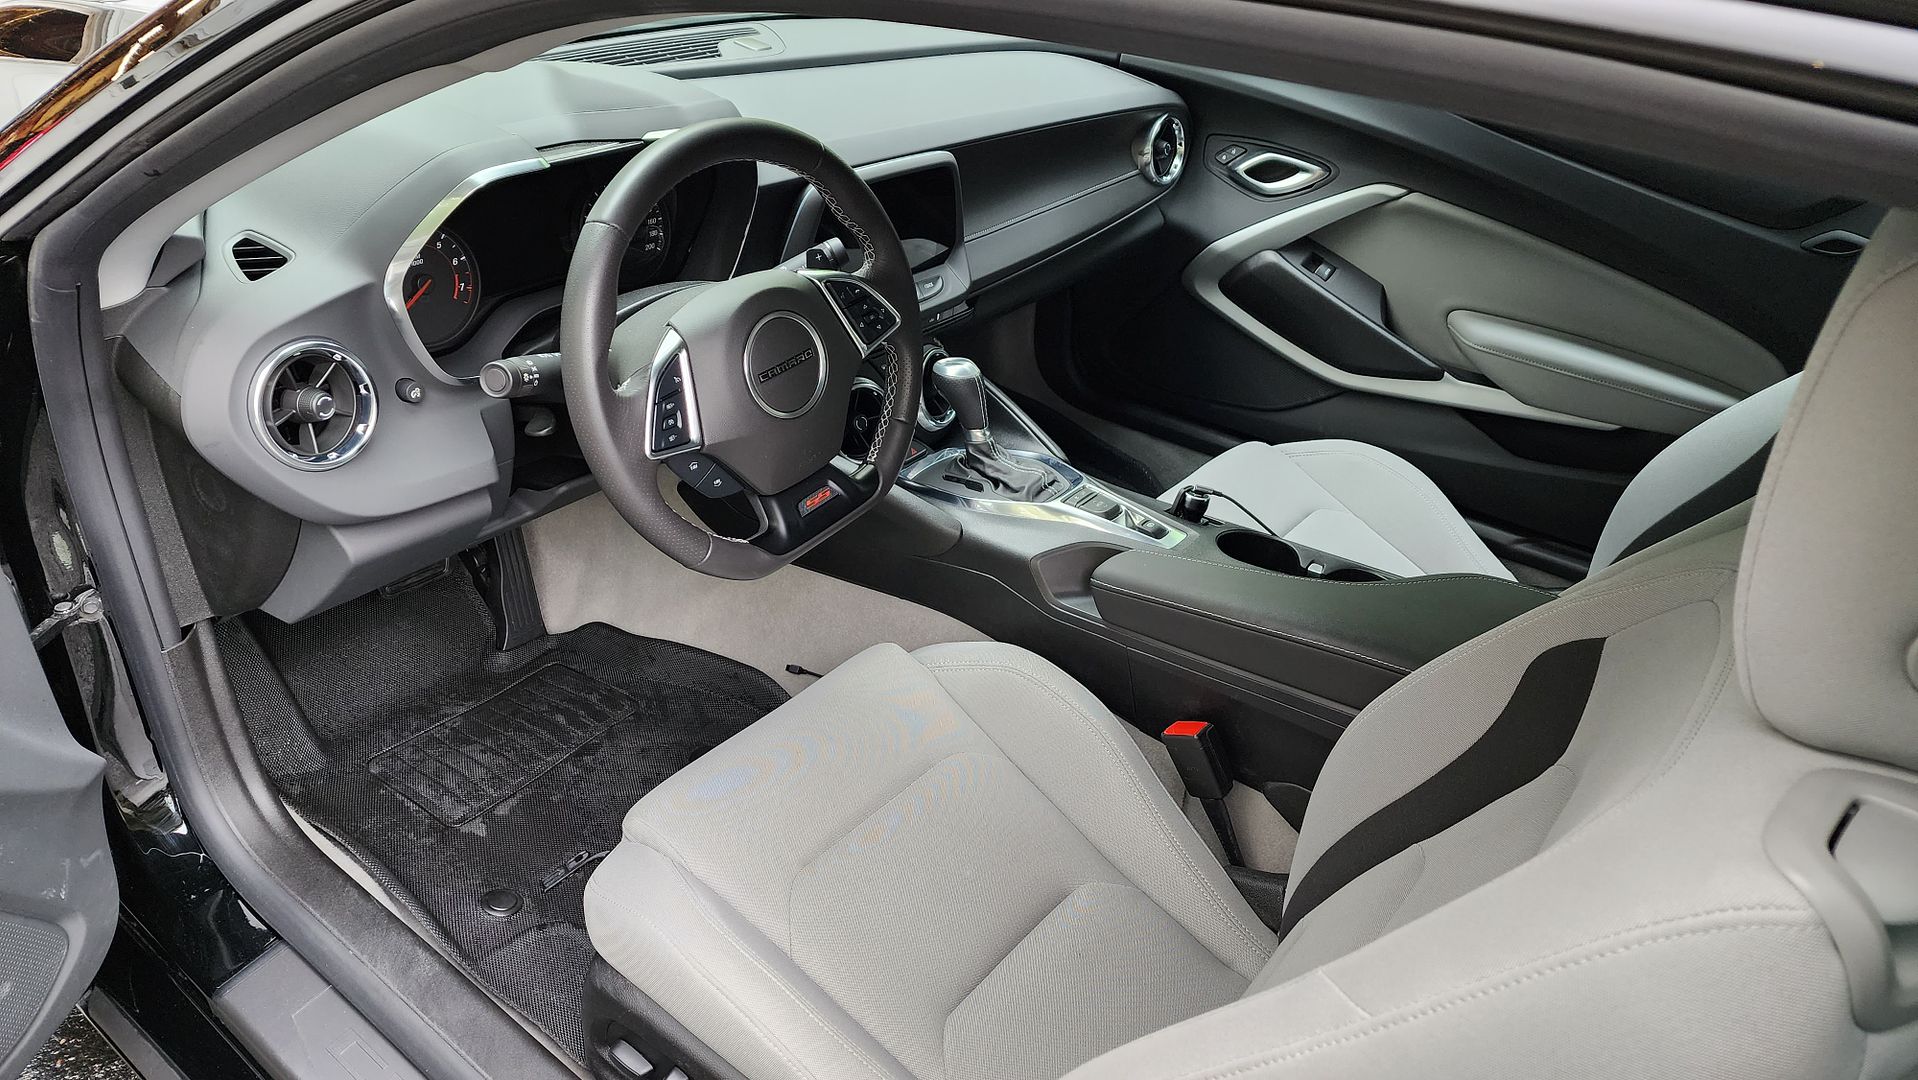 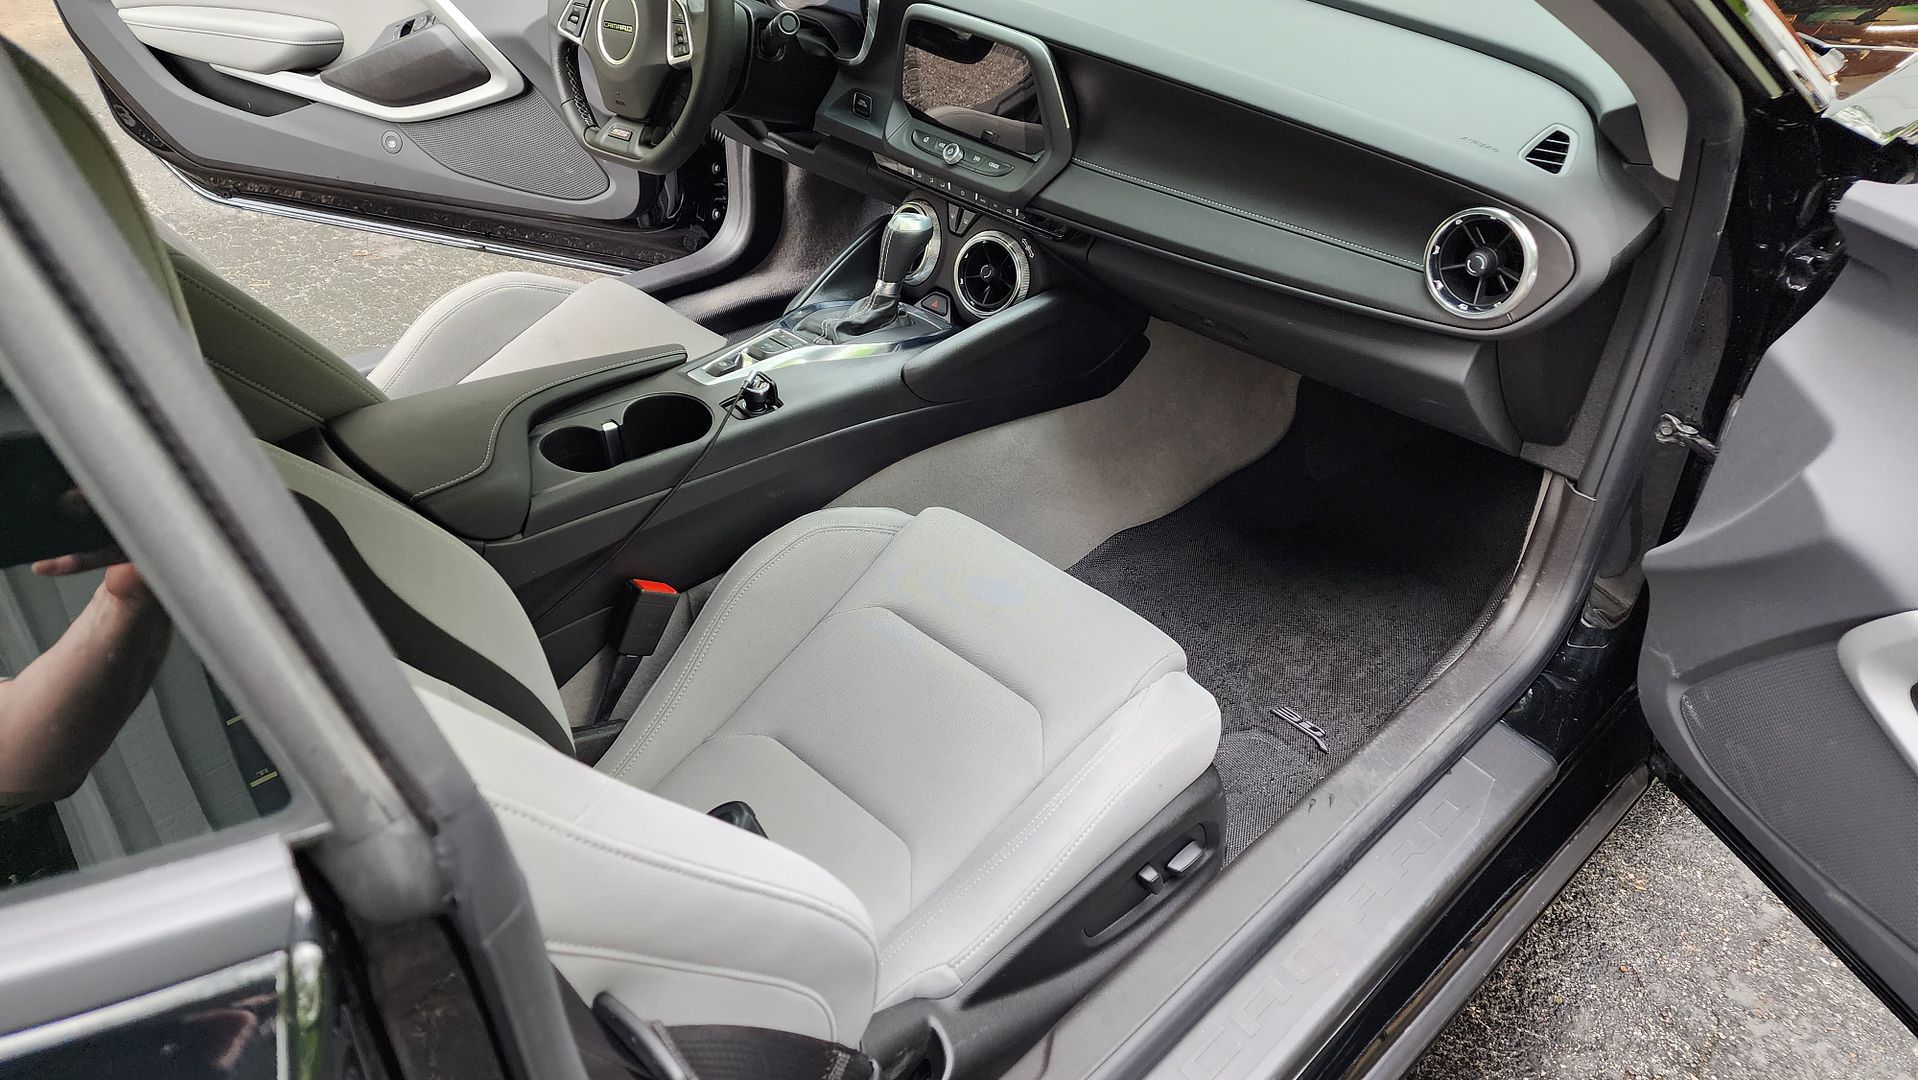 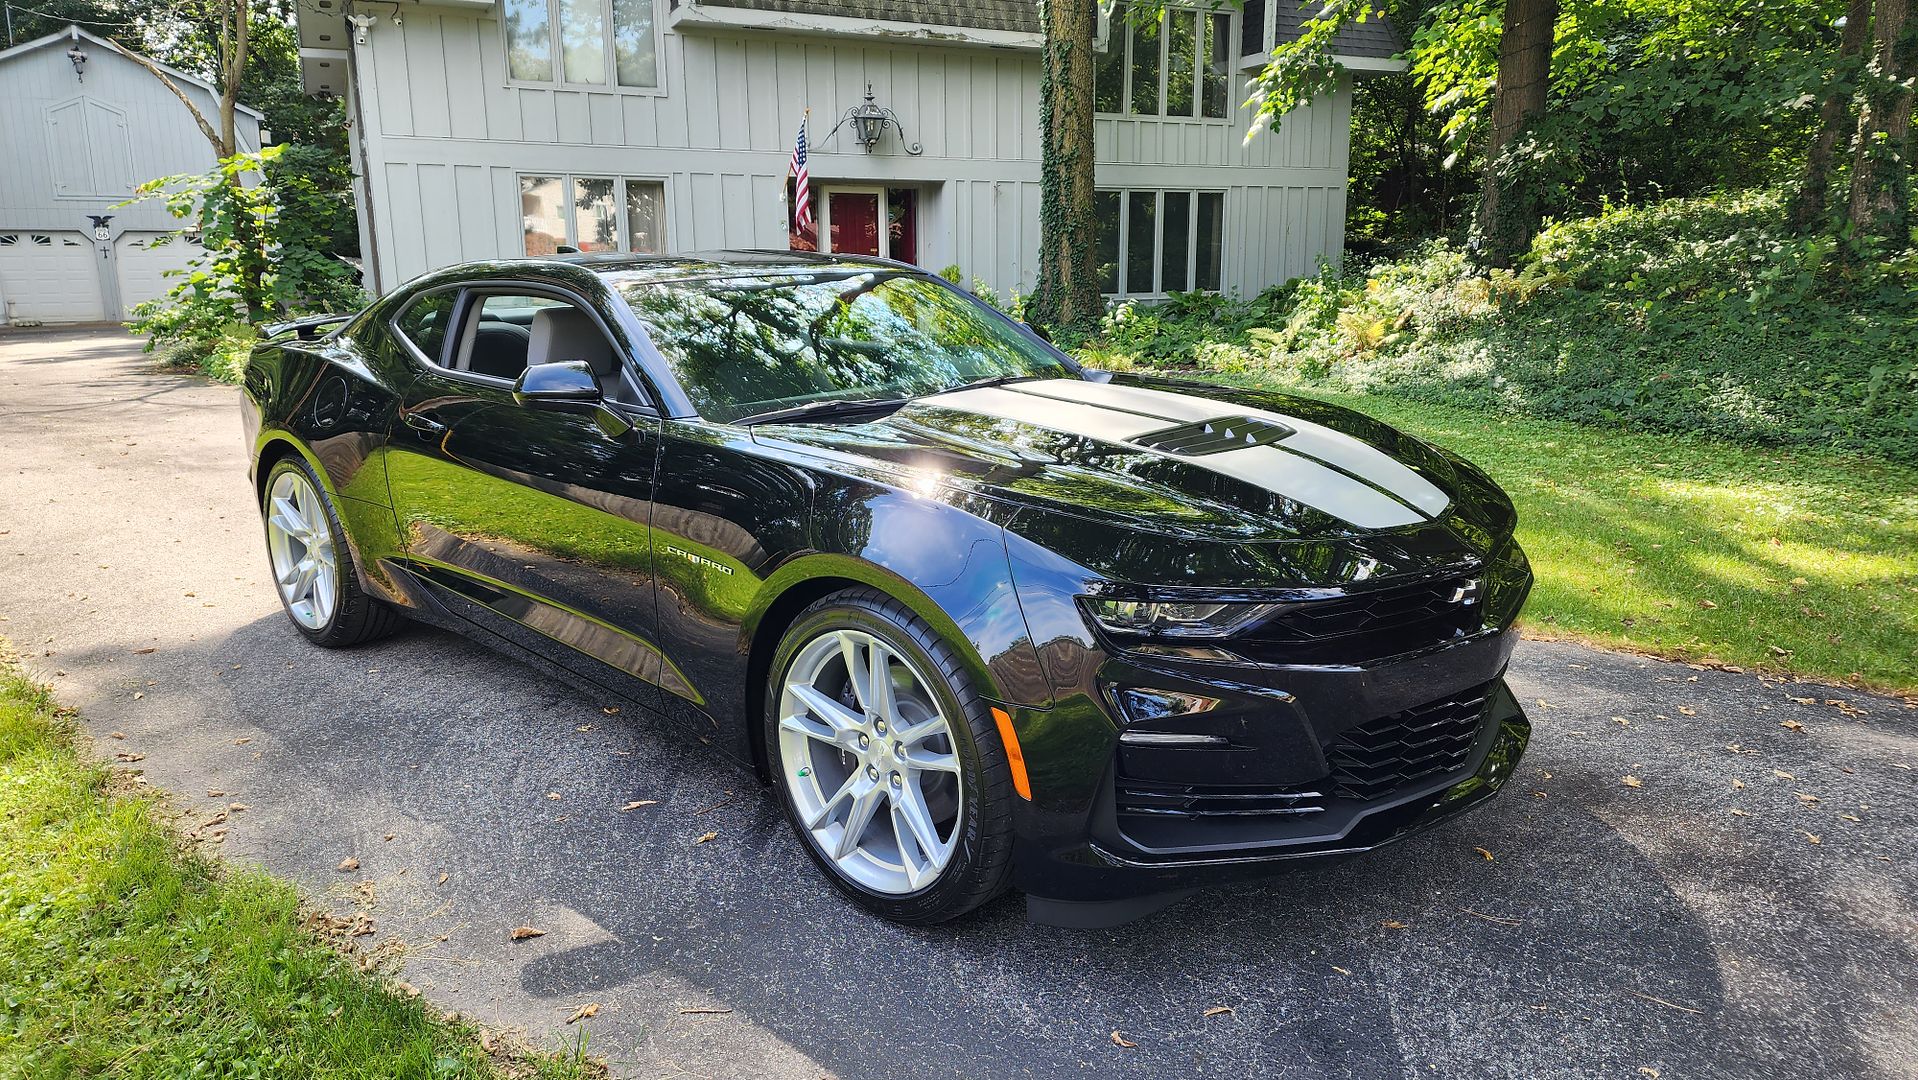 It is a daily driver, even in northern IL winters using Blizzak winter tires 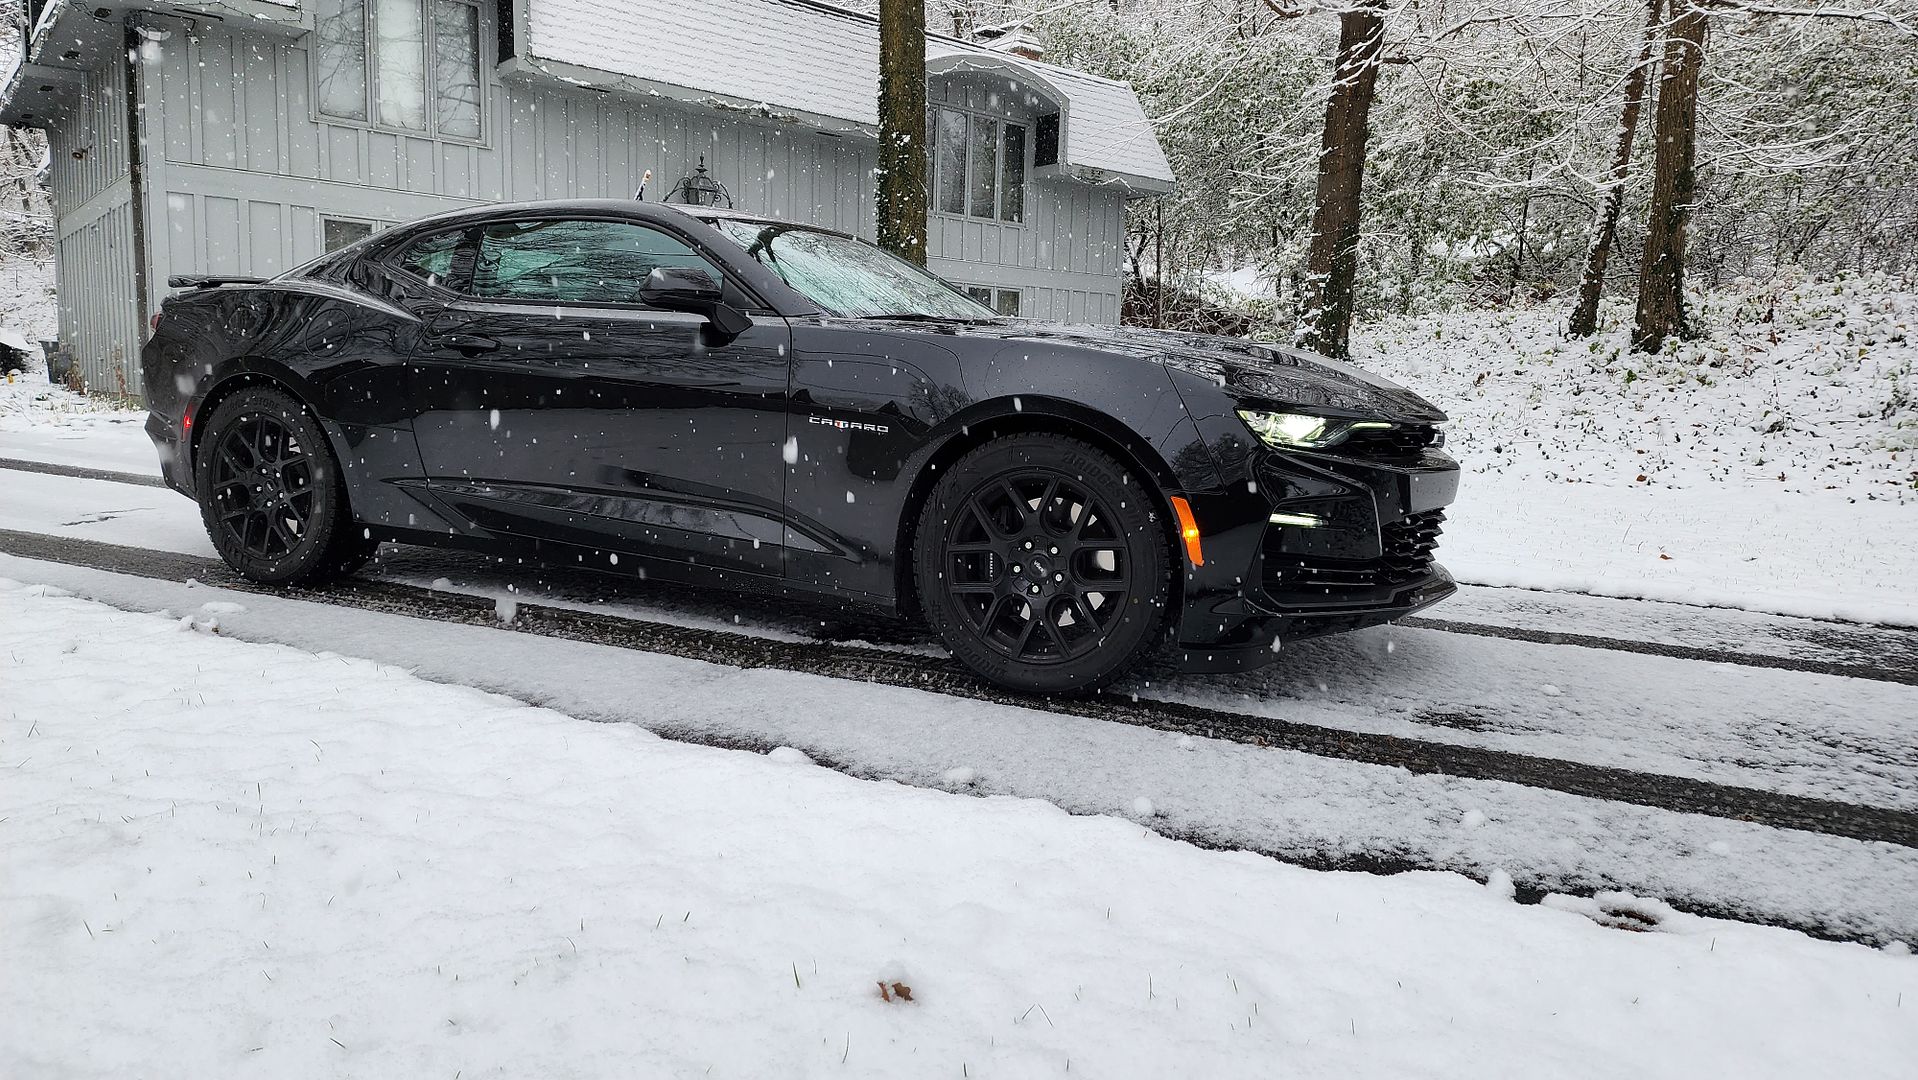 My 2014 Accord Sport with 220,000 miles as my previous daily driver and my new daily driver. 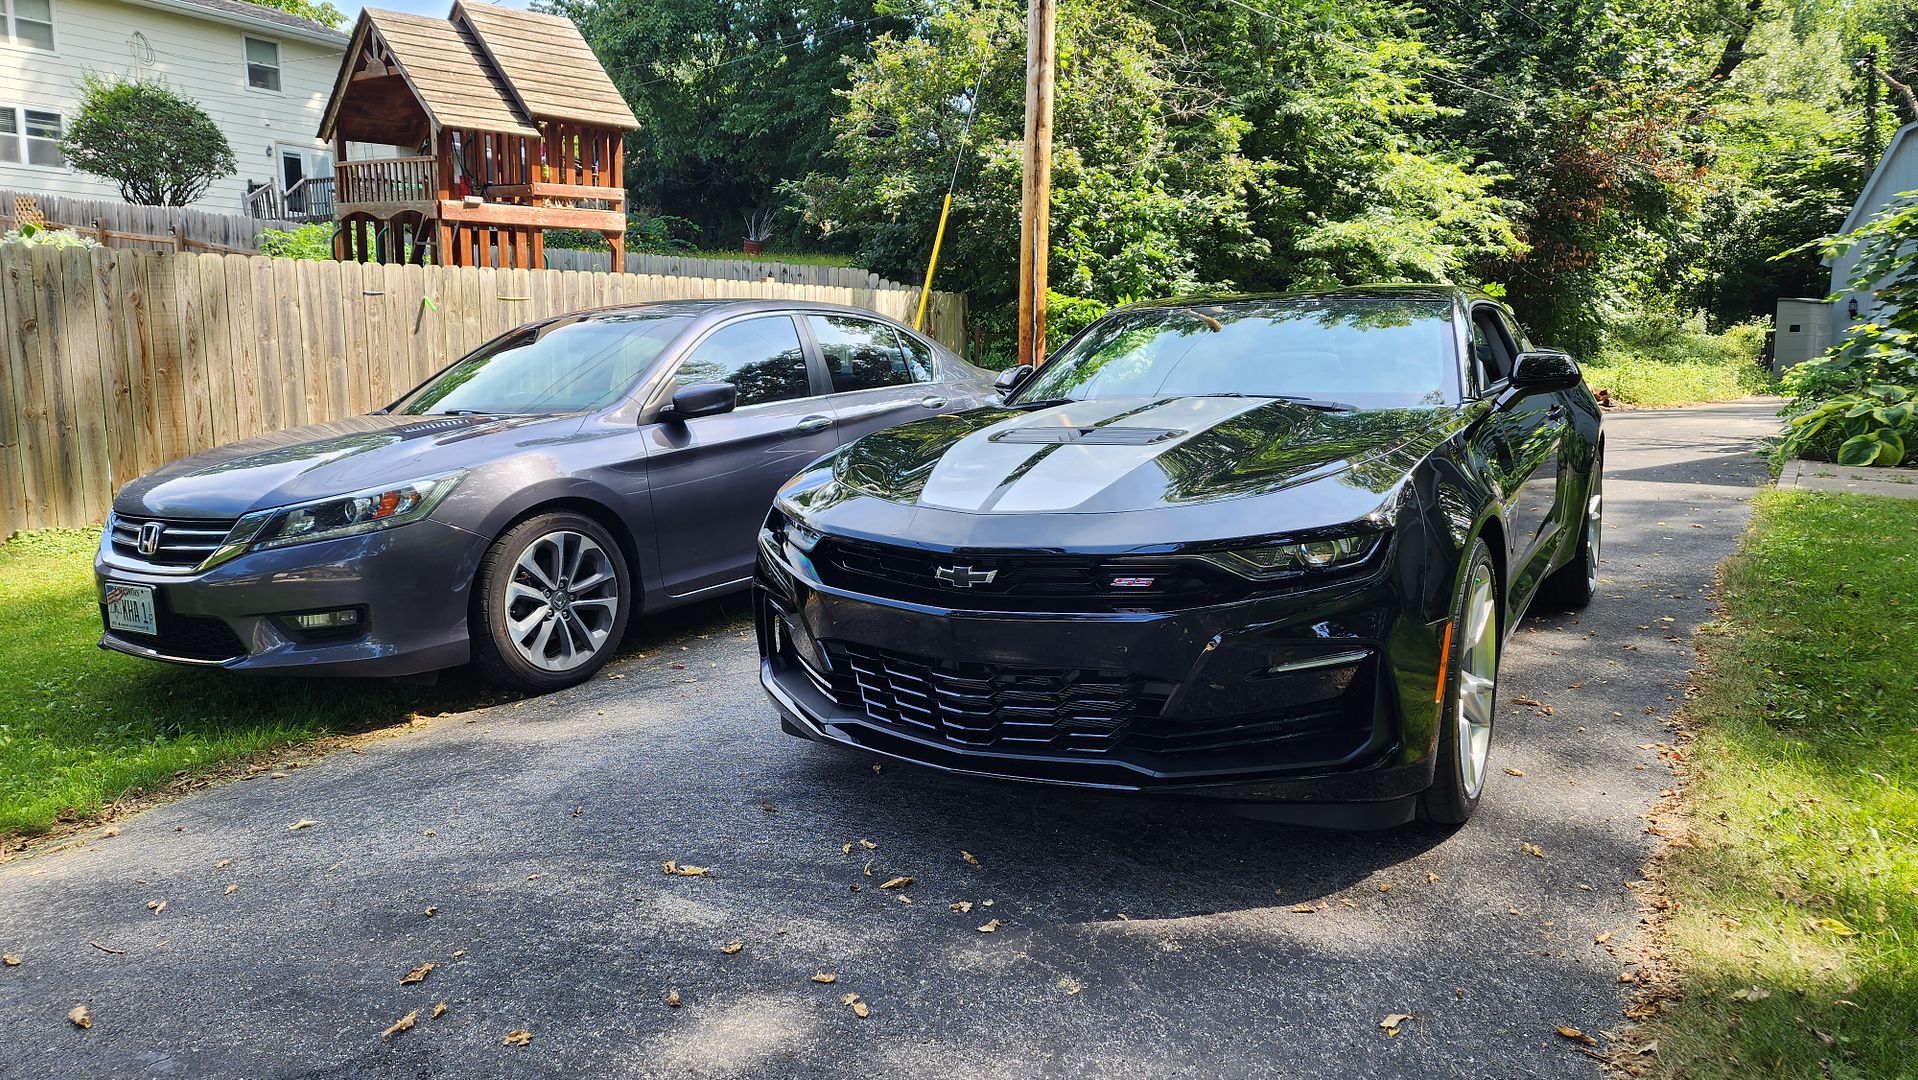 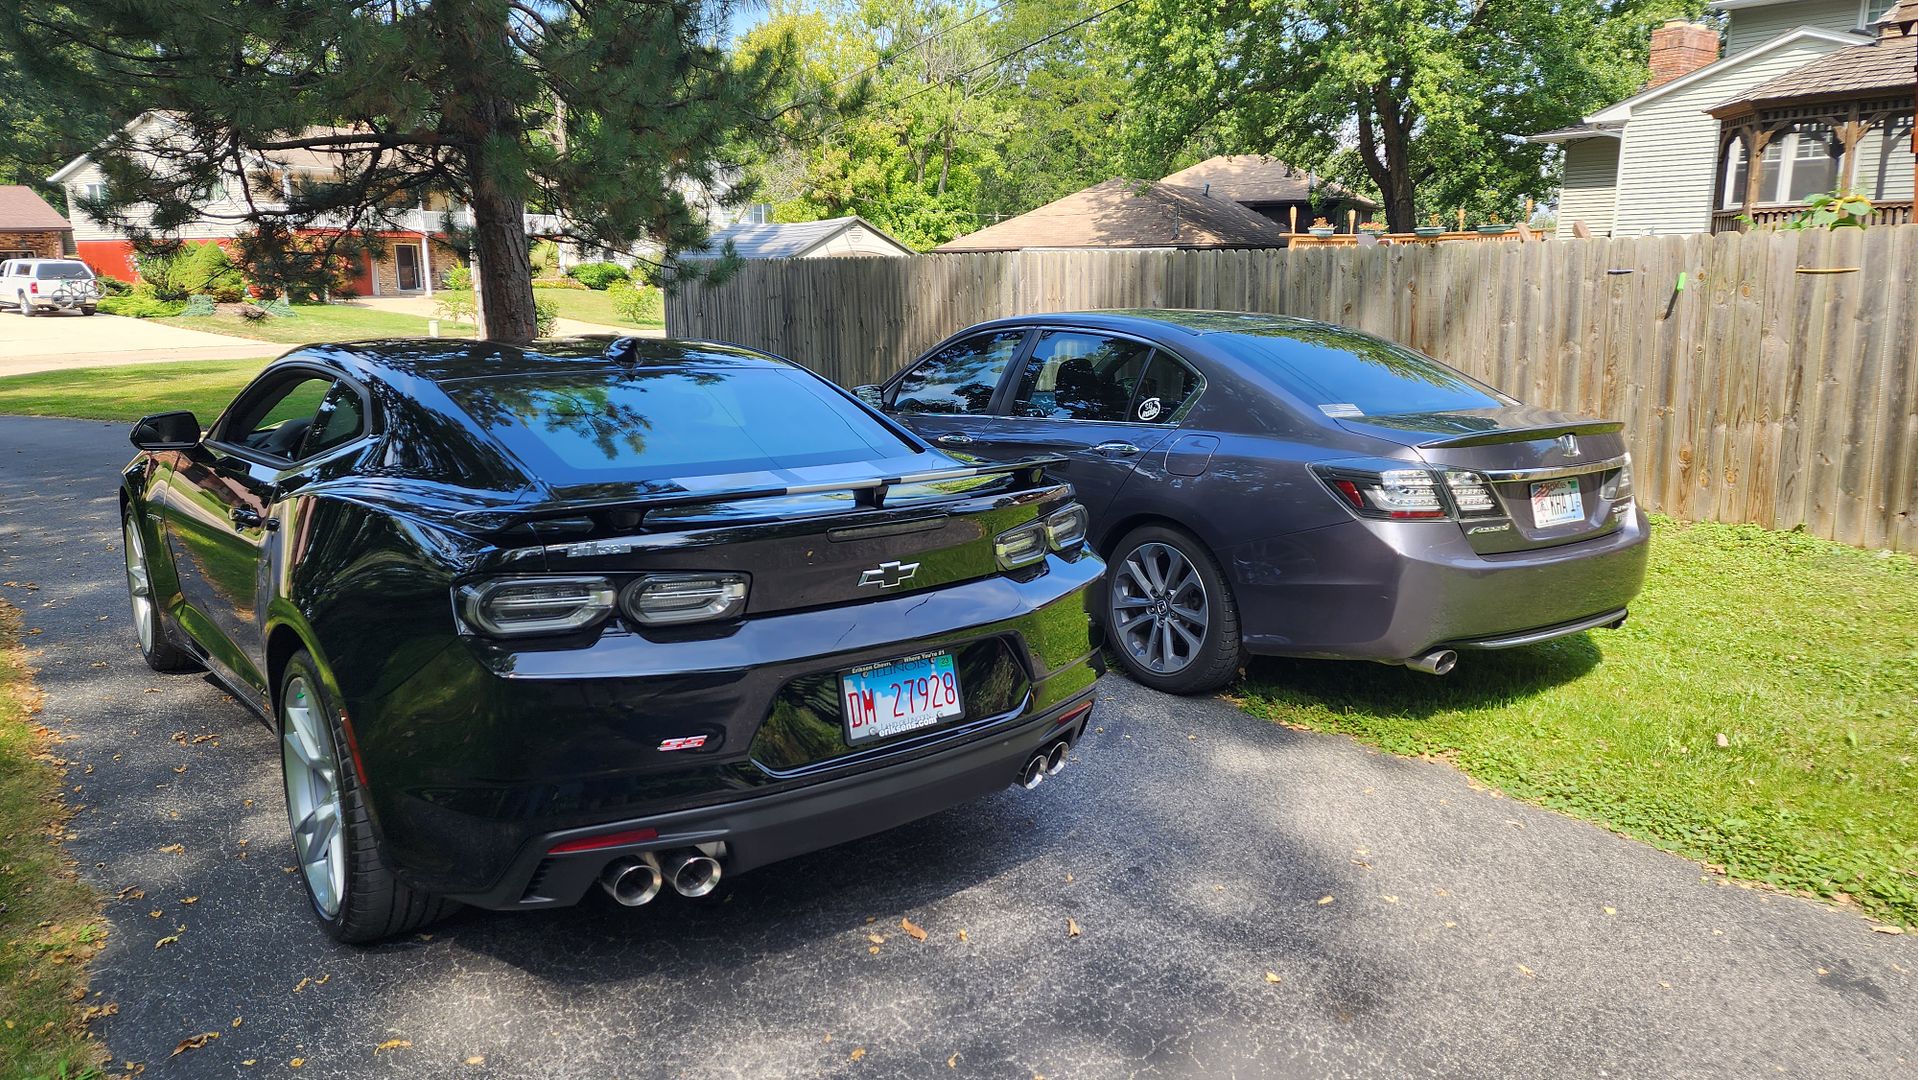 I also designed and 3D printed a custom SS emblem for the front grille 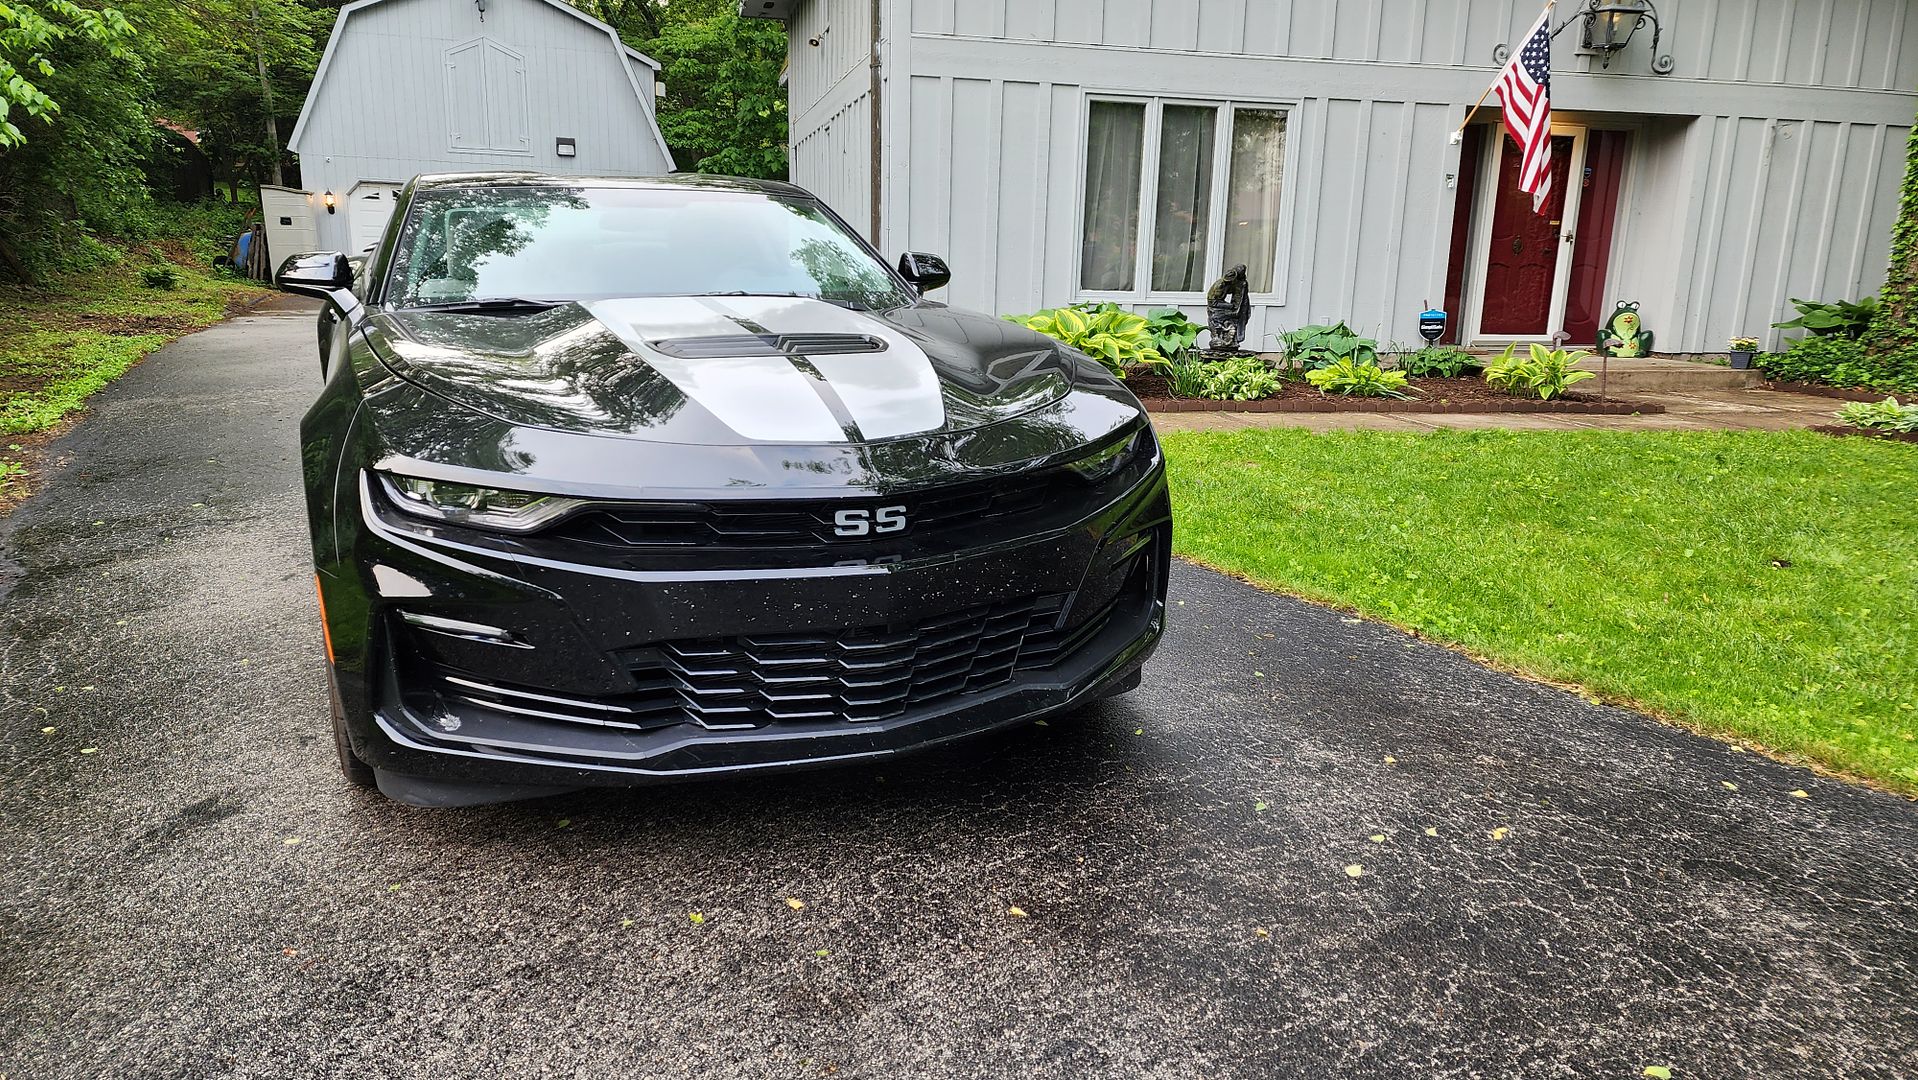 I ordered this car to my desired specification in May of 2022, it was built in August of 2022 and I took delivery in September of 2022. One year and 20,000 miles later, I am finally able to dissemble the car to do acoustical treatments and properly setup a sound system. I ordered the 1SS package because it included the 8” infotainment IOS interface but without Bose. As a result, I have a full-range signal out of the front that I can use. The plan is my typical equipment, transferred from my 2014 Accord: Hertz Mille front and sub stage and JL VXi (or MVi) amplifiers for the built-in DSP. Acoustical treatments will be by Resonix for their quality and performance. As with all of my builds, step one is disassembly. To do this safely, I purchased a subscription to ACDelcoTDS and used the access to the dealer service information to download instructions to disassemble all of the interior panels, as well as electrical schematics for most of the systems in the car. The disassembly instructions allow me to know exactly where fasteners and clips are, so nothing gets broken during the process. Disassembly This is a sports car, no doubt, but a budget sports car. The budget aspect is very apparent when tearing into the interior. The interior plastic is cheap and the fasteners at the rear are mostly plastic push-in clips that you destroy when removing them. There are a lot of rattle opportunities in the back as a result. The metal is very resonant, and a lot of treatment will be required prior to putting anything behind the B-pillar. The battery is in the rear passenger corner, which is fairly handy. There are 60A and 100A outputs available, which will match the amplifier selections nicely. The driver’s side rear corner is mostly empty and JL makes a StealthBox for this location. I plan on using this space for the JL amplifiers, keeping them fully hidden behind the factory side panel. 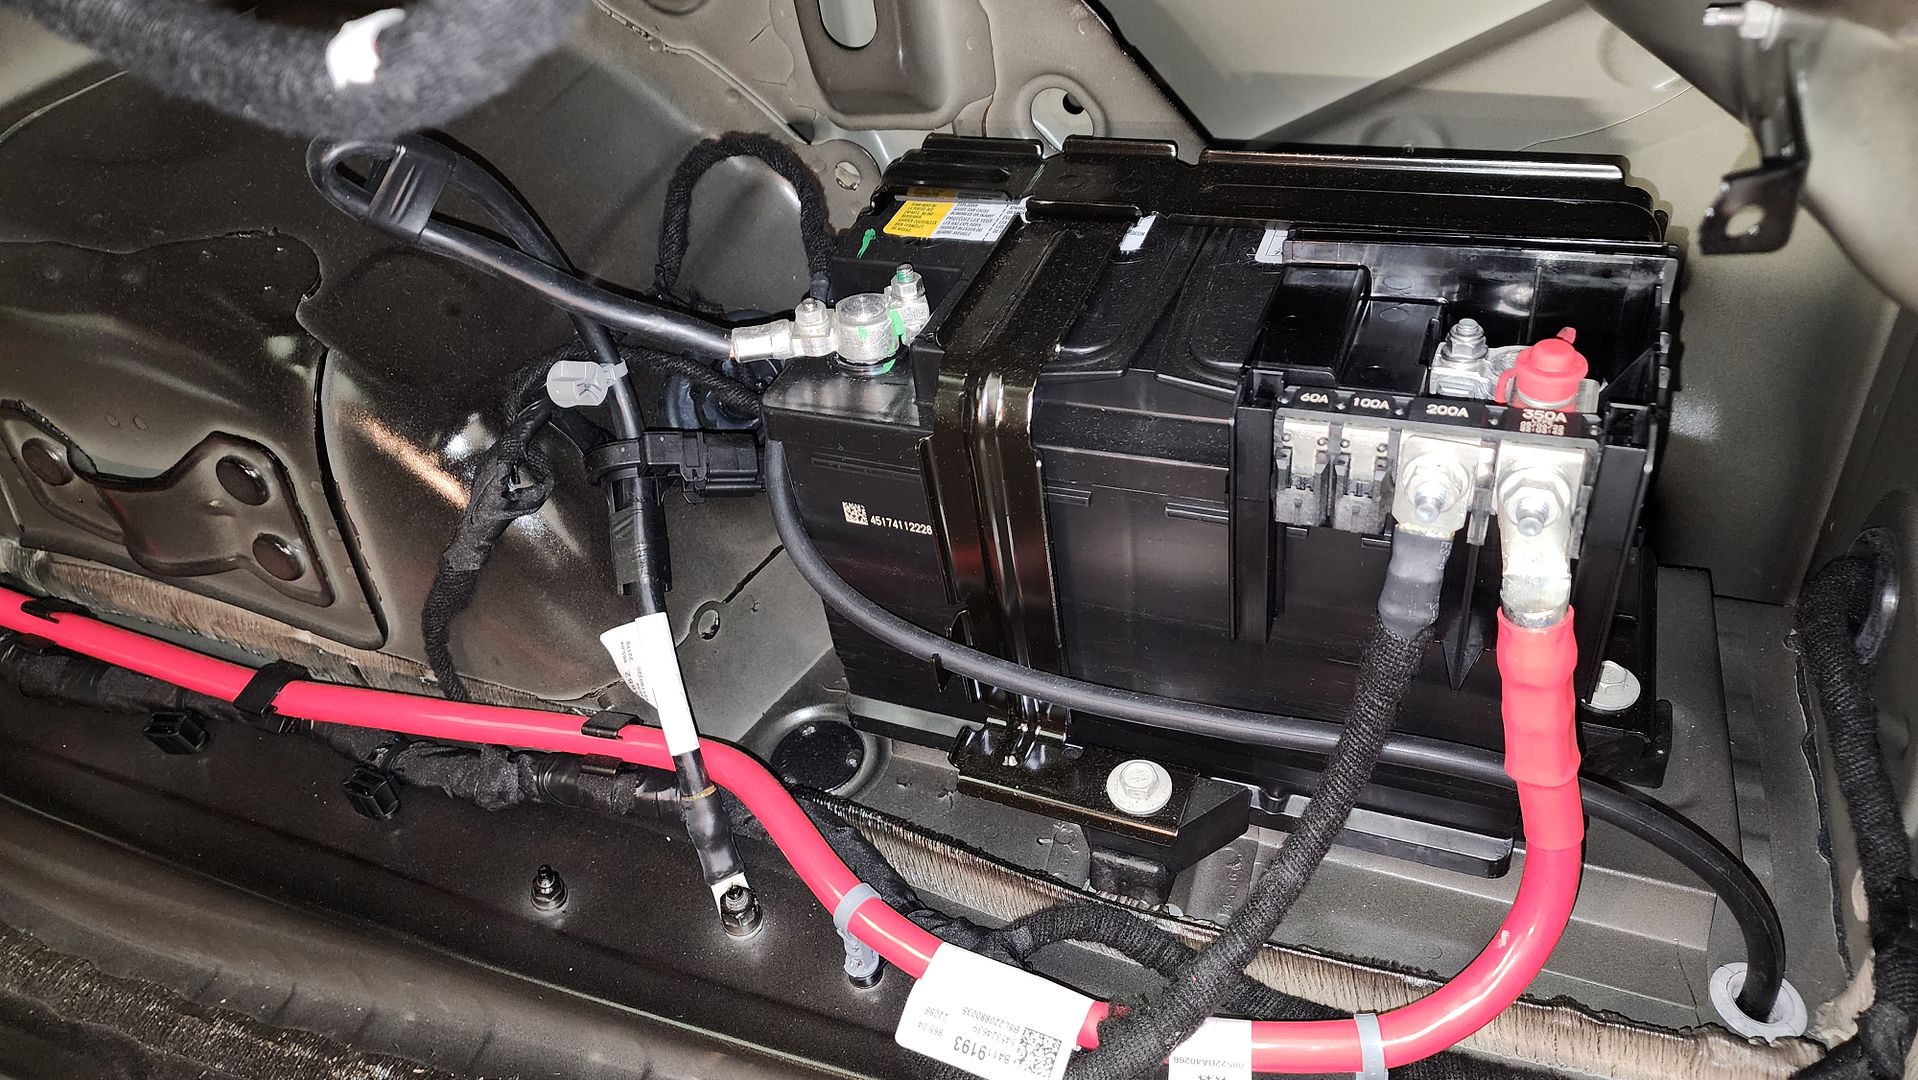 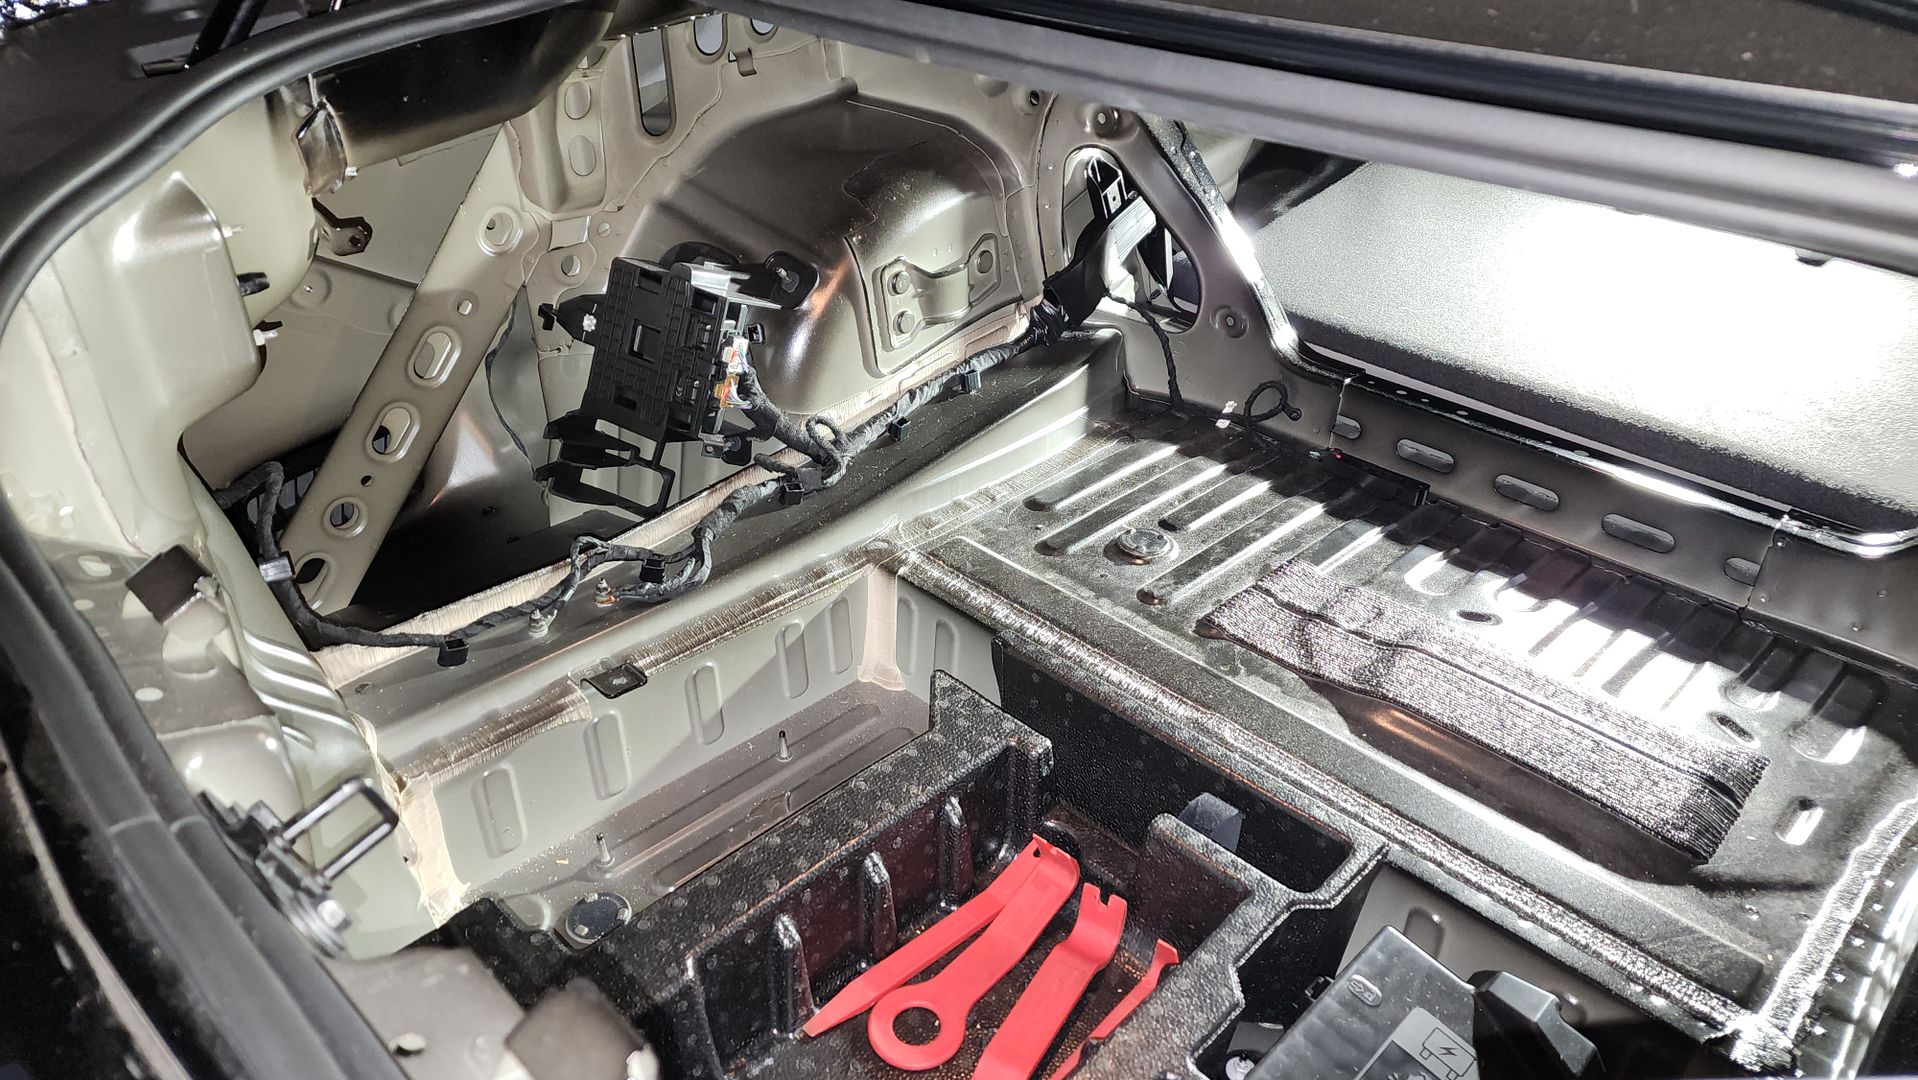   The front doors have a decent amount of sound absorption on them, with an appropriate membrane to cover the opening into the door. The stock speaker is a 6x9 driver that had decent bass response in the factory configuration. There is some factory deadener applied to the outer door skin, but it is thin and able to be peeled back. The door panels are annoying to remove, but not terrible one you figure out the trick. I did not try to separate the panel from the weatherstripping due to the metal clips, instead, I lifted the combination off the door by removing three plastic push-in clips. Chevrolet wiring harnesses are removed by pulling the red tab backwards then depressing a small, recessed lever to disengage the clip. It is easy once you know the process.   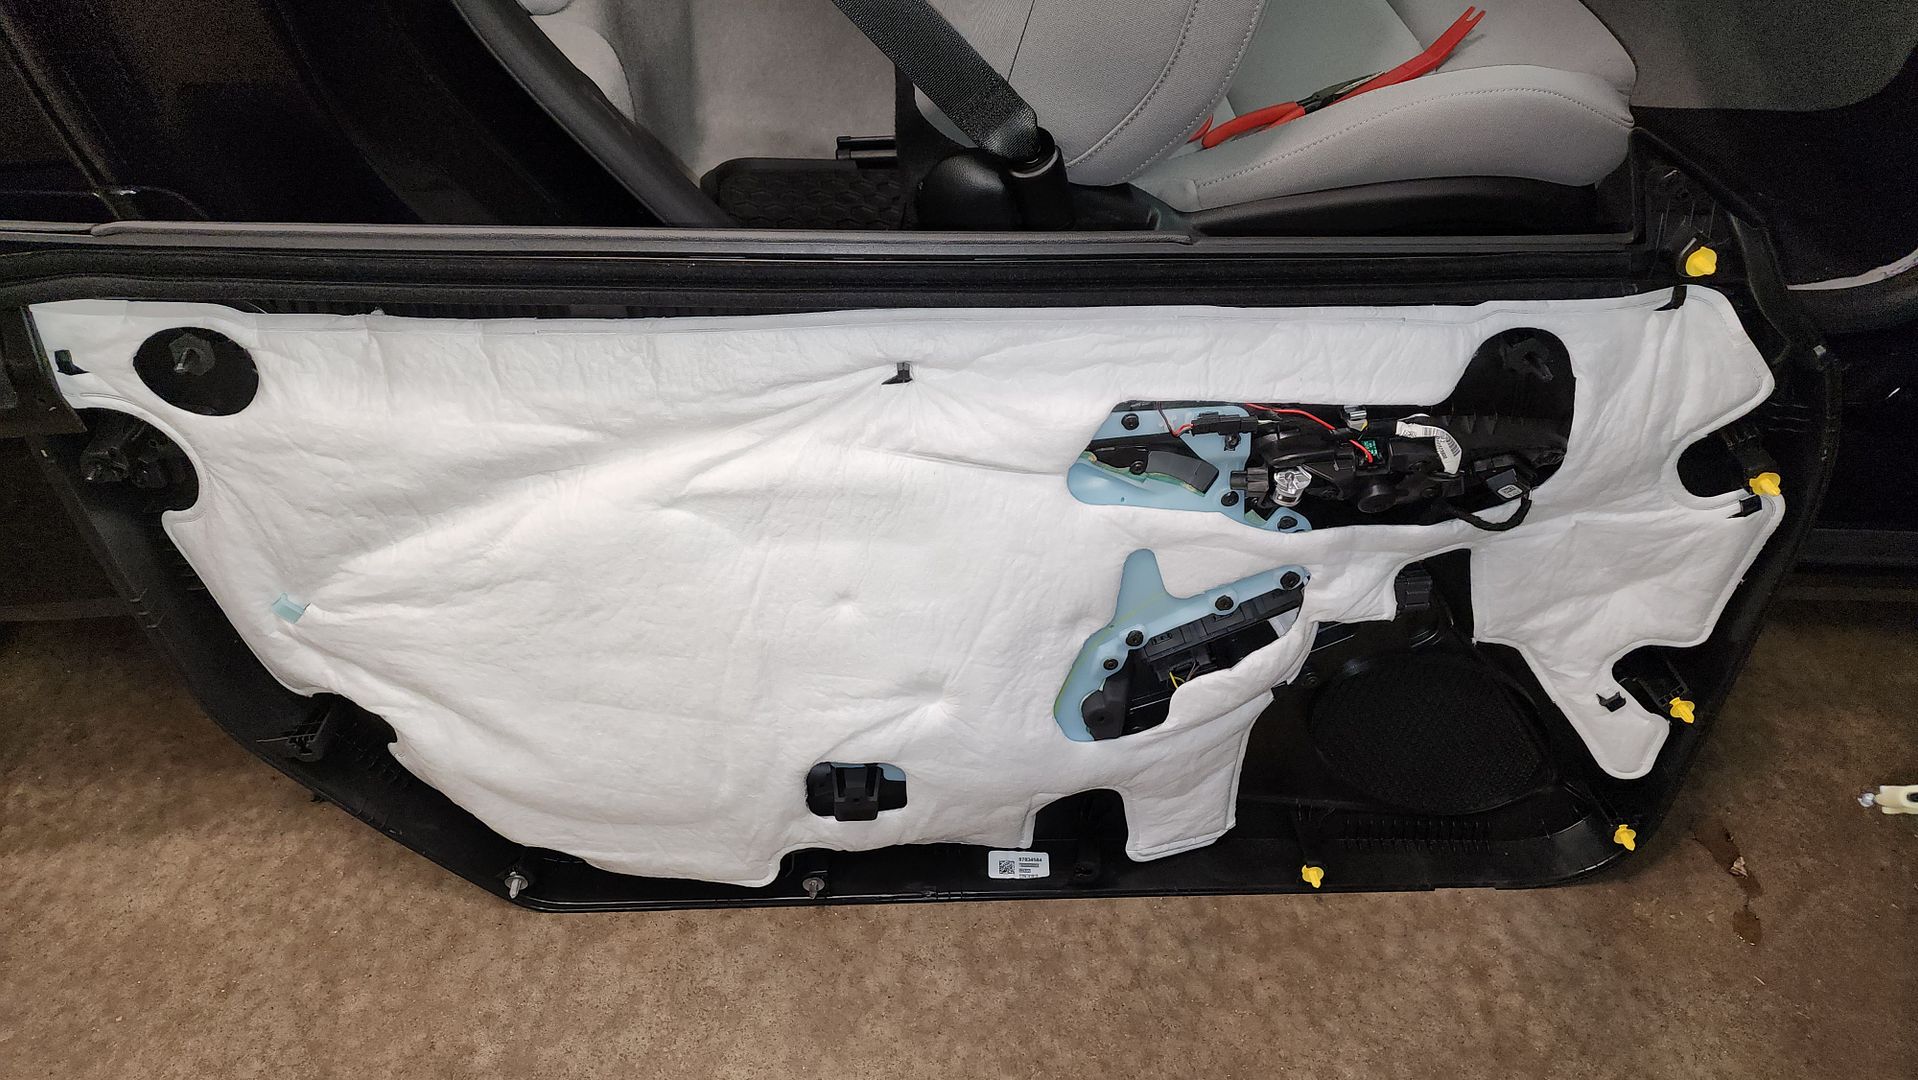 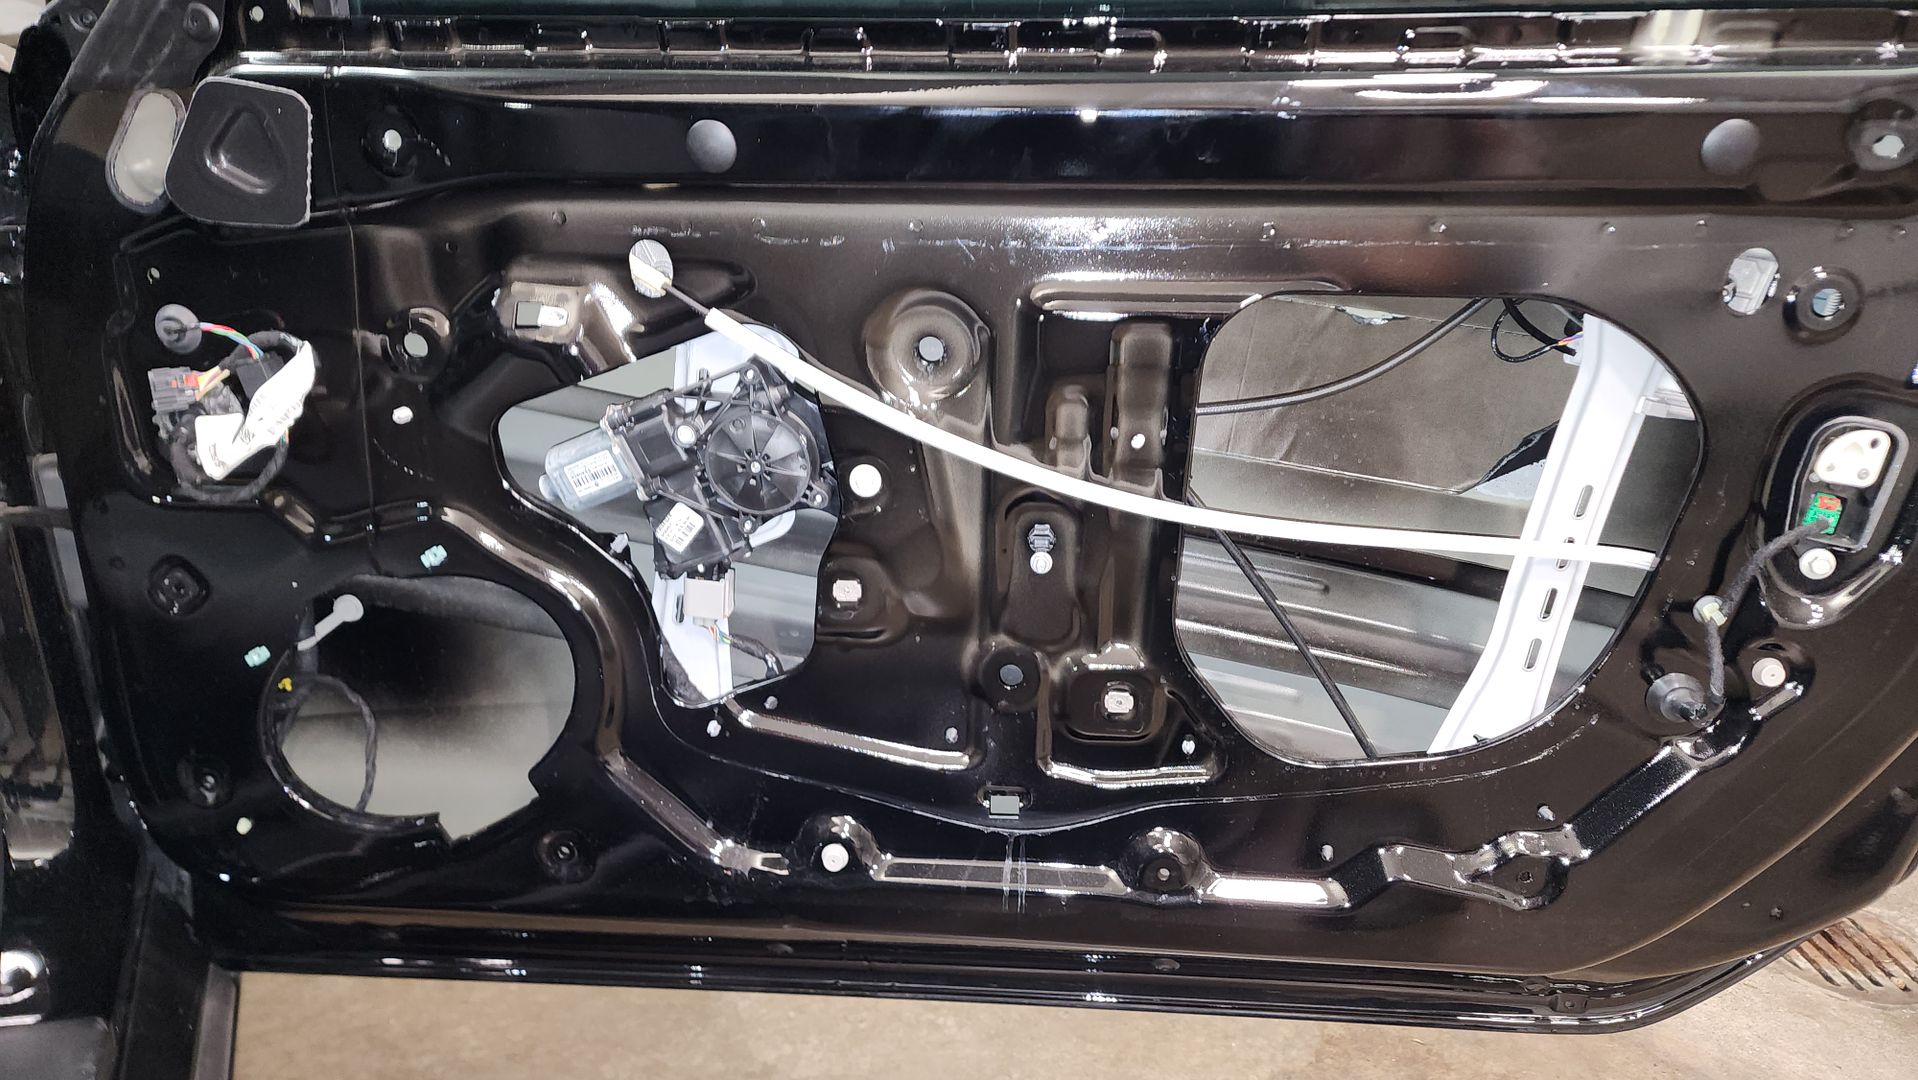 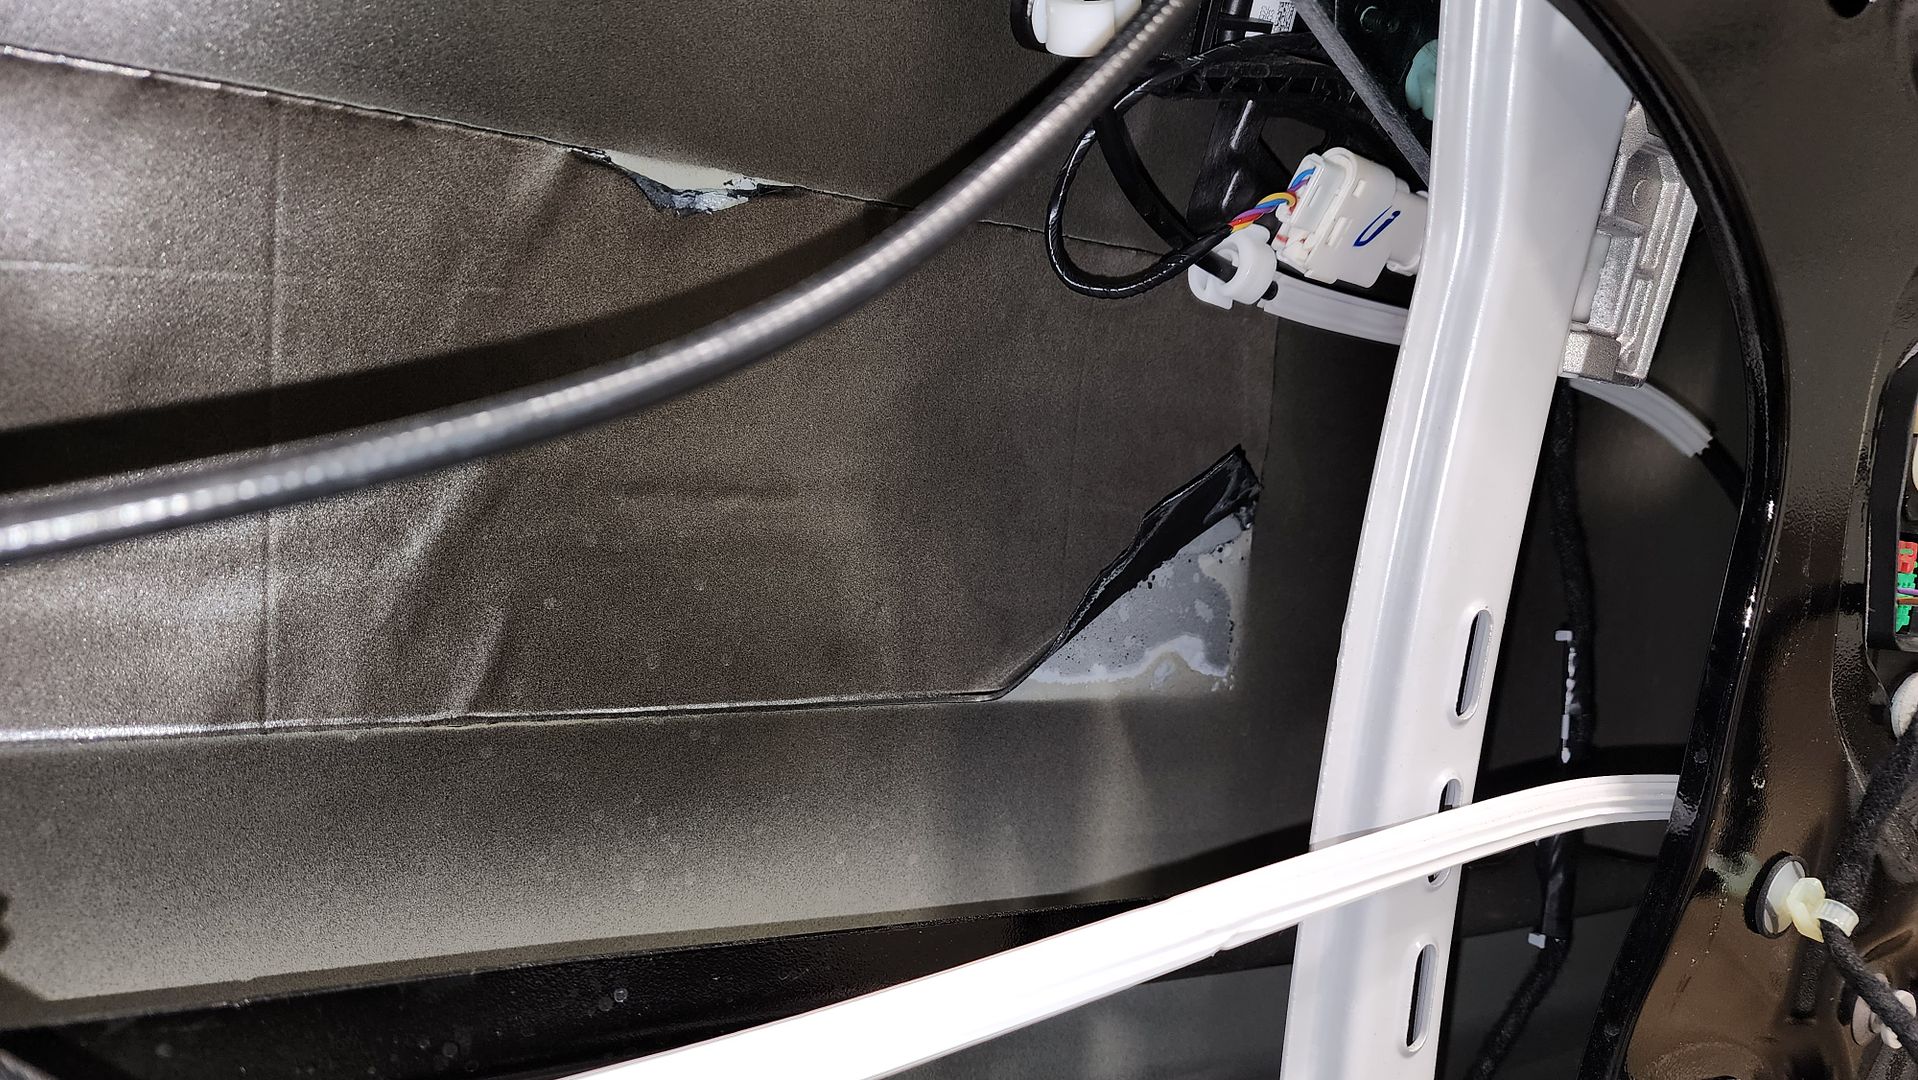 The rear seat comes out easily which allows the two side panels to come out once the B- and C-pillar trims are removed. These rear side panels have speakers mounted to them, but they are nearly inaudible in the factory system and will not be reused in this build. There is some decent padding bonded to an acoustic barrier in the cavity behind the speaker, but the rest of the rear quarter is hollow. The entire rear metal assembly is very resonant, and tinny. A lot of Resonix CLD will be needed in the rear of this car, along with a lot of Ultratouch insulation in all of the cavities. 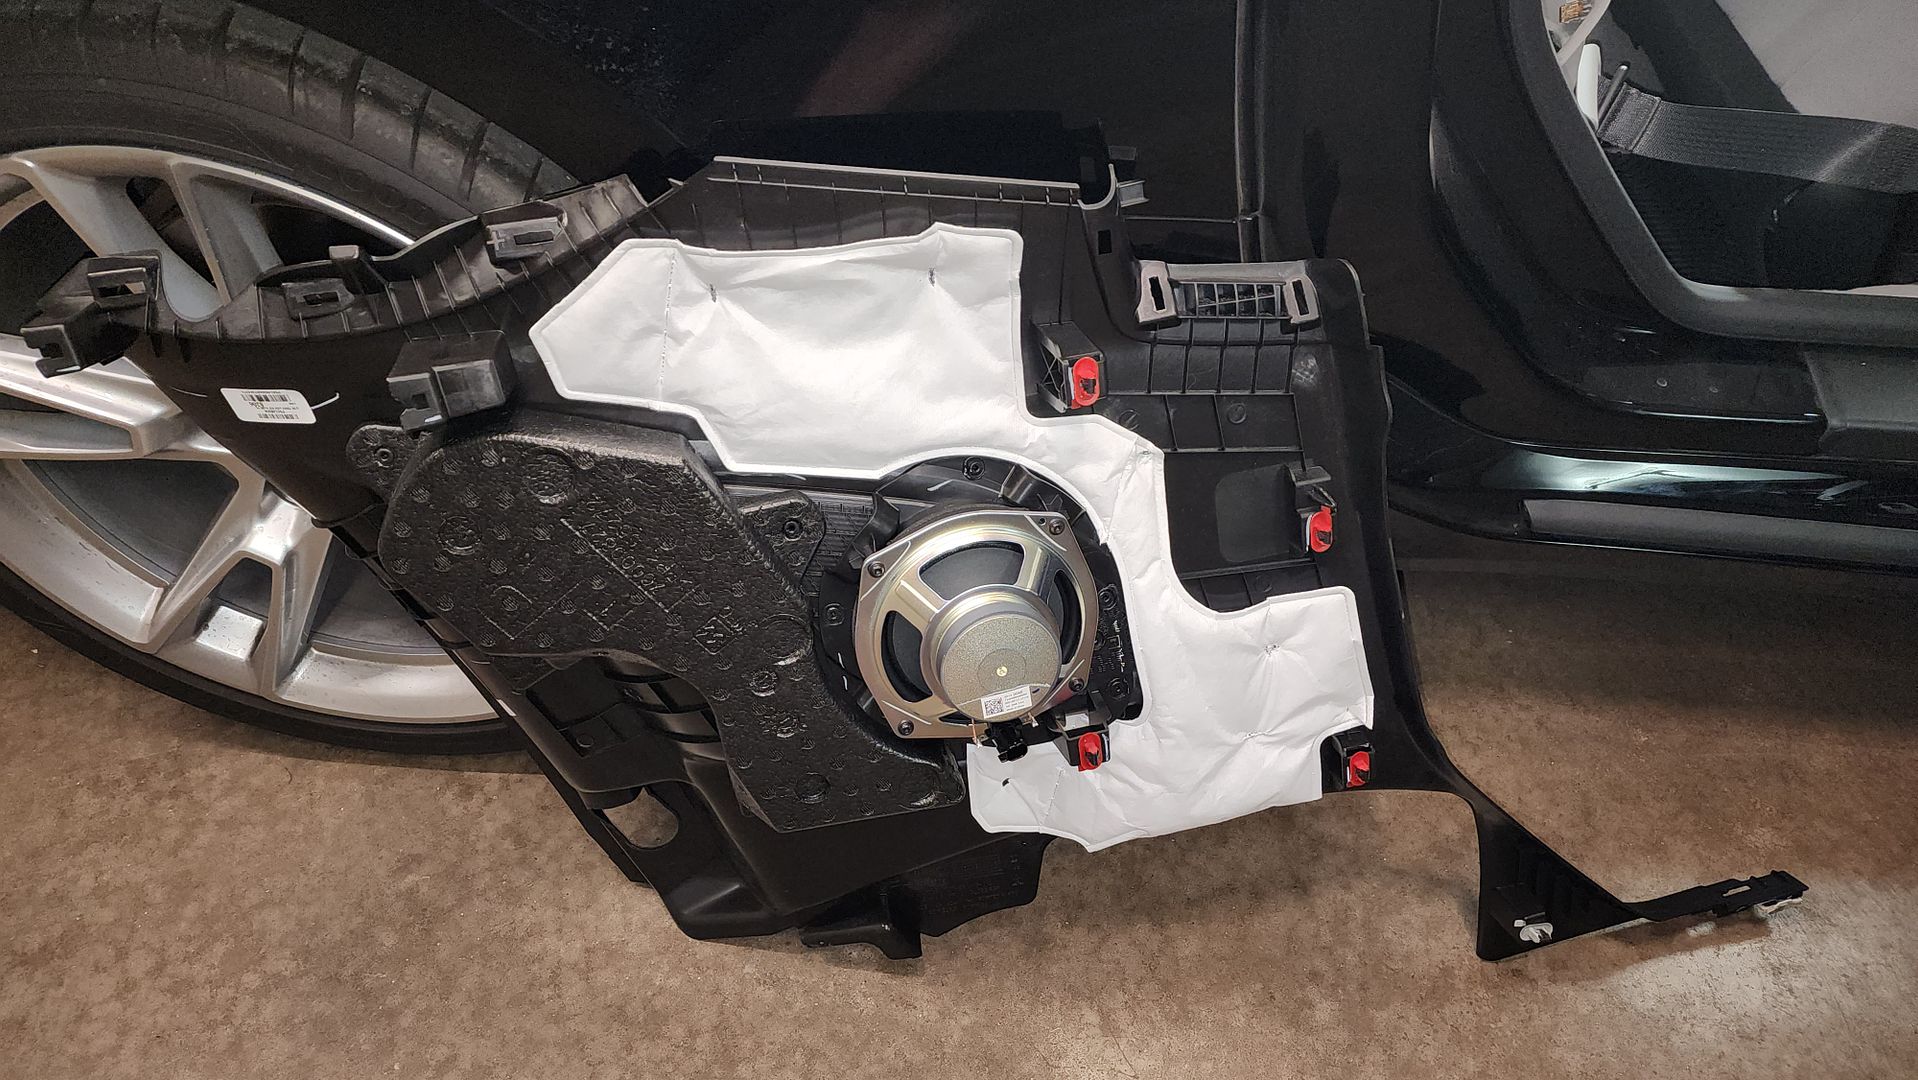 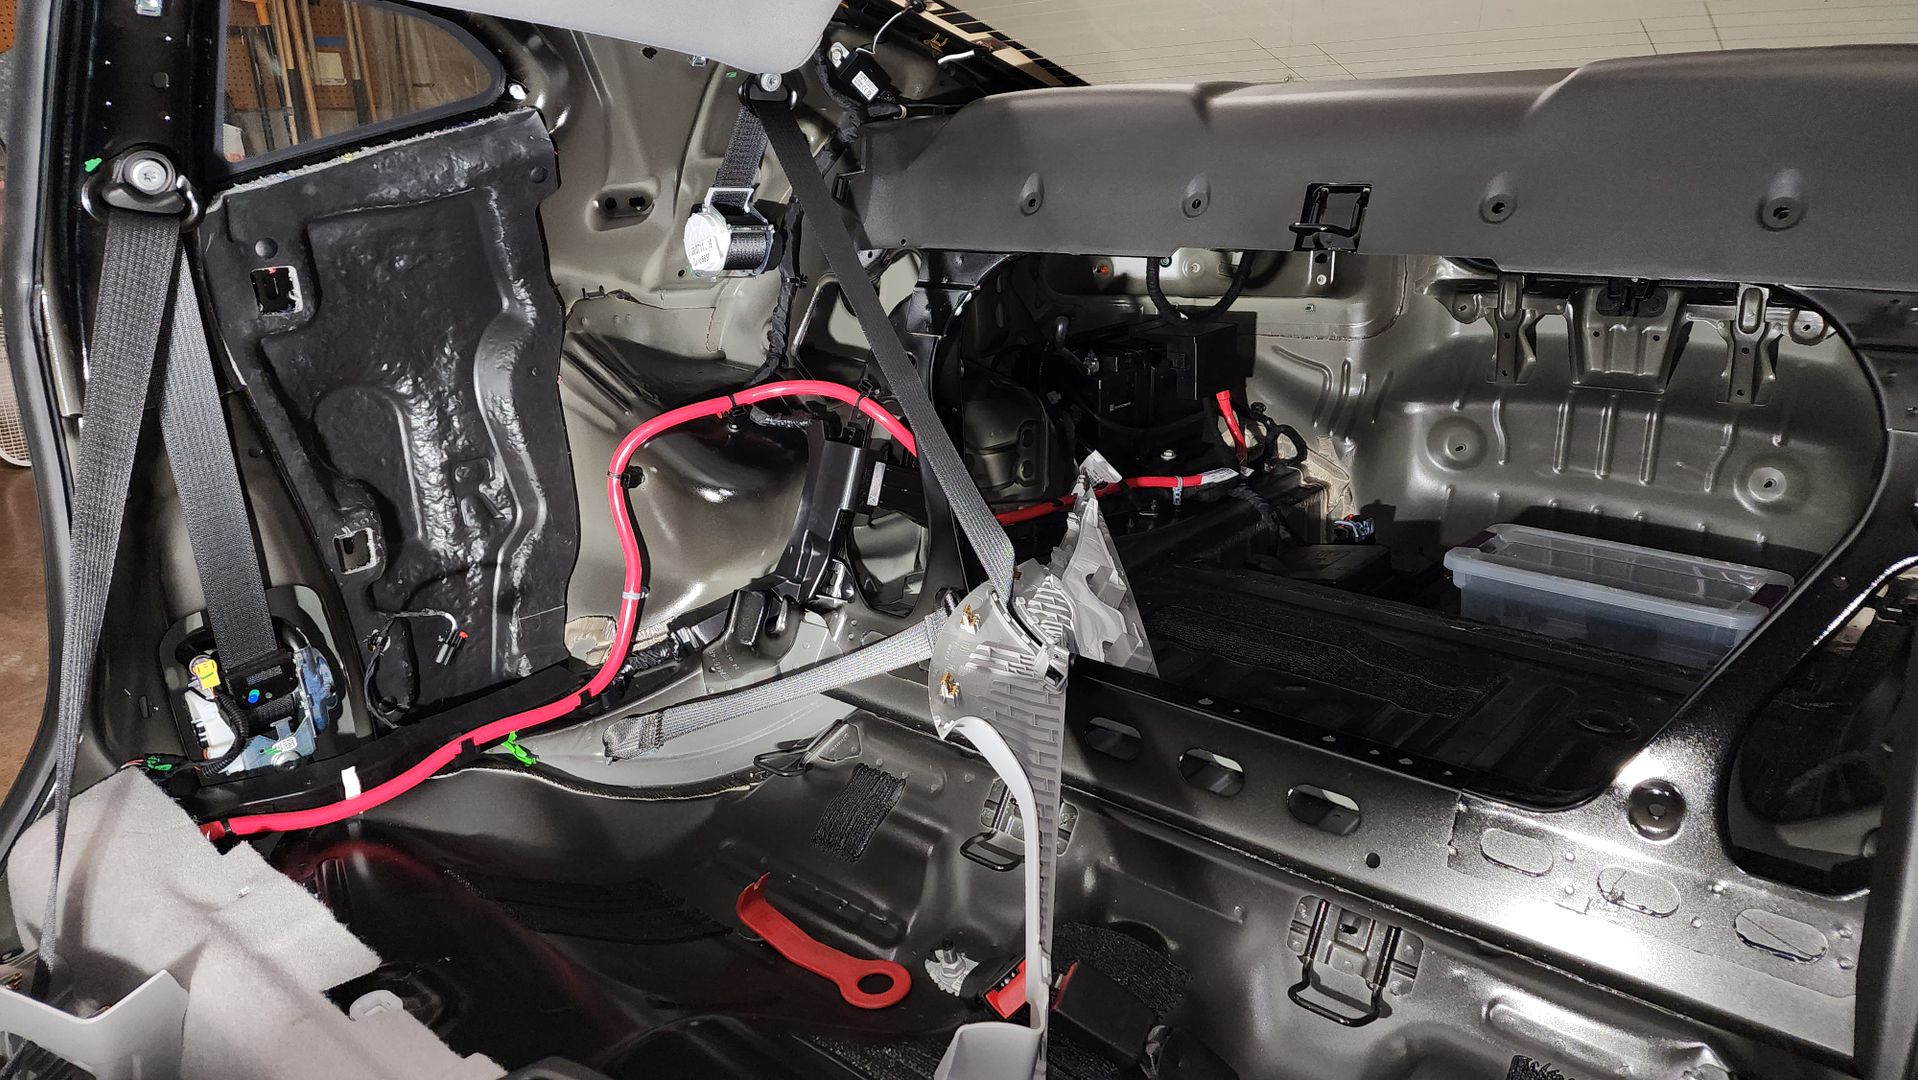 Once the two side panels are removed, the rear deck cover can come off. You’d like to think that you would have a lot more room to access the window with the plastic cover off, but you don’t. The rear deck is very resonant and tinny, so I plan on top and bottom layers of Resonix CLD here. The rear deck has a bit of jute padding, but some Resonix Fibermat is planned in place of it. Because I do plan on putting Hertz HCX 3-way 6x9 back here, I need to make sure this assembly is acoustically “dead”. While I don’t plan on having these running most of the time, I do plan on having a tune available that makes use of them for windows-down jamming when a soundstage isn’t needed. 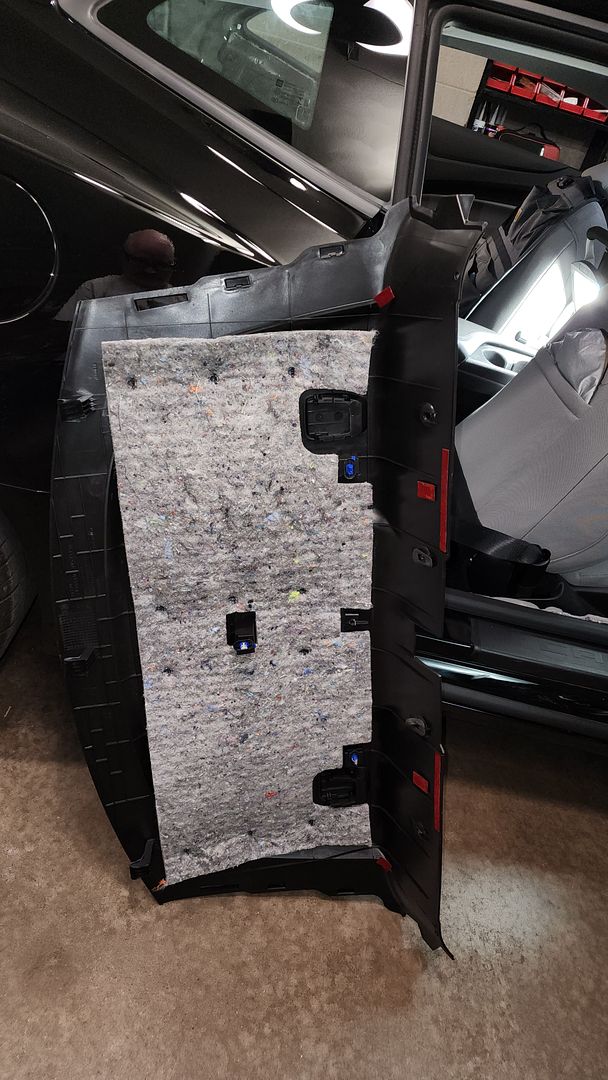 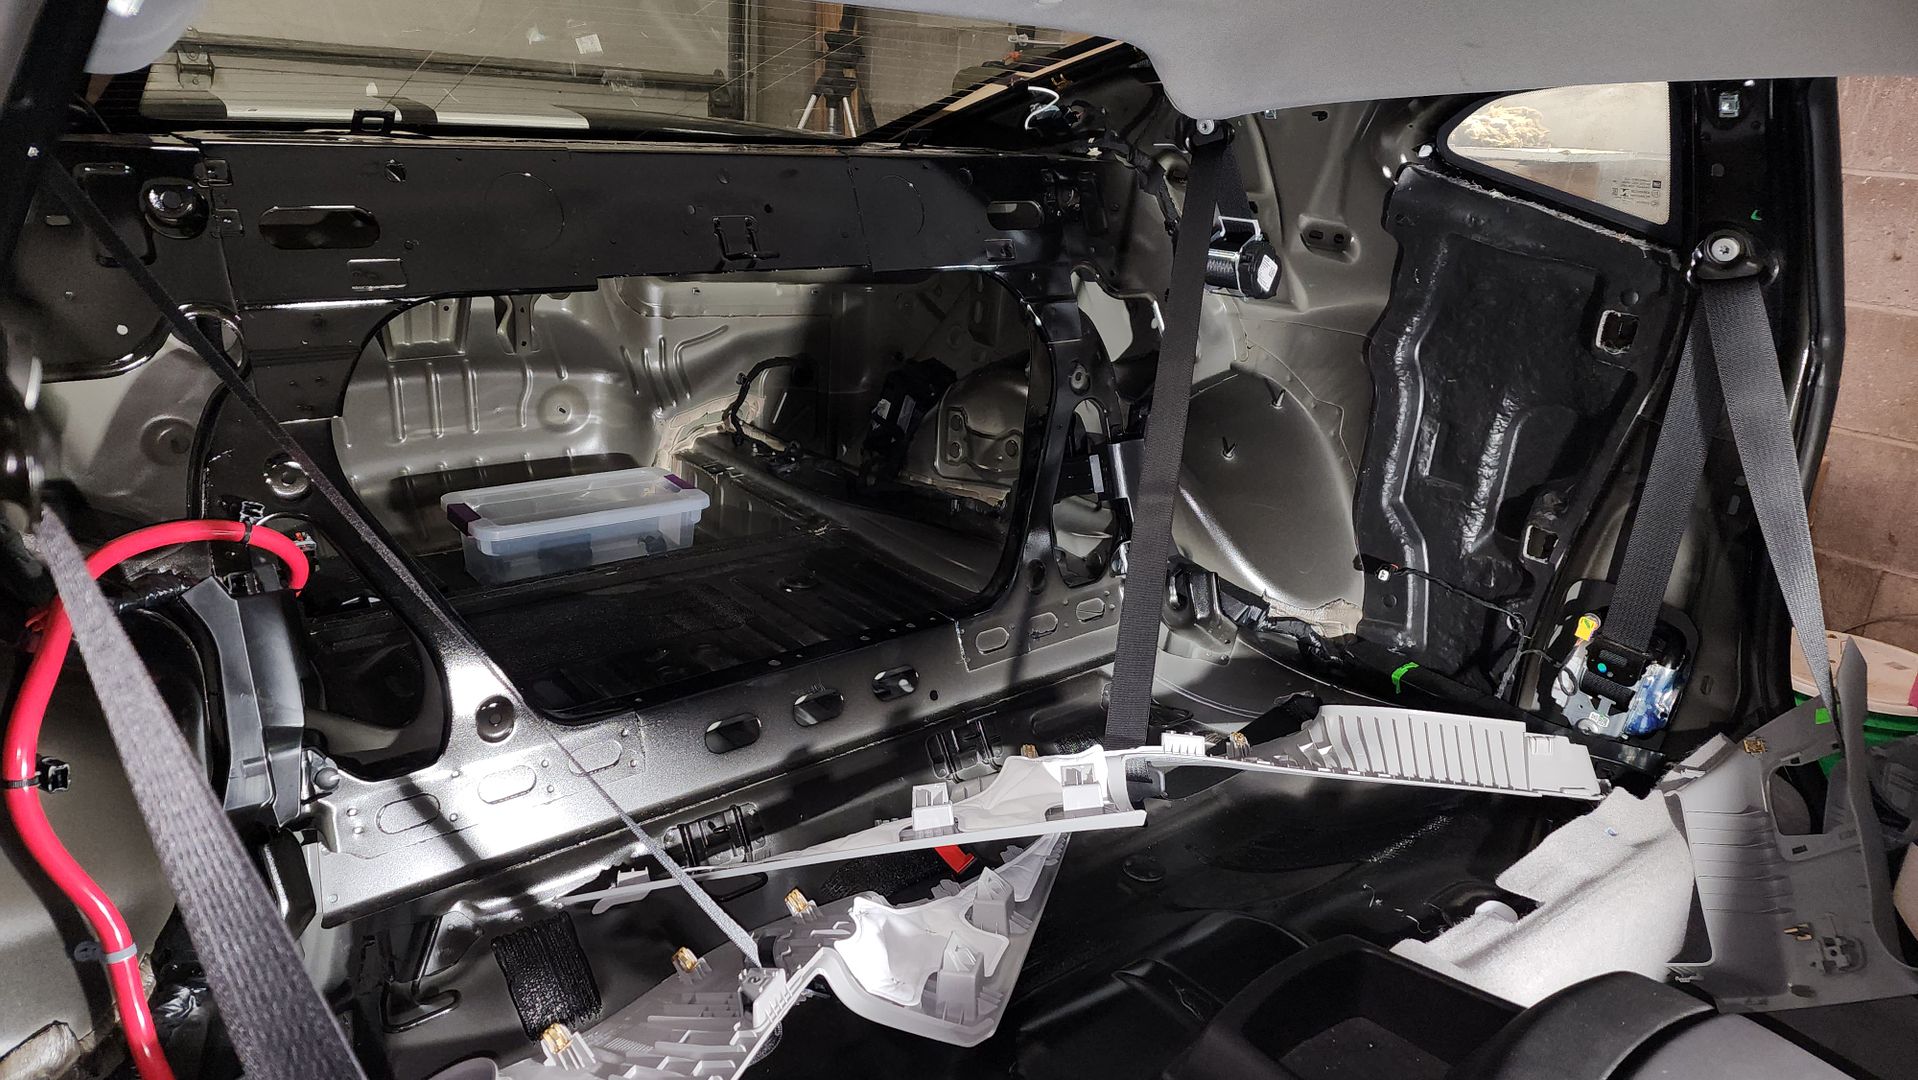  Next up is removing the front seats, lower dash trim, center console, and then the carpet.
__________________
2023 1SS A10 Black NPP/C2U/H72 - Daily Driver
Historically an Accord and Camry owner with self-performed maintenance/repair. 1100: 5/3/22 . . . . . . . 2000: 6/25/22 . . . . . .4000: 8/17/22 . . . . . . . 6000: 9/10/22 Daily Driver mileage update: 22k mi. @ April 2024 New Engine @ 22,600 Build Log: https://www.camaro6.com/forums/showt...6#post11353116 Last edited by keep_hope_alive; 08-29-2023 at 07:37 PM. |

|

|
|
08-30-2023, 01:44 PM
|
#2 |
      
Drives: Wild Cherry LT1 Join Date: Dec 2016
Location: Massachusetts
Posts: 1,923
|
I like the light grey interior. I actually ordered a white 1SS with light grey. Was going to upgrade to the white knee pads. Anyway, that went out the window with production delays and no updates.
Pulling the car apart, especially the dash and for the rear speakers was one of my least favorite things to do in a long time. There’s so little room to maneuver back there… kudo’s for going through with it. As I’m sure you know, most of the plastic tidbits are pretty soft / easily scratched. My fingernail took a small chunk out of the passenger A pillar cover. It was the last piece to put back on, of course! Good luck… you’re moving right along! |
|
|
|
|
09-01-2023, 08:23 AM
|
#3 |
|
Electrical Engineer
Drives: 2023 1SS A10 Black Join Date: Apr 2022
Location: Illinois
Posts: 775
|
The entire rear quarter is empty and very resonant. We fix this with come CLD on the metal surfaces, and you add material until the metal sounds more dense. Then you add sound absorption, as much as possible, and I use Ultratouch R-19 because it can be torn up and shoved in small cavities or left as a bulk piece that provides some pressure on the panels - increasing the acoustic damping properties.
  A lot of work ahead, but I do enjoy this process.
__________________
2023 1SS A10 Black NPP/C2U/H72 - Daily Driver
Historically an Accord and Camry owner with self-performed maintenance/repair. 1100: 5/3/22 . . . . . . . 2000: 6/25/22 . . . . . .4000: 8/17/22 . . . . . . . 6000: 9/10/22 Daily Driver mileage update: 22k mi. @ April 2024 New Engine @ 22,600 Build Log: https://www.camaro6.com/forums/showt...6#post11353116 |
|
|
|
|
09-01-2023, 11:34 AM
|
#4 |
 Drives: 2022 LT1, 1981 320i Join Date: May 2022
Location: Massachusetts
Posts: 71
|
Wow, nice to get a good look at what's underneath the interior. Good luck, seems like you know what you're doing.
|
|
|
|
|
09-01-2023, 11:54 AM
|
#5 | |
|
Electrical Engineer
Drives: 2023 1SS A10 Black Join Date: Apr 2022
Location: Illinois
Posts: 775
|
Quote:
__________________
2023 1SS A10 Black NPP/C2U/H72 - Daily Driver
Historically an Accord and Camry owner with self-performed maintenance/repair. 1100: 5/3/22 . . . . . . . 2000: 6/25/22 . . . . . .4000: 8/17/22 . . . . . . . 6000: 9/10/22 Daily Driver mileage update: 22k mi. @ April 2024 New Engine @ 22,600 Build Log: https://www.camaro6.com/forums/showt...6#post11353116 |
|
|
|
|
|
09-01-2023, 07:47 PM
|
#6 |
 
Drives: 2016 Camaro 2SS "Convertibobble" Join Date: Mar 2022
Location: Peoria, IL
Posts: 280
|
I was just about to accuse K_H_A of cheating, merely sending along pix of the car *on the production line* before the interior was actually installed...
...until I noticed the kitty sitting there below some of the insulation. WOW! I have no doubt it's gonna be incredible when complete. (Also, 2x on that gray interior looking very nice. For some reason cannot recall seeing many pix of other gray interiors...)
__________________
'16 2SS Garnet Red ~24K
"Mods": GM wind deflector, home-made rear seat delete & platform, not-quite garnet red key fob cover (+10rwhp) '99 4Runner 367K '94 ST1100 146K |
|
|
|
|
09-01-2023, 09:26 PM
|
#7 |
|
Drives: 6th Gen LT1 Join Date: Jun 2023
Location: Southeast
Posts: 237
|
Wow, that's amazing.
I'm impressed that you actually dissasembled everything. The interior is on of my least favorite things to work on a car. I mostly enjoy mechanical stuff. Since you know about acoustics, what would you recommend to do to lower the road and tire noise. Something relatively easy to install? |
|
|
|
|
09-02-2023, 05:20 AM
|
#8 |
|
Electrical Engineer
Drives: 2023 1SS A10 Black Join Date: Apr 2022
Location: Illinois
Posts: 775
|
At this point, I have used about 6 sheets of CLD (deadener) and about 30 cu.ft. of insulation. If I stopped here, the result would be a much quieter car with road and tire noise from the rear being nearly inaudible, because noise from the doors/floor/front would dominate. That is how you perceive sound - you perceive the loudest source and once you eliminate that, you perceive the second loudest... then third... then fourth... and so on.
What makes the rear quarters so problematic is the surface area. It is also the more difficult area to access given how much disassembly is required. Because that volume is open to the trunk, we have the entire trunk/rear/quarter/floor/wheel well/etc. directed into the cabin with only plastic to contain it. Now, I do give GM some credit for the one barrier/pad that is behind the speaker. Without that, road noise would be MUCH louder in this car. This is what I'm stuffing into the cavities:  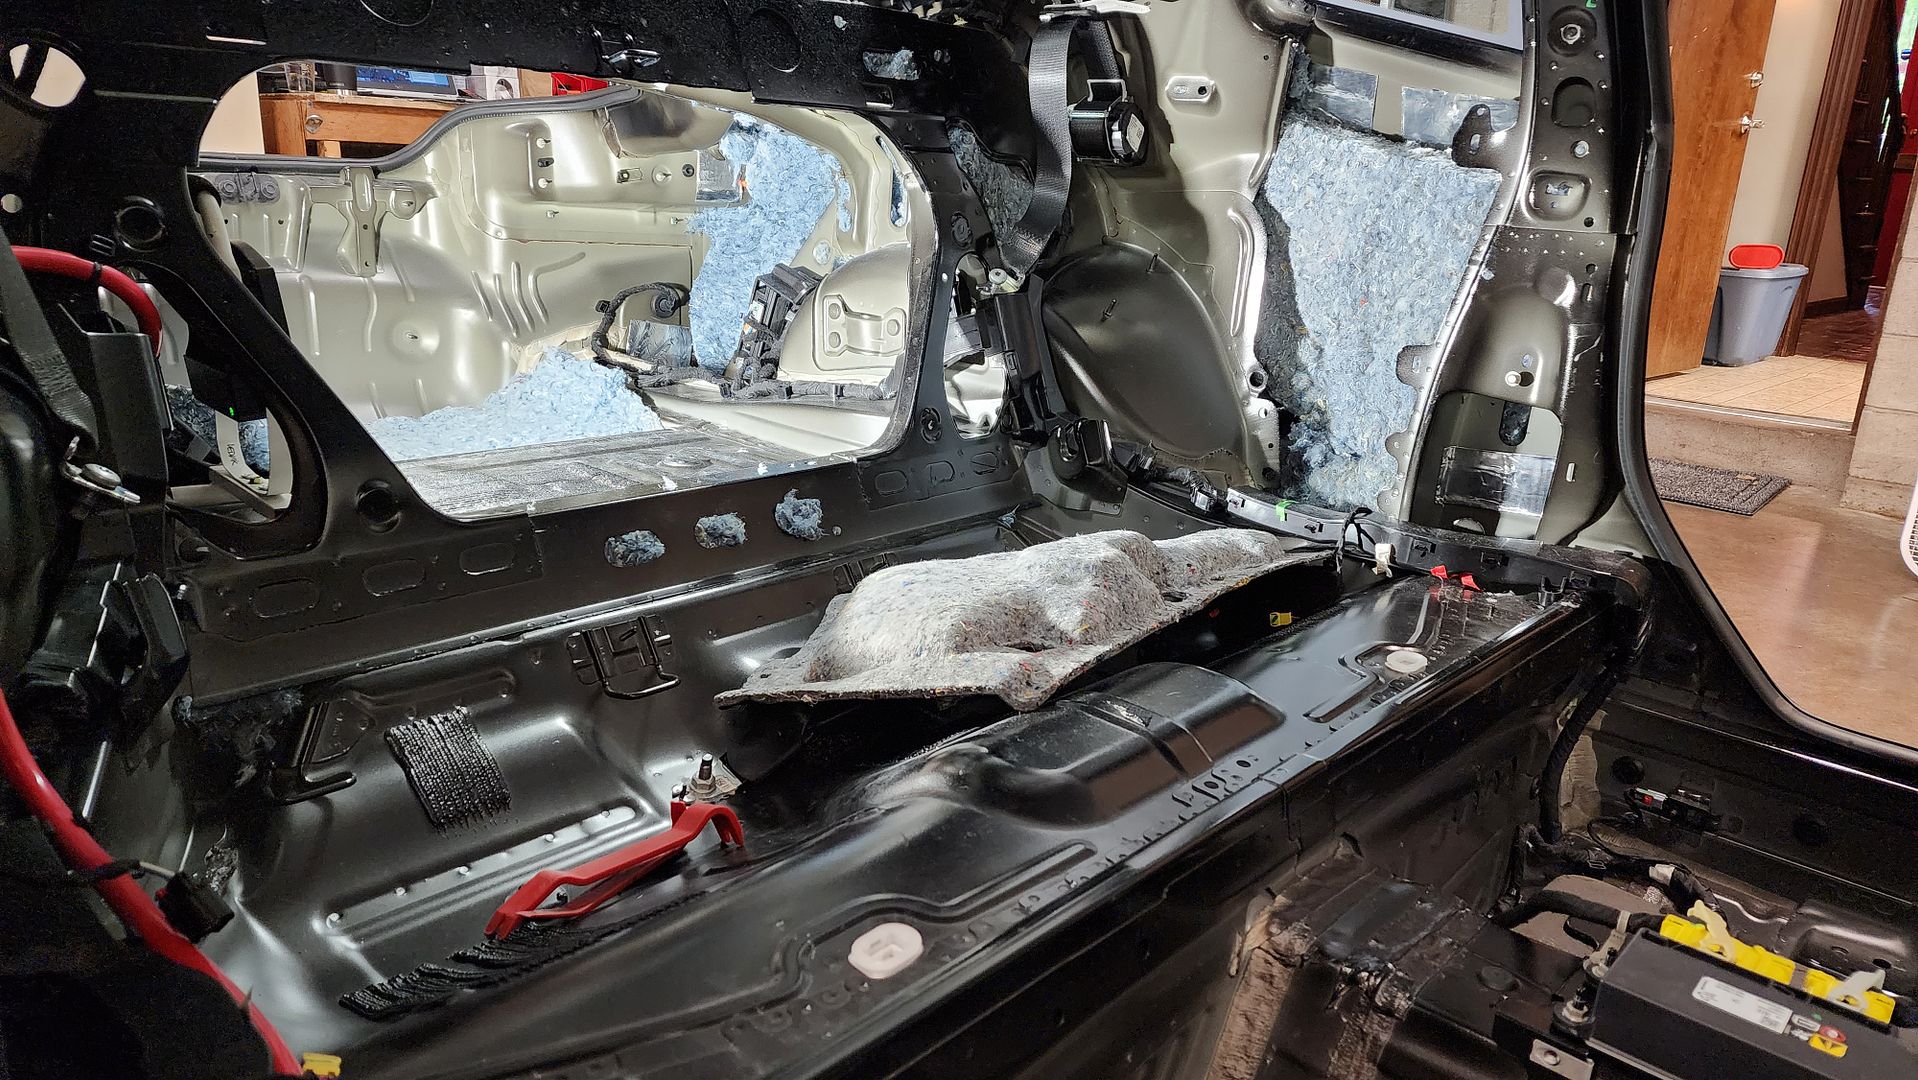 The passenger side required removal of the battery, which is fairly easy at this point. 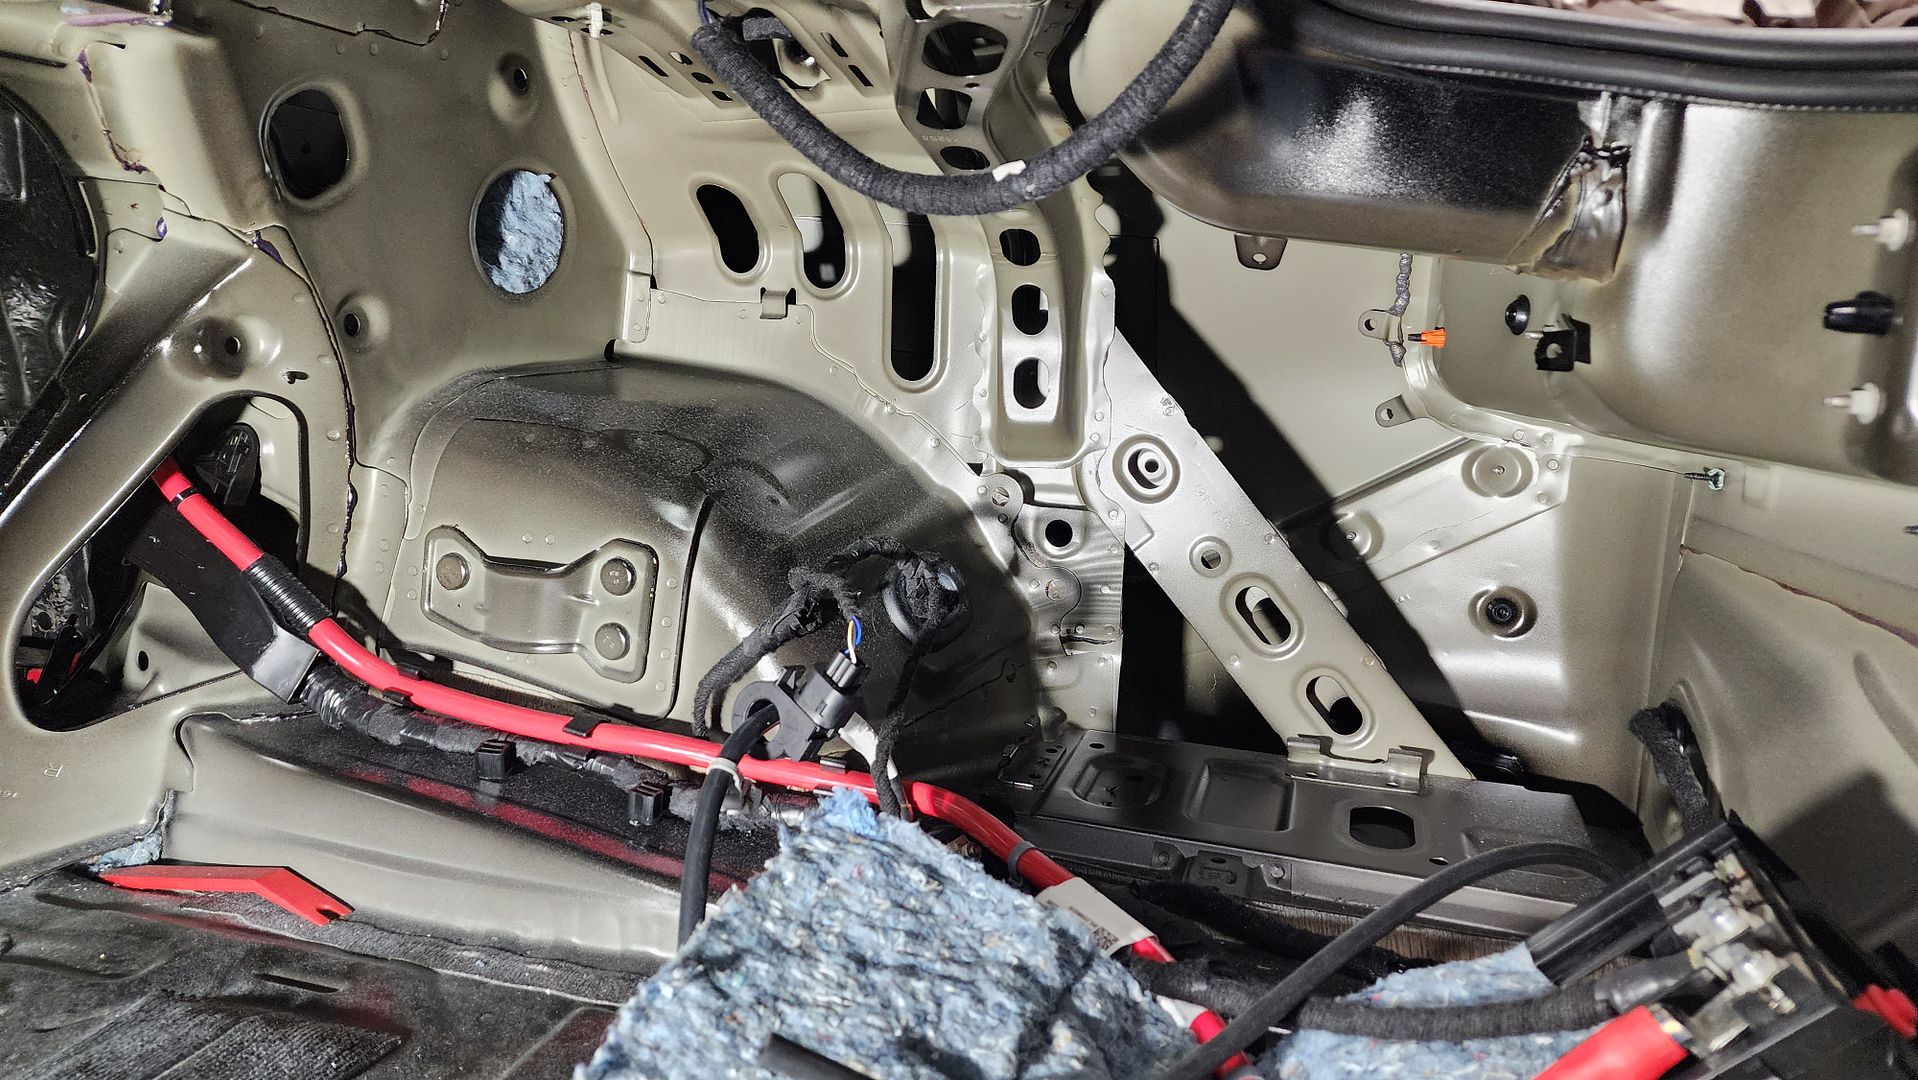 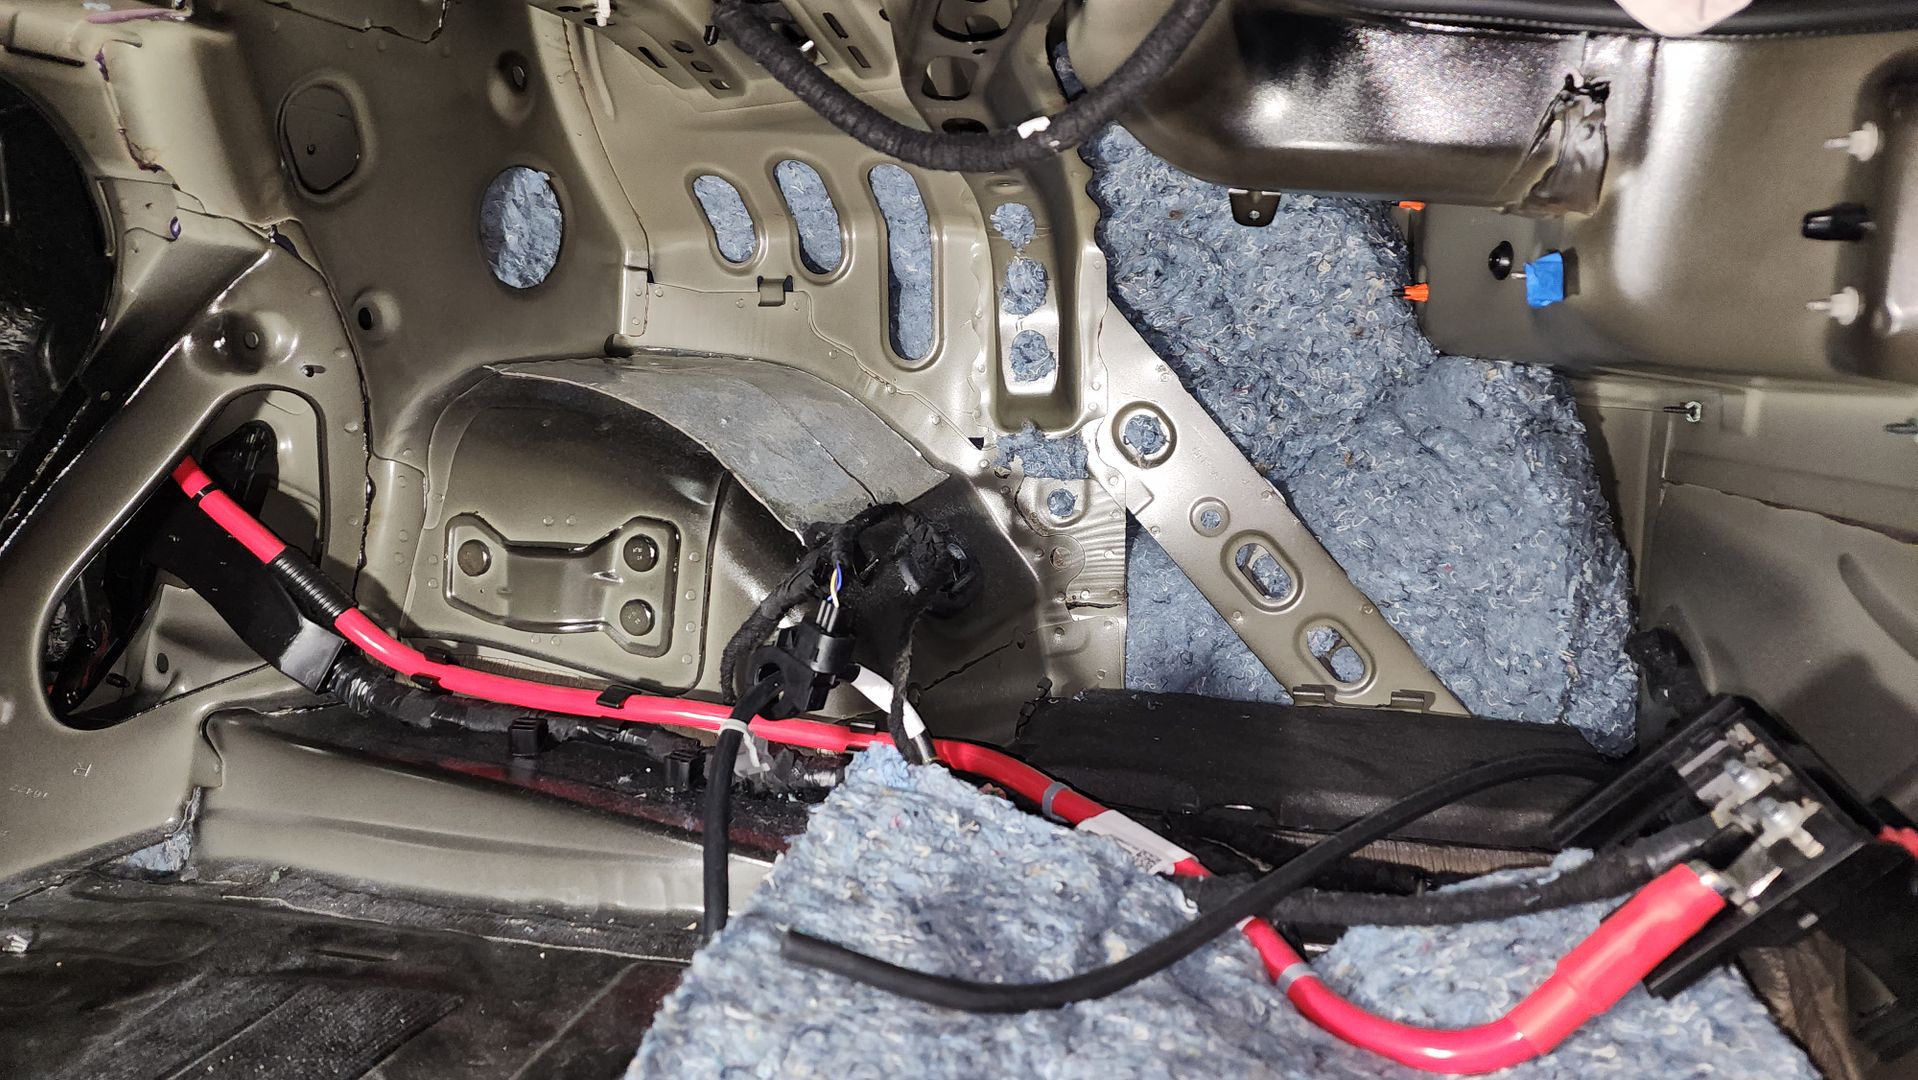 battery tray is stuffed below and then CLD is added. 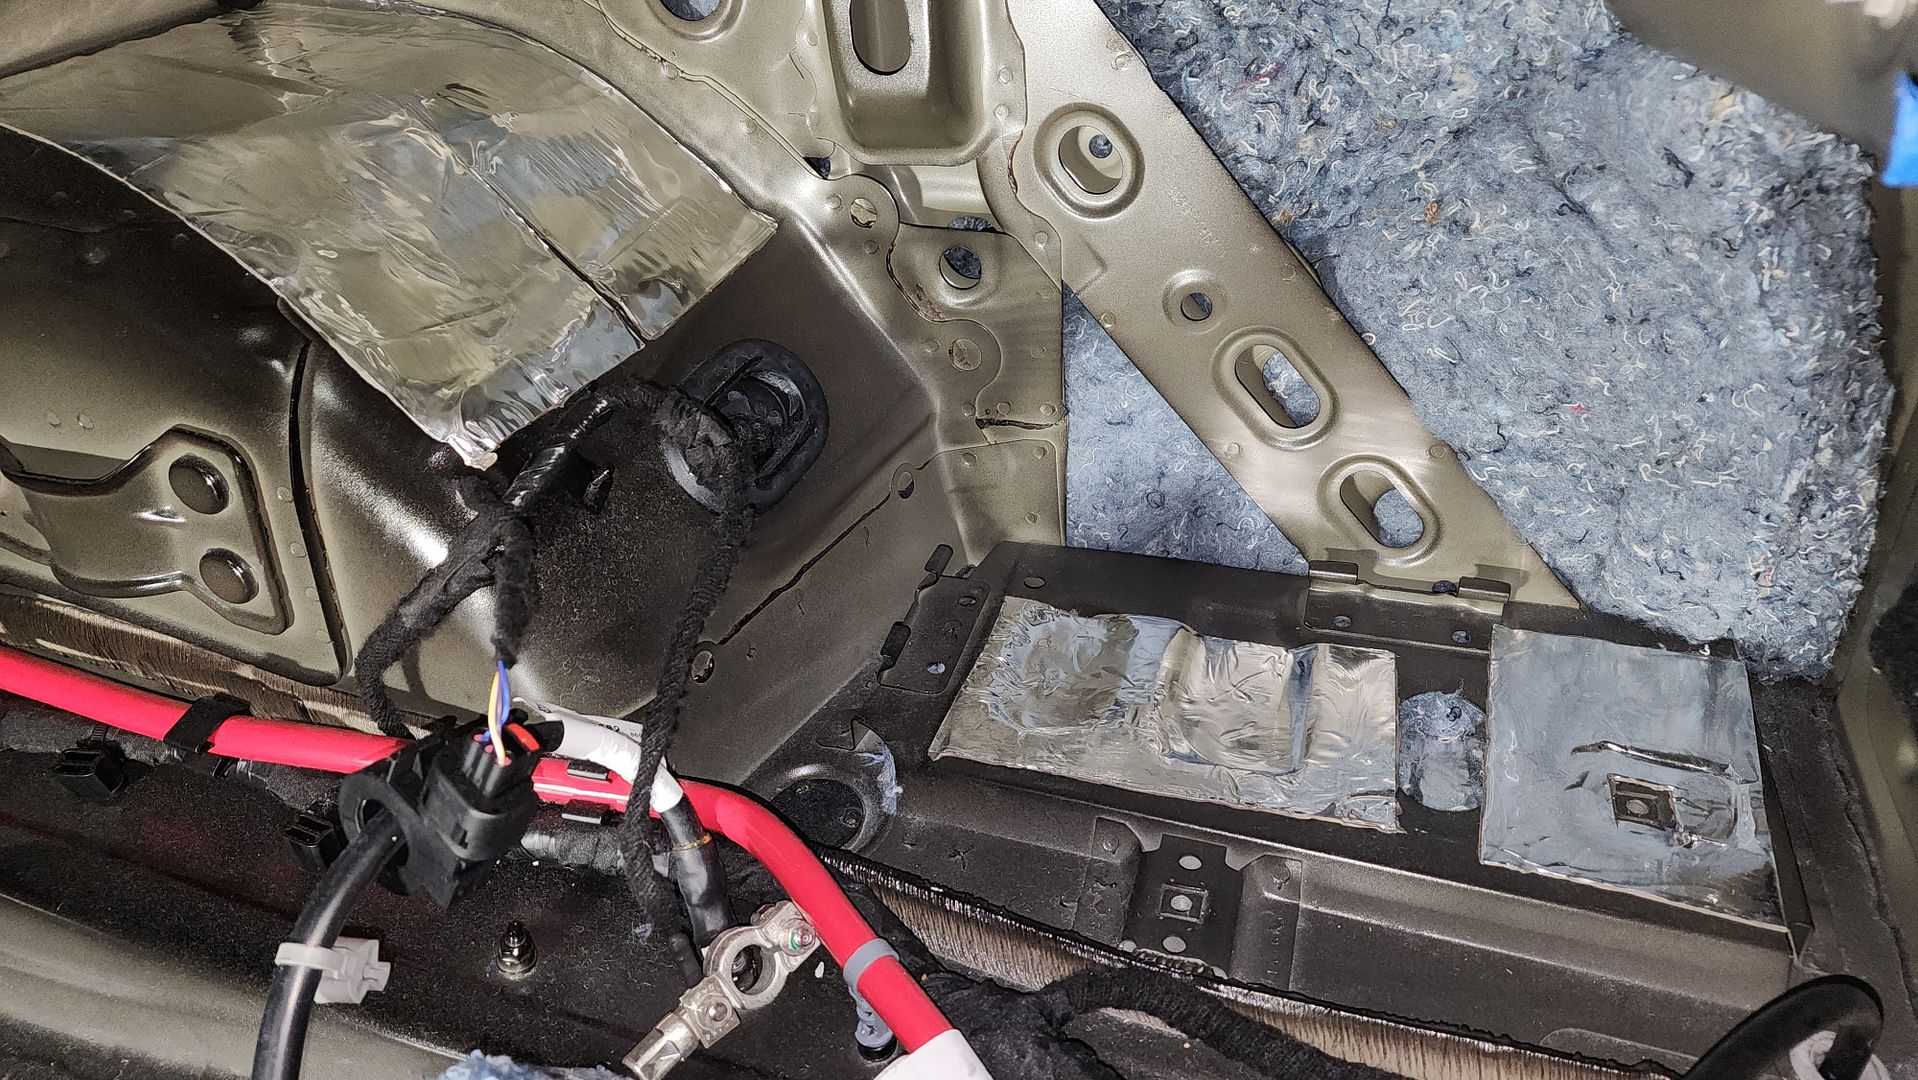 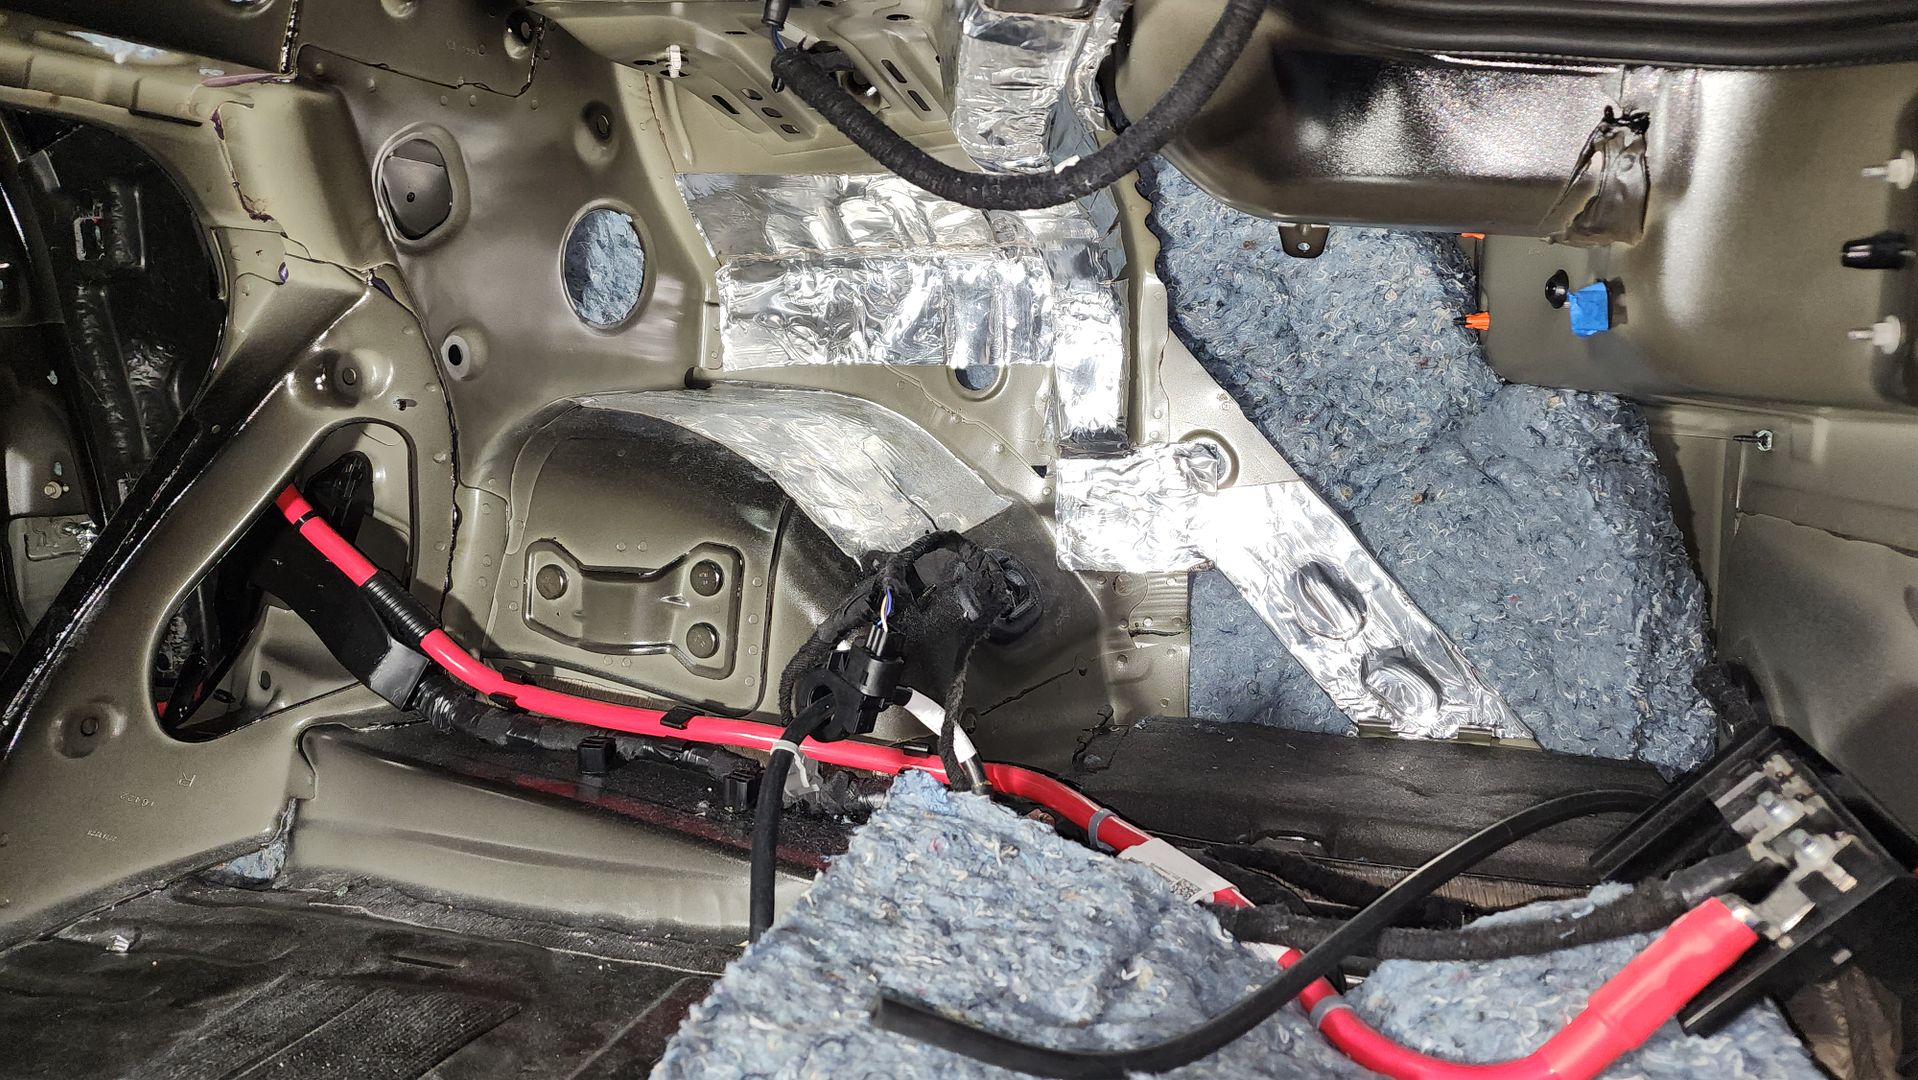 Now it is ready for the battery. I have added a closed cell foam (CCF) to the top of the battery tray and where mounts connect to pad those contact surfaces. CCF is the next step during reassembly. I also have a thermal barrier covering the opening to the quarter panel to contain the insulation fibers. I don't want the battery area getting dusty from those fibers. The thermal barrier is just a dense layer of ultratouch insulation with a foil facing. This stuff is handy to use on the floor as well. 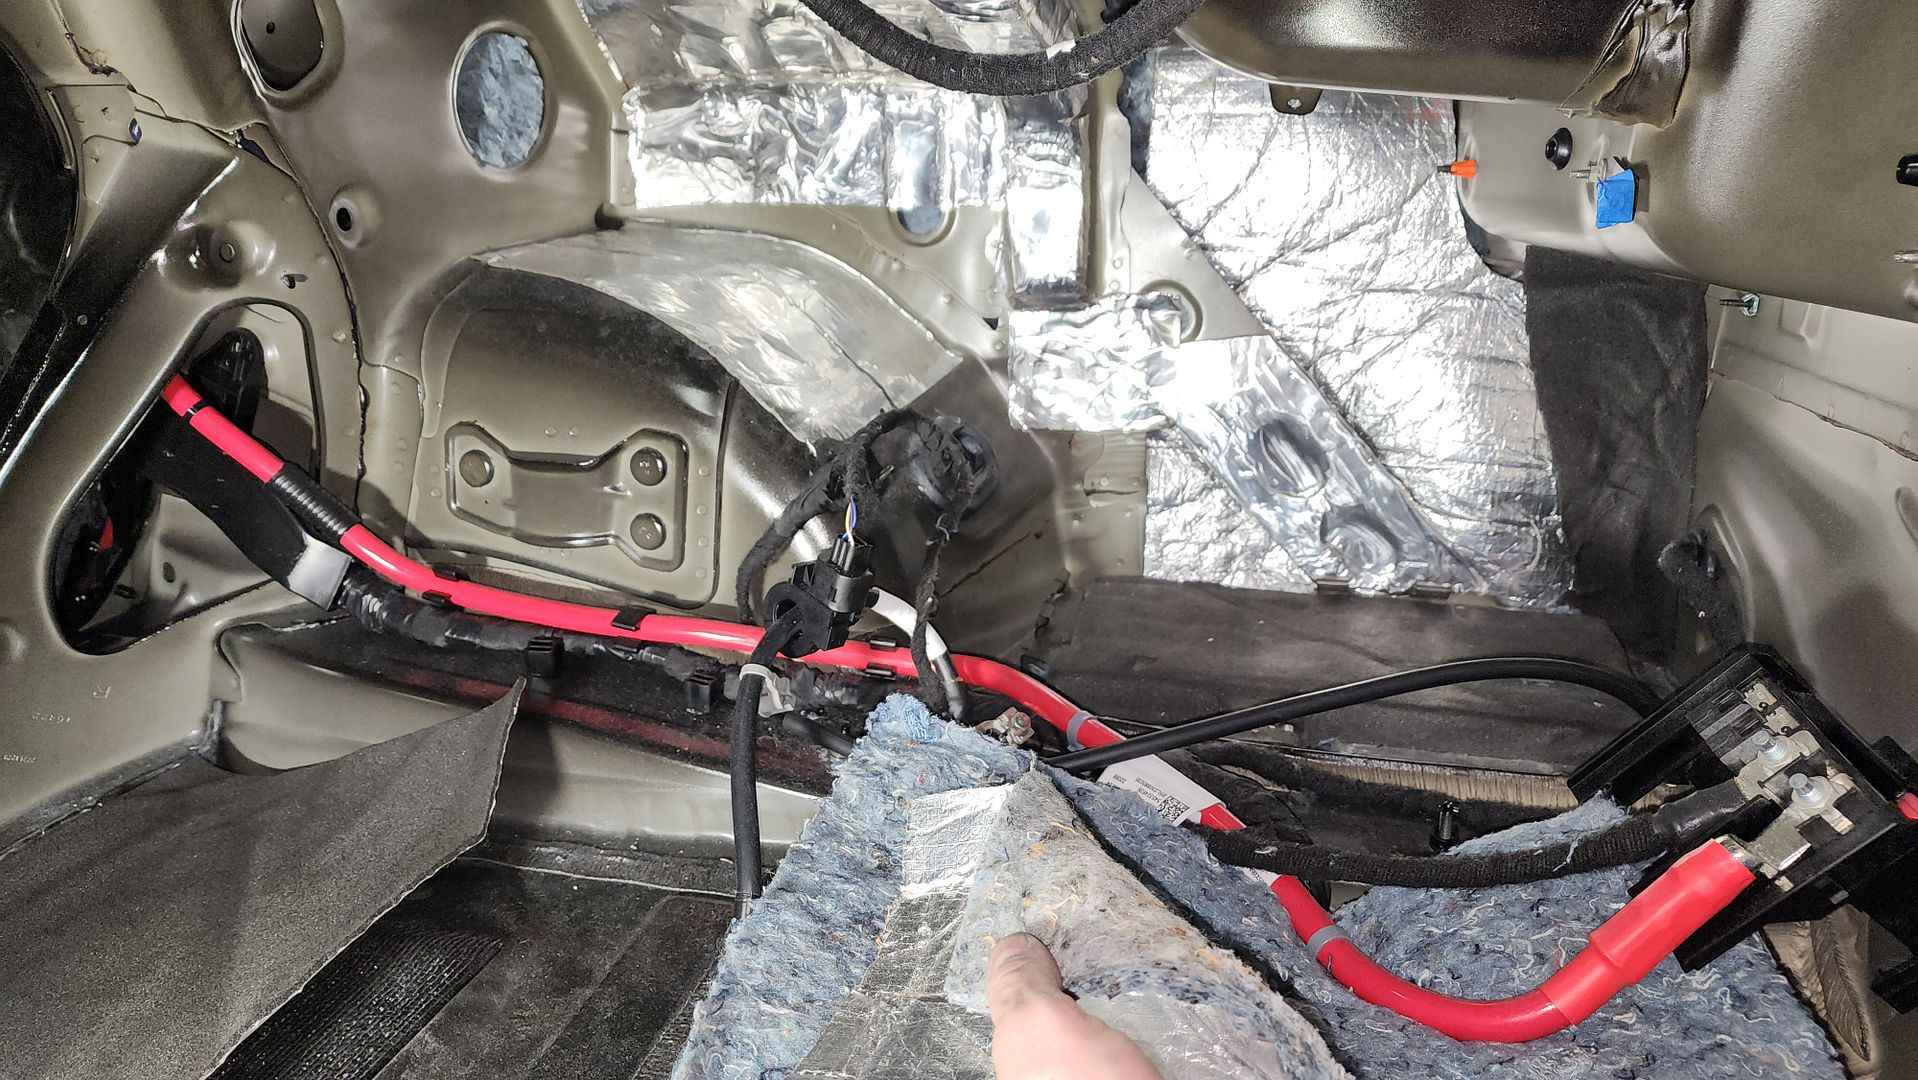 Battery reinstalled. I may do a full layer of CCF behind it to fully encapsulate the area, and it will look nice too. 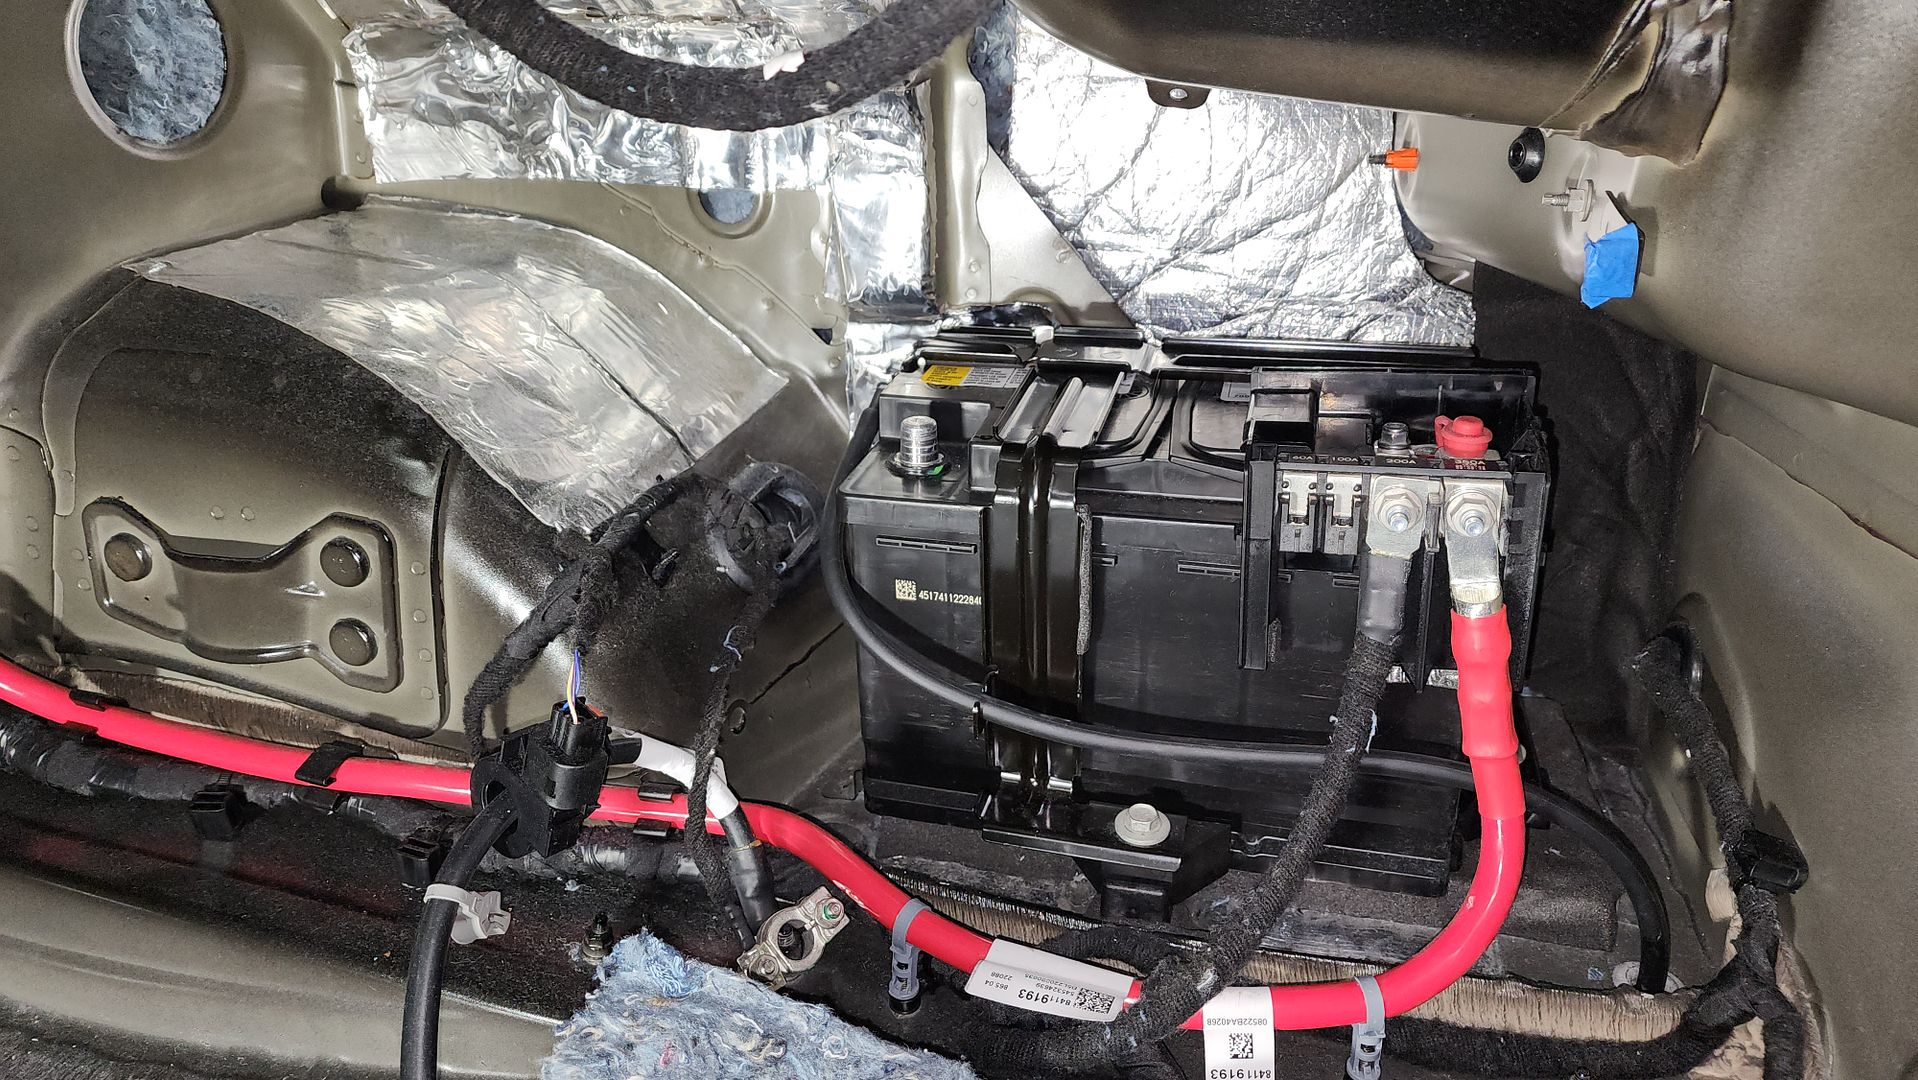
__________________
2023 1SS A10 Black NPP/C2U/H72 - Daily Driver
Historically an Accord and Camry owner with self-performed maintenance/repair. 1100: 5/3/22 . . . . . . . 2000: 6/25/22 . . . . . .4000: 8/17/22 . . . . . . . 6000: 9/10/22 Daily Driver mileage update: 22k mi. @ April 2024 New Engine @ 22,600 Build Log: https://www.camaro6.com/forums/showt...6#post11353116 |
|
|
|
|
09-02-2023, 05:31 AM
|
#9 | |
|
Electrical Engineer
Drives: 2023 1SS A10 Black Join Date: Apr 2022
Location: Illinois
Posts: 775
|
Quote:
 I have been happy with the gray. My last car was all black and it was less interesting.
__________________
2023 1SS A10 Black NPP/C2U/H72 - Daily Driver
Historically an Accord and Camry owner with self-performed maintenance/repair. 1100: 5/3/22 . . . . . . . 2000: 6/25/22 . . . . . .4000: 8/17/22 . . . . . . . 6000: 9/10/22 Daily Driver mileage update: 22k mi. @ April 2024 New Engine @ 22,600 Build Log: https://www.camaro6.com/forums/showt...6#post11353116 |
|
|
|
|
|
09-02-2023, 05:48 AM
|
#10 | |
|
Electrical Engineer
Drives: 2023 1SS A10 Black Join Date: Apr 2022
Location: Illinois
Posts: 775
|
Quote:
Much easier to access with the seats removed! But removing these seats is a bit of a hassle because the harness is tricky to access and you have to remove the seat belt retractor which means you have to remove the B-pillar trim. One could just leave the seats next to the car the whole time and keep the belts connected, but I didn't want to walk around them for a few weeks. What I am doing is what will greatly reduce road and tire noise. Granted, you could skip the small areas where I fill every void and cavity and just focus on the large areas. But the same level of disassembly is required. You could just put insulation in the cavity around the wheel wells then recover with the factory panels. An easier product to use is Fibermat as it is the same as what the factory uses, just thicker. https://resonixsoundsolutions.com/sh...absorbing-mat/ Fibermat doesn't have the hassle of the UltraTouch insulation I use, and you could put large pieces in the wheel wells and behind the factory panels. This here is the best moldable noise barrier on the market: https://resonixsoundsolutions.com/sh...noise-barrier/ It is designed to cover the floor and wheel wells, and is easy to conform. It's not cheap tho, and it requires full coverage to be effective. But it's much easier to work with than mass loaded vinyl (MLV). Road noise comes from a variety of areas, some we can treat and some we can't. As we start to make the car quieter, we attack the most problematic areas, which reveals other areas. To me, the rear is the loudest and now that I've seen what's there, it makes sense. What we can treat:
What we can't treat:
I did take 1/3 octave sound pressure level measurements with the stock configuration (my experience as an Acoustical Engineer provides me with the tools and experience to take useful measurements). I recorded the process and have a repeatable path so I can compare when I'm done. If GM used nylon-coated clips (like my Honda and Toyota) instead of metal clips, I would reinstall everything and retest before the next step. Instead, the clips GM uses don't like to be reused, so my goal is to reassemble once I'm complete.
__________________
2023 1SS A10 Black NPP/C2U/H72 - Daily Driver
Historically an Accord and Camry owner with self-performed maintenance/repair. 1100: 5/3/22 . . . . . . . 2000: 6/25/22 . . . . . .4000: 8/17/22 . . . . . . . 6000: 9/10/22 Daily Driver mileage update: 22k mi. @ April 2024 New Engine @ 22,600 Build Log: https://www.camaro6.com/forums/showt...6#post11353116 |
|
|
|
|
|
09-02-2023, 06:06 AM
|
#11 | |
|
Electrical Engineer
Drives: 2023 1SS A10 Black Join Date: Apr 2022
Location: Illinois
Posts: 775
|
Quote:
My 2001 Accord before that was a rolling laboratory, that long build log is here: https://www.diymobileaudio.com/threa...-diy-sq.66357/ This was the quietest Scion tC on the road, that also sounded amazing: https://www.caraudio.com/threads/200...ld-log.495486/
__________________
2023 1SS A10 Black NPP/C2U/H72 - Daily Driver
Historically an Accord and Camry owner with self-performed maintenance/repair. 1100: 5/3/22 . . . . . . . 2000: 6/25/22 . . . . . .4000: 8/17/22 . . . . . . . 6000: 9/10/22 Daily Driver mileage update: 22k mi. @ April 2024 New Engine @ 22,600 Build Log: https://www.camaro6.com/forums/showt...6#post11353116 |
|
|
|
|
|
09-02-2023, 07:03 AM
|
#12 |
 
Drives: 2SS 1LE Join Date: Jul 2023
Location: Massachusetts
Posts: 320
|
Good stuff here, thanks for sharing. Brings me back to my car audio days..
I'm impressed by the factory bracing that you can see in the trunk once everything is removed. How do you ensure everything is reinstalled 100% correctly and without looseness / rattles? That's always been my fear when it comes to interior work.
__________________
2024 2SS 1LE | 6MT | Riverside Blue
1100 - Order submitted - 7/12/23 2000 - Order accepted - 8/22/23 Vehicle Built (per chevy chat bot) - 10/10/23 Window sticker available online - 11/4/23 Arrived at dealership - 11/10/23 |
|
|
|
|
09-02-2023, 07:24 AM
|
#13 | |
|
Electrical Engineer
Drives: 2023 1SS A10 Black Join Date: Apr 2022
Location: Illinois
Posts: 775
|
Quote:
When I reinstall the panels I take a few important steps. 1. I ensure all clips are in-place and I replace damaged clips. 2. I add soft things between the hard places that touch. CCF or felt with an adhesive backing is great here. This is what luxury cars have to prevent rattles. 3. I take my time and pay attention to ensure each clip is properly inserted.
__________________
2023 1SS A10 Black NPP/C2U/H72 - Daily Driver
Historically an Accord and Camry owner with self-performed maintenance/repair. 1100: 5/3/22 . . . . . . . 2000: 6/25/22 . . . . . .4000: 8/17/22 . . . . . . . 6000: 9/10/22 Daily Driver mileage update: 22k mi. @ April 2024 New Engine @ 22,600 Build Log: https://www.camaro6.com/forums/showt...6#post11353116 |
|
|
|
|
|
09-10-2023, 09:27 PM
|
#14 |
|
Electrical Engineer
Drives: 2023 1SS A10 Black Join Date: Apr 2022
Location: Illinois
Posts: 775
|
My Resonix order has arrived. Contained within the order are the following:
(2) Boxes of CLD for 80sq.ft. (1) Box of FiberMat 25 (2) Boxes of Fibermat 45 (2) Boxes of Guardian (4) CCF Speaker Ring Stips (1) Sheet of CCF Decoupler 3S (1) Roll of Butyl Rope (1) Roll of Harness Tape (1) Sheet of Moldable Barrier Step 1 is to clean the metal surfaces to remove grease/dust/dirt. Step 2 is a full treatment of CLD, nearly 100% coverage, along the outer door skin. Step 3 is a full treatment of Guardian, nearly 100% coverage, along the outer door skin (on top of CLD) Step 4 is a full treatment of CLD, nearly 100% coverage, along the inner door skin, being careful not block clip/fastener holes. Step 5 is to close up the holes with Moldable Barrier. Step 6 is to prepare the speaker mount which will be a combination of CLD on the adapter, Butyl Rope between adapter and metal, and between speaker and adapter, and then CCF Strips to seal the speaker to the door panel. Step 7 is treating the door panel itself with CLD. Step 8 is covering the door panel with Fibermat. 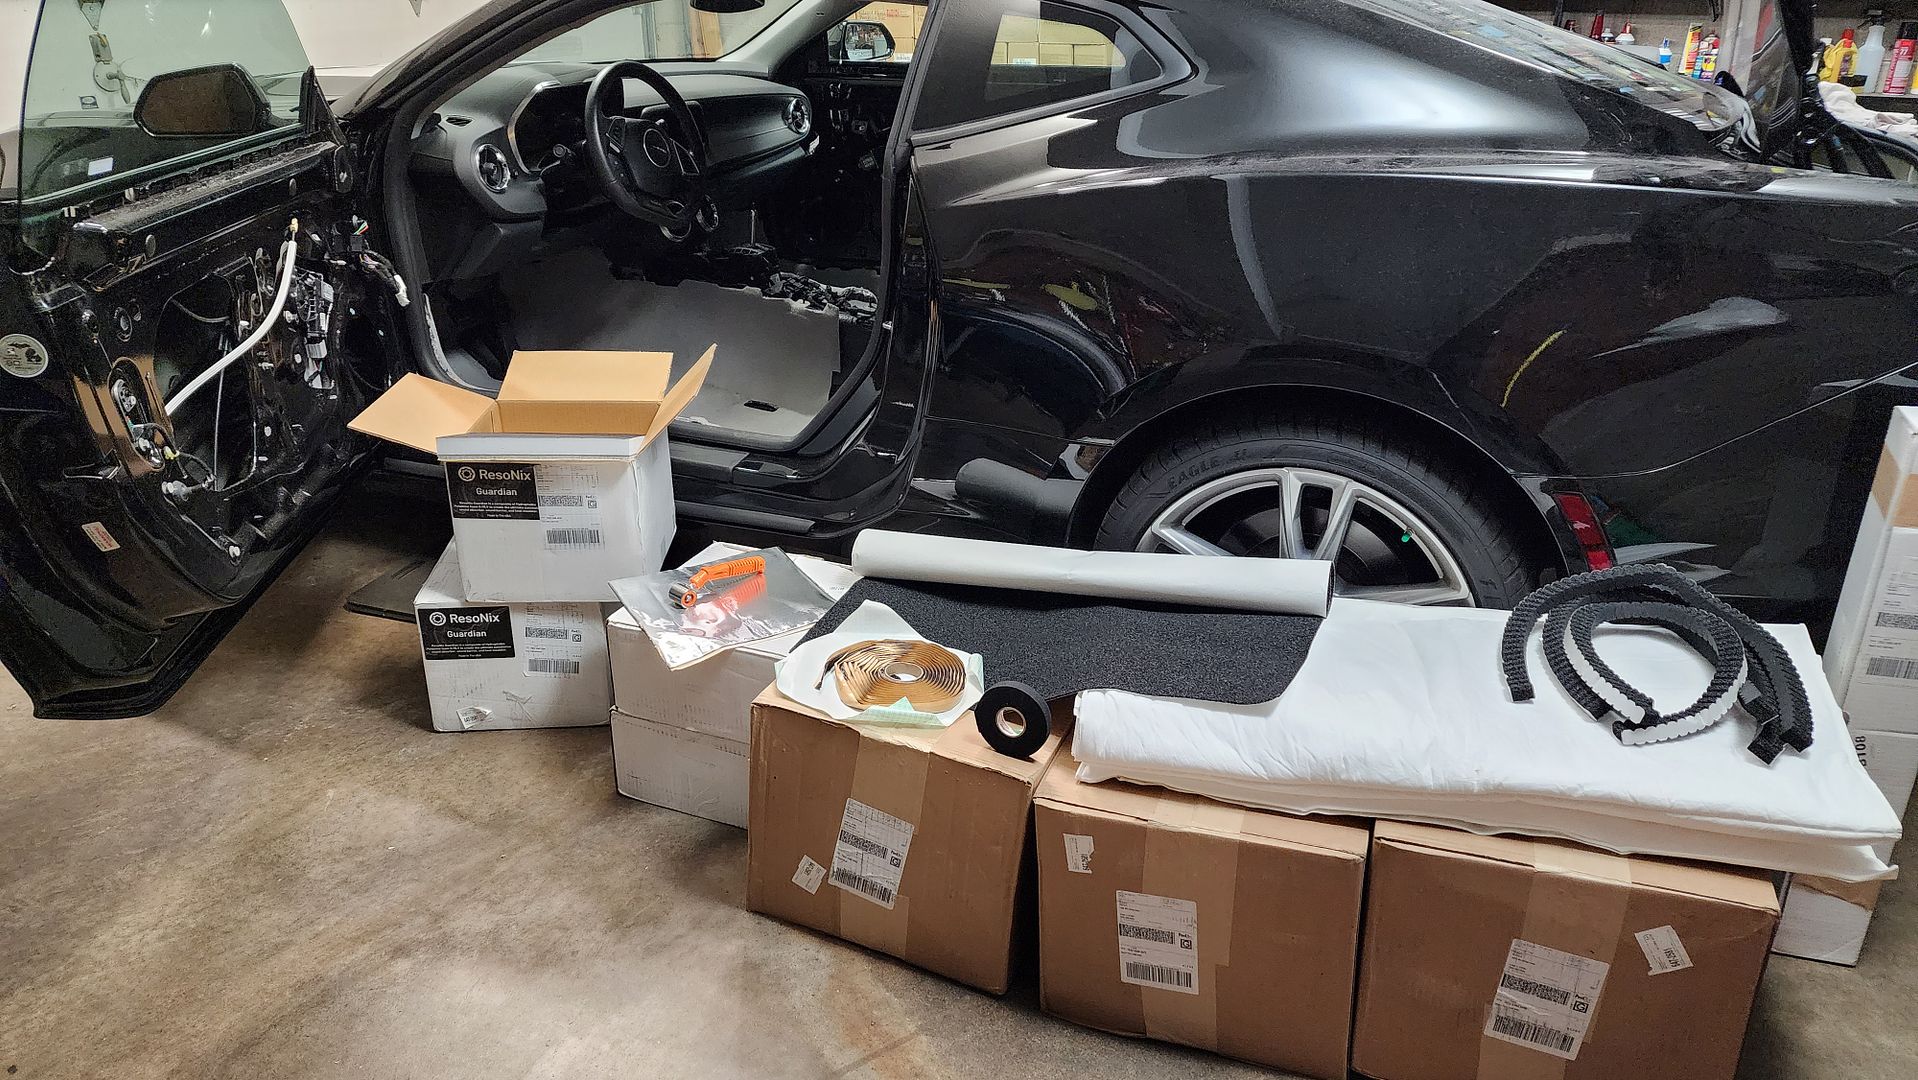 It’s great to finally have a viable alternative to loose insulation for sound absorption. This is a perfect product, it is the same as OEM but thicker and better, with a PSA. 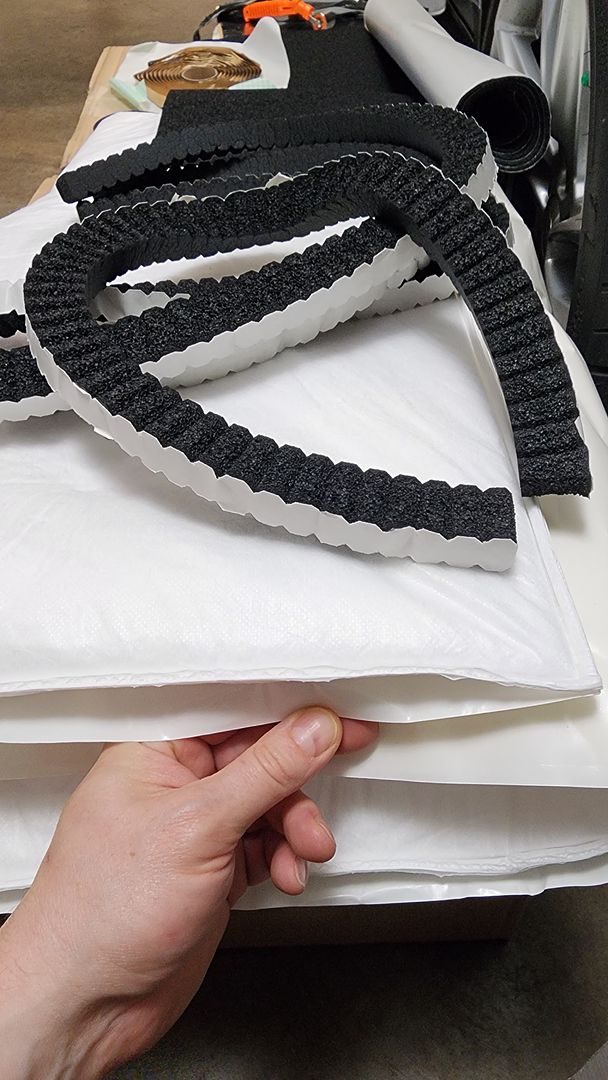  Finally, a product that replaces my fiberglass panels wrapped in plastic. And this is better than a replacement as it offers superior features to anything I have made myself before. 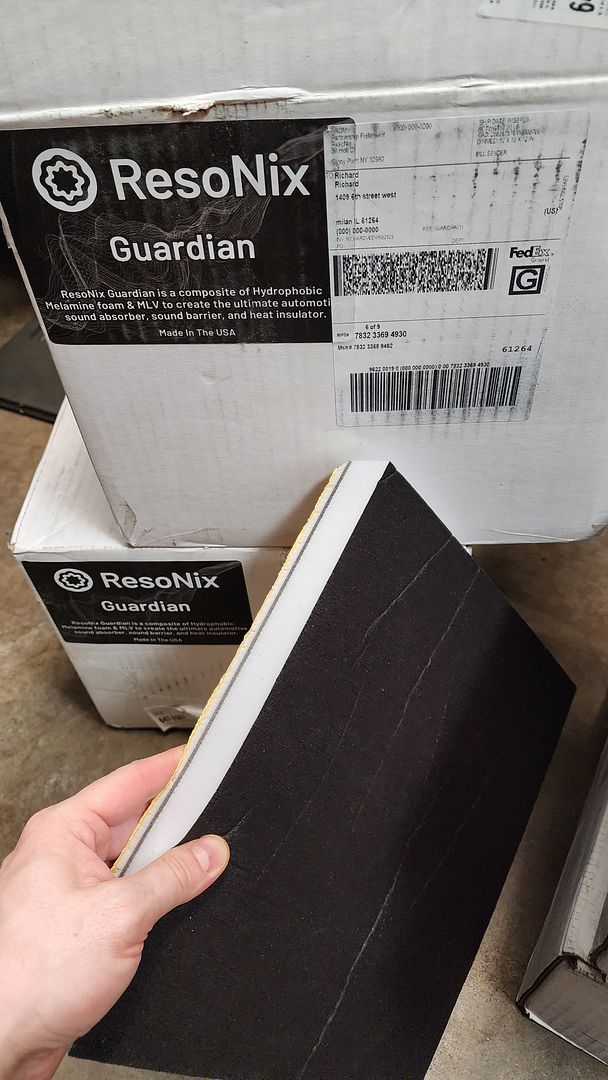 Driver’s door is ready to be closed up with Moldable Barrier. About 12 sq.ft. of CLD and almost one full box of Guardian is on this door so far. 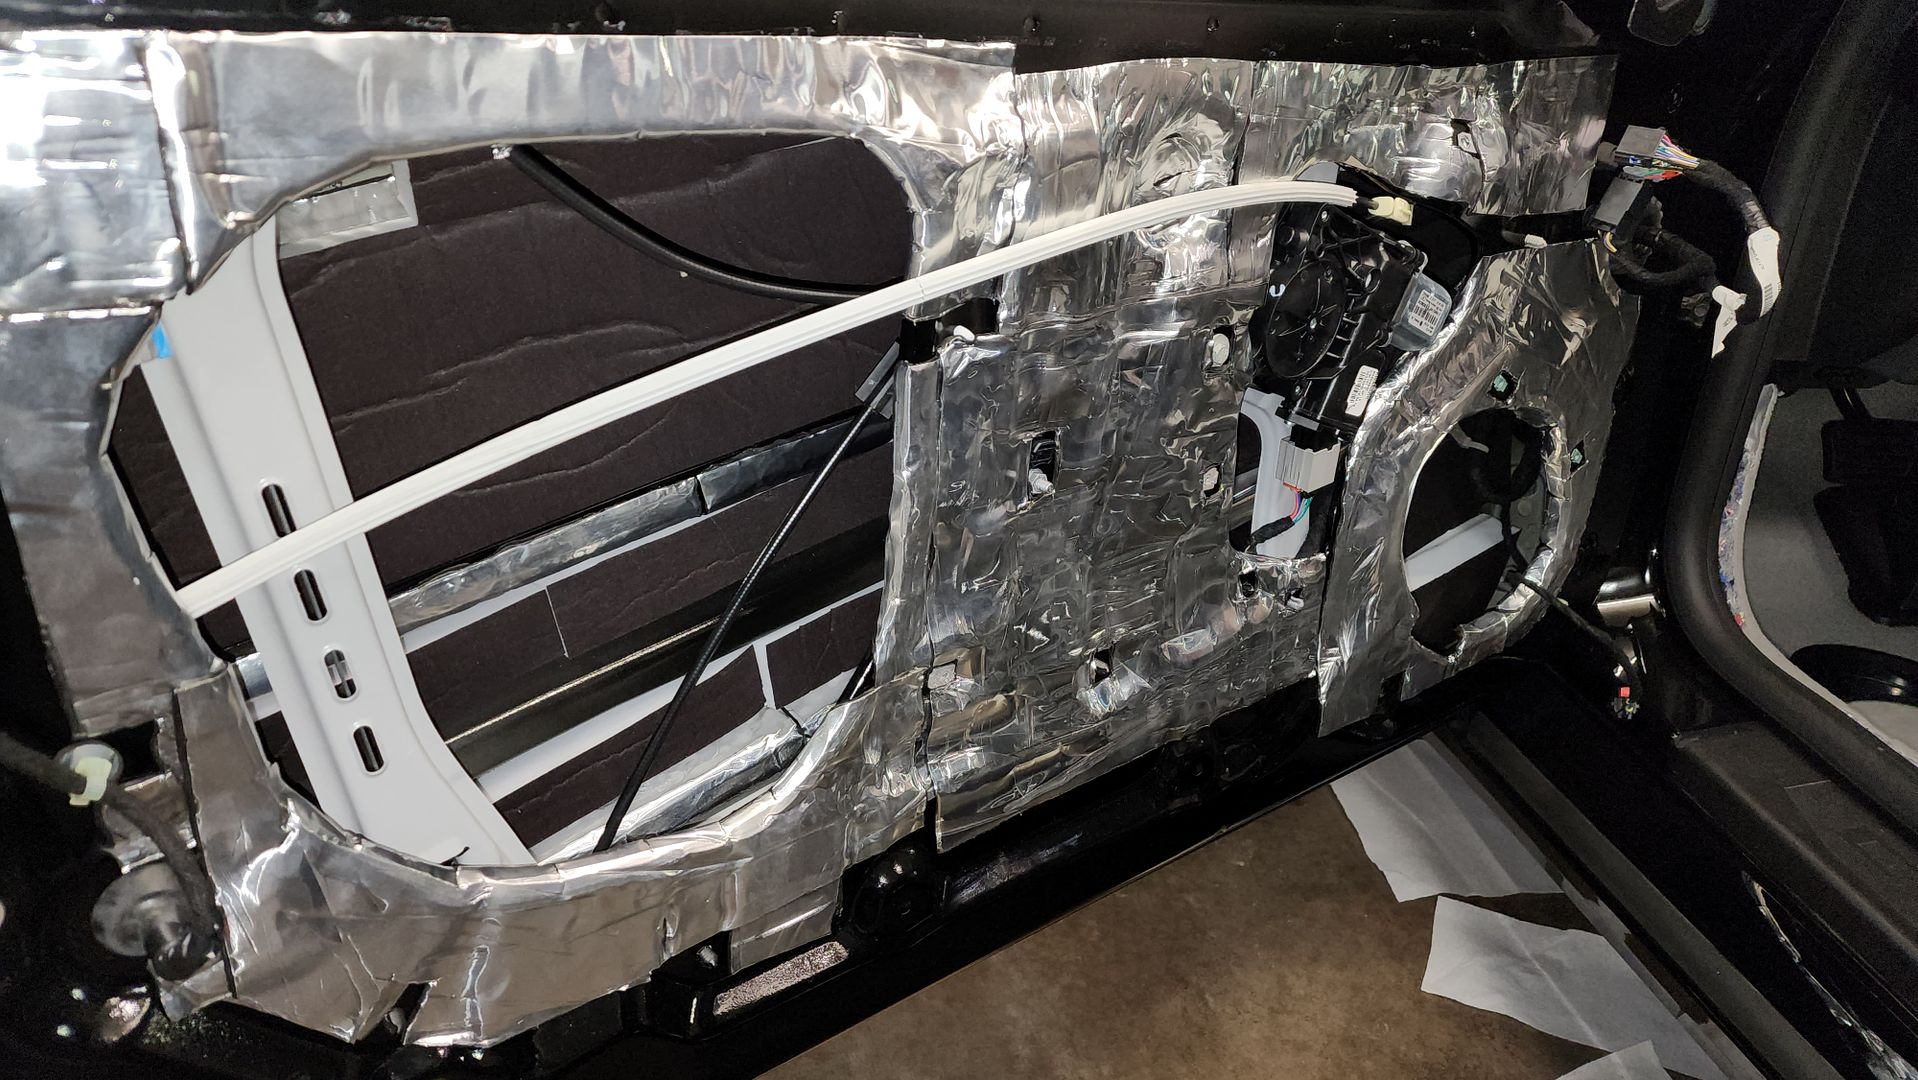 I need to treat and add the speaker mounting bracket next, making that adapter as “dead” as the doors.  Passenger door is in-process, and you can see how thick Guardian is. I’ve even added strips in the wells of the “W” shaped brace. 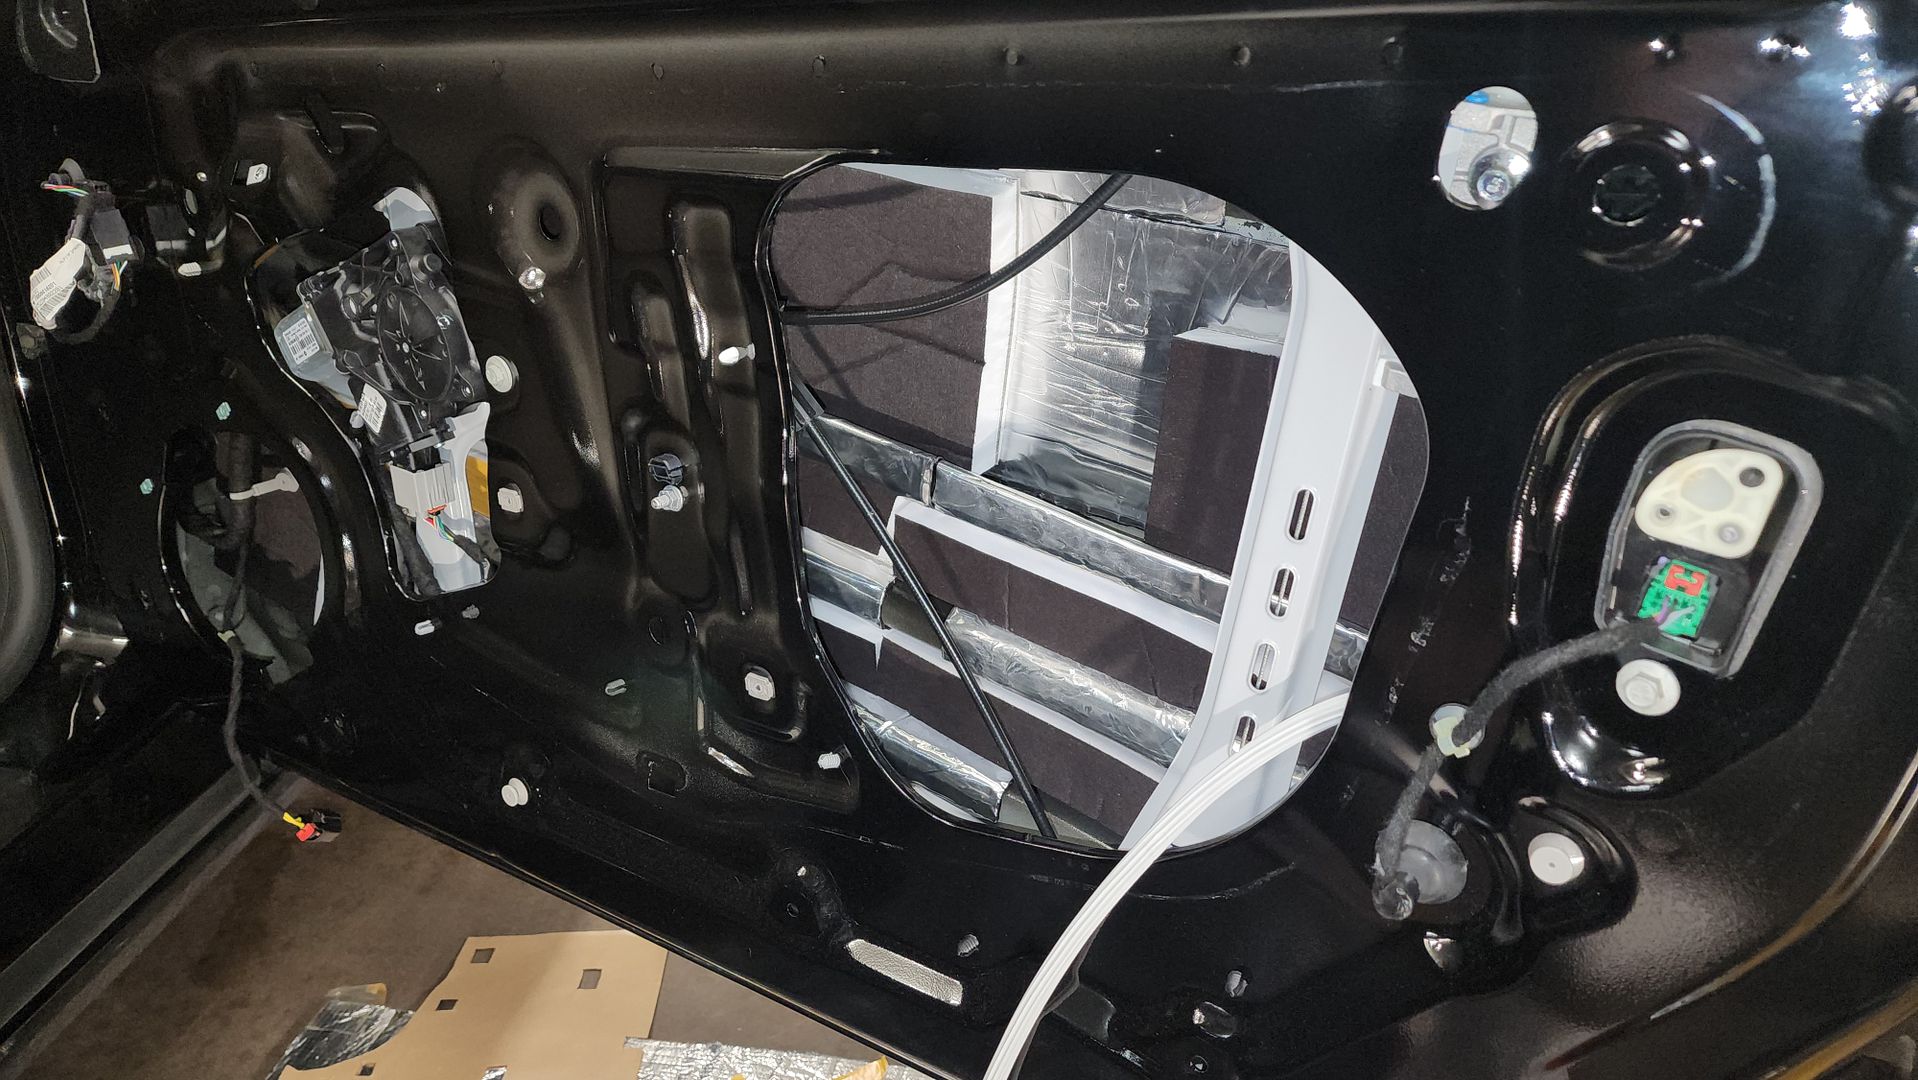 I have more to add, and the process of adding this is tedious. I’m taking videos of the process to share on my channel once I have the doors wrapped-up. 
__________________
2023 1SS A10 Black NPP/C2U/H72 - Daily Driver
Historically an Accord and Camry owner with self-performed maintenance/repair. 1100: 5/3/22 . . . . . . . 2000: 6/25/22 . . . . . .4000: 8/17/22 . . . . . . . 6000: 9/10/22 Daily Driver mileage update: 22k mi. @ April 2024 New Engine @ 22,600 Build Log: https://www.camaro6.com/forums/showt...6#post11353116 |
|
|
|
|
|
|
|
|
Post Reply
|
| Tags |
| acoustic, audio, speakers, stereo, subwoofer |
| Thread Tools | |
|
|


