Making a Post and uploading pictures
Using the quick reply method.
The quick reply can be found at the bottom of every page of a thread. It looks like this.
To use the quick reply box simply type your response inside the box, and click the "post quick reply" button.
Obviously the quick reply box is not going to give you a full range of features. If you need more options we can "go advanced"
Using the advanced window
The advanced window has all of the features of the quick reply box and more. Most importantly, the advanced window has the Upload button.
The advanced box has the same simple setup as the quick reply box. Simply type your response in the white space and click "submit reply" To get more advanced, you must use the various buttons on the screen to achieve your goals.
Lets start with the top row.

- The remove text formatting button. Highlight the text you wish to return to the default settings, and click this button.
Fonts - Click the

arrow, and it will reveal a list of fonts for you to choose from.
Sizes - Click the
arrow to select sizes.

- Font color button.

- Commonly used smileys button

- The upload button. Seemingly the most important button to almost every user of Camaro5. I will go into depth with this later on in the page.


- Undo and redo buttons, use these when you screw up...And you will screw up.


- Bold button

- Italics button

- Underline button


- Left align, center, and right align buttons.


- Numbered lists and bulleted lists. Rarely used, but really help to clean up a post.

- The hyperlink button. Highlight the text you want to turn into a link, click this button, paste in your address...


- Remove Hyperlink button. Guess what this does.

- E-mail adress link, use this to make an easy way for people to email you.

- Insert image button, completely different from the Upload button. Use this for inserting images from the internet. Simply right click on an image, "copy link location", click this icon
, and paste the link. Simple as that.

- Essentially quotes selected text.
Using pics in your replies
Using the Upload Icon
The upload Icon can be you worst enemy, or your friend. It is up to you. Patience will get you there. Start off by clicking the icon.
By clicking the icon, you will have a window open up that looks like this:
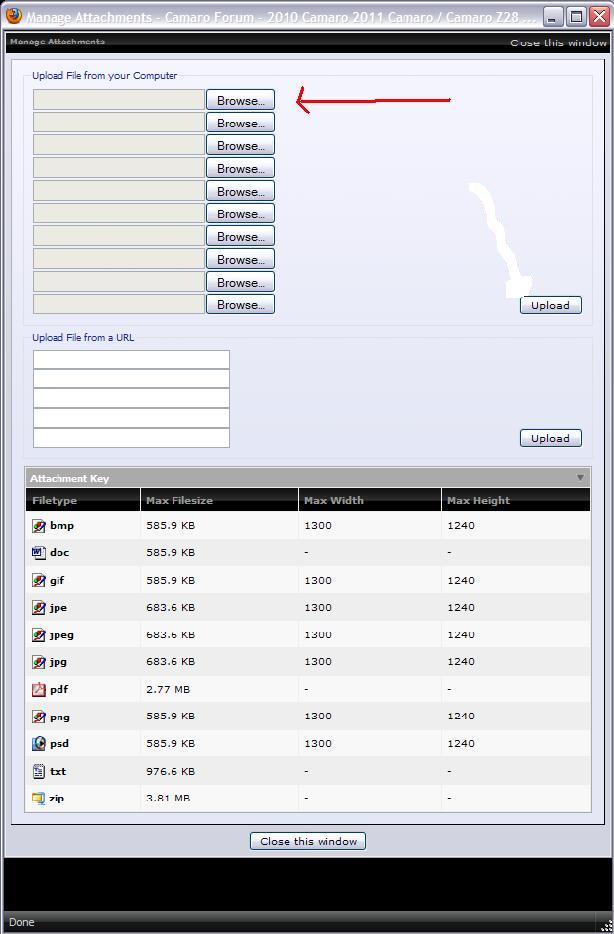
This window is easier to use than it looks. Start off with the browse button. This button will open up the files on your Personal Computer. Search for the file on your computer and select it. The next step is extremely crucial for a successful upload. Please read it carefully.
Press the "Upload" button. If you do not press this, and you close the window before you upload your file, your image will fail to upload.
^When you see new data in the box Under "current attachments" Then you have successfully uploaded your pic.
Select close window. Now, there are 2 ways to finish this process.
- After you get done typing your reply, select the "post reply" button. This will automatically put your uploaded pics at the end of your post.
- Or you can strategically place your uploaded files into your reply by clicking the down arrow beside the . This button will bring up a drop down menu with all of your uploaded files in it. Simply select the file you want to insert into your reply.
At this point click "submit reply" And to your surprise, the pic will be uploaded exactly where you want it.

Extremely simple way to insert images from a website into your reply. Simply right click an image, and select "copy image location"
When you return to your Reply box, select
, paste in your link, and press Ok. Pic should load into your message box.