[FONT="Comic Sans MS"][COLOR="Navy"]
Selecting the Correct Polishes.
Using high quality polishes is important when machine polishing because we want to ensure that we remove the as little paint as possible, while removing the tops of the scratches in the most uniform manner. We want do this with out excessively scouring the paint's finish. A brief description of how polishes wok is in order. A polish is nothing more then abrasive material (aluminum oxide) held in a lubricated suspension. As the machine forces the pad to move against the paint (the movement is a function of the machine design) the abrasives are forced against the paint, removing microscopic amounts of paint. With traditional diminishing abrasive polishes the abrasives wear during the polishing cycle, becoming finer and finer, bringing the paint to a higher and higher luster. Newer, super micro abrasive polishes are already super refined and ultra fine to begin with. They do not break down or wear, but instead produce a very even cut through the time they are applied.
As a professional detailer, I carry almost 50 different polishes from many different manufactures in order to get the best possible shine and gloss on the paint. For novices, beginners, and enthusiasts, this would be overload. It is best stick with one brand of polish and one type of abrasive (diminishing or non-diminishing).
Proper Auto Care was the first company to bring
Germany's Menzerna line to the enthusiast market, and even today,
Menzerna's polishes are amongst the best traditional diminishing abrasives available.
Meguiar's has really changed the game with their newest super micro non-diminishing abrasives.
For machine polishing we are going to need
two separate polishes: A more aggressive polish for removing paint defects and swirls, and a fine polish used to remove any fine swirl marks caused by the first polish and finish out to a flawless car show shine. For the purpose of this thread I am going to focus on using
Meguiar's M105 and
M205 polishes to get the job down as I really feel they give safely give the enthusiast professional level results in the safest and more efficient manner possible.
Meguiar's M105 Ultra Cut Compound is an aggressive polish which features Meguiar's new non diminishing abrasives to quickly level and remove defects. The amount of correction this polish can is pretty amazing, even on a dual action polisher such as the Flex.
Meguiar's M205 Ultra Finishing Polish also features Meguiar's new non diminishing abrasives. It is a finer polish designed to remove any ultra fine swirls left behind by more aggressive polishing.
Selecting The Right Pads.
The correct polishes have to be matched the proper polishing pads to get the greatest effect. As with polishes, there are various grades of pads, some have more cut and leave behind micro swirls and some have less cut and burnish to a higher gloss. Proper Auto Care carries the complete line of
Lake Country Pads, and even holds a patent on the constant pressure technology which use a secondary, softer foam, to give a more constant feel to machine. Polishing the swirls out of the Corvette's paint then refining to a better then new standard requires
two separate cuts of pad, similar to the two cuts of polish.
The
Orange Power Pad. This 6.5 inch, constant pressure pad, feature
Proper Auto Care's patented dual foam design and Lake Countries patented CCS technology to provide a great moderate cut pad that will quickly level defects and create minimal swirl. Use this pad with
Meguiar's M105 and a
Flex 3401 Dual Action to level the swirl outs of the paint while creating little to no marring.
The
White Polishing Pad. This 6.5 inch uses the same technologies as the Orange Power Pad, but uses a finer cut foam that makes it ideal for leaving behind a flawless finish. Use this pad with
Meguiar's M205 Ultra Finishing Polish and a
Flex 3401 Dual Action to remove any fine swirls from the previous step (or for removing ultra fine washing swirls, as sometimes this step is all that you will need) and burnish the paint to a super high gloss.
Selecting the Other Tools Needed.
In addition selecting the right
machine,
polishes, and
pads, a couple more items are necessary.
A pad brush: Use the pad brush to lightly scrub the face of the polishing pad (with the machine on) to remove dried polishing residue during the polishing process. When you polish the car you are removing paint, which will contaminate the polish and pad. I like to brush the pad after polishing every two sections.
High Quality Microfiber Polishing Clothes: You don't want to put more scratches and swirls in the paint when you wipe off the polishing residue from the paint. Use high quality microfiber cloths to remove the residue with out scratching, as nothing is more frustrating then polishing the paint to a high luster then scratching the paint immediately afterwards. Please do not ask me how I know!!!
Painter's Tape: It is always a good idea to tape up any black trim, edges, and body seams with a low tack tape. I like using 3M's low tack blue or green tapes.
Clay Bar Kit: Before polishing the paint it is ideal to clay the surface and remove any bonded containments from the paint's surface. If there is any contamination on the paint prior to polishing, it could sheer lose and become trapped between the pad and the paint, causing scratching.
Getting Started.
Tools needed:
A polisher (
Flex 3401 Dual Action Polisher)
Polishes (
Meguiar's M105 Ultra Cut Compound and
Meguiar's M205 Ultra Finishing Polish)
Pads (Orange Power Pads and White Polishing Pads)
Quality Microfiber ClothesA Pad Brush:
A Clay Bar Kit
Before polishing your Corvette the surface has to be as clean as possible to avoid contaminating the polish or trapping grit between the pad and the paint. Wash the car very thoroughly using the directions in this thread (coming soon) to prevent adding any new swirls.
After washing use a detailing clay kit to remove any impurities and bonded contaminants from the paint's surface that the wash didn't remove. (again I will do a write up on how to clay and link to this spot for reference in the future).
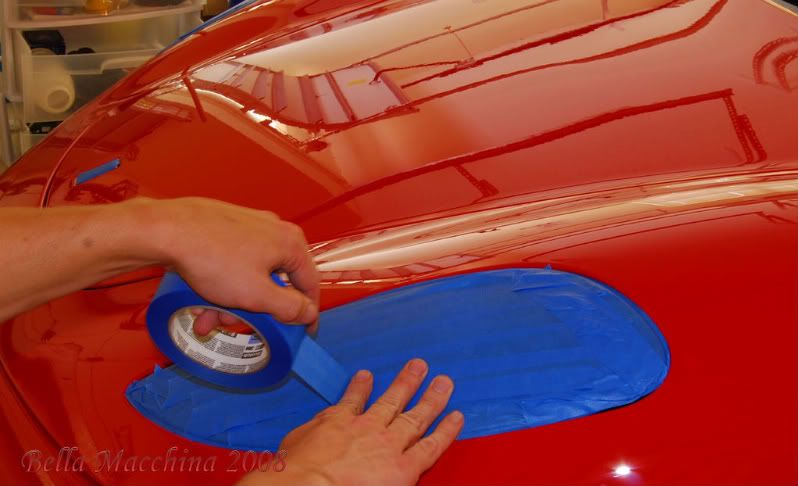
Once the surface is completely clean and dry use painter's tape to mask off any seems and sharp edges.
The tape will create a barrier that prevents the polishes from staining dark plastics or damaging rubberized emblems.
Taping areas such as the headlight covers is a good idea as the abrasive polish could lightly haze the clear finish of the plastic or lexan.