Like some of the most base-model Camaros, my 202 1SS 1LE came with the most basic IOS stereo system available in a 6th-gen: a dash display screen controlling a radio module behind the dash to the right of the glovebox, two 2.5 wide-range dash speakers, two 6x9 woofers in the doors, and two round 5.25 two-way speakers in the rear-seat side panels. The front four speakers function as component set, with each dash speaker handling the highs and most mids and the door speakers handling the lower frequencies. The rear speakers are for rear fill, I guess, and are really just a round cone with a whizzer. They dont get a full-range signal from the radio module, either. There is no amp in the trunk at all from the factory, no rear-shelf speakers (there are openings though), and no center dash speaker. Starting in 2019, GM moved away from the MOST communication protocol and changed to an ethernet-based AVB protocol. This means that all the electronics that interfaced with the 2016-2018 Camaros doesnt work on mine.
While I thought this OE stereo was actually better than it had a right to be, I wanted to upgrade it. My goal was better sound quality rather than quantity (SPL). I listen to a wide variety of music and at home I have what most would consider an audiophile-quality system. I wanted to improve detail retrieval, frequency extension at both extremes, dynamics, refinement, and hopefully get a little bit of imaging (accurate sound placement across soundstage depth and width). IOW, I wanted a more realistic playback of the information stored on the source recordings. Because this is also a car I use to compete in autocross competition, I did not want to add much weight. I also wanted to keep this a pretty low-budget system. These criteria ruled out subwoofers, giant amps, and slabs of heavy sound-deadening material. Realizing that this car is not super-quiet inside, especially when I have the OE or other race tires on it, I didnt need this system to live up to my home systems performance. I just wanted something that plays music well.
A final goal was to avoid cutting any factory wiring if possible. When I started this project, there was not yet any interface to plug into the factory radio module of a non-amplified 2019+ GM vehicle like a NAV-TV. It looks like Axxess is coming out with such a product, but I havent looked into it. I was able to find speaker adapters for the door speakers and I made some for the dash speakers using the plugs from my stock dash speakers. But getting signals to an amp would require tapping into the factory speaker wires or fabbing up a harness. Well get back to that later.
My initial plan was to upgrade the dash and door speakers and just not use the rear side-panel speakers, knowing that I would probably want some kind of amp upgrade from the meager output of the factor radio module. The factory speakers are 4-ohm rated, unlike the Bose, so this made compatibility with aftermarket speakers easier. I settled on Audiofrog GS25 speakers for the dash, and GS690 for the doors. I chose these because the GS25s are specifically made as replacements for these types of dash speakers in GM, Toyota, and a couple other brands of cars and they have tabs for this so you can drop them right in with no adapters required. Also, both pairs of speakers have high sensitivity, meaning they would play well on the factory power and that any amp I used down the road would not have to be huge and powerful. Finally, the GS25 has about the widest frequency range of any twiddler I found, going down to 200hz. Thats nice to get most of the midrange out of the crossover frequency. These are not cheap speakers. There is a much cheaper Kenwood twiddler that also drops in. It might sound okay, but it is much less sensitive and it has less extended highs and lows.
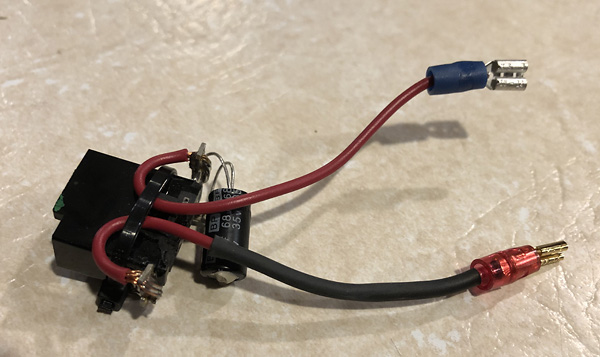
The factory crossover for the front component drivers is just a 68uF capacitor in the positive signal to the dash speakers, which create a high-pass filter at around 585hz. I left this in the circuit, but Id recommend you ditch that and use a 200uF capacitor instead. This gives a crossover frequency of about 200hz, which is what Audiofrog recommends for the GS25 (other speakers may want a different crossover frequency). I used Metra 82-3017 speaker adapters to allow the 6x9 door speakers to attach in the factory manner, and a Stinger RKFR69 Roadkill kit to help get a decent seal and backwave attenuation. I used all the factory speaker wires, using Metra adapters for the door speakers (72-5600). For the dash, there seems to be no real adapter option on the market, so I made my own by cutting the connectors off the factory speakers and soldering a couple inches of wire and some spade connectors to them, like so:
Just upgrading these four drivers and fading down the rear speakers really made a big difference in sound quality. I was immediately getting the detail and frequency extensions I wanted, along with a big dose of refinement. These speakers were also louder than the factory speakers. They were clearly more sensitive than the factory cheapies. So far, so good. I was less than $600 invested (including adapters and such), and could have stopped here. In fact, I did use it for about three months like this.
I came across the Kicker KEY180.4 that combines a 45W x 4 power amp with automatic 40-band EQ, 24dB/octave active crossover, and time alignment. Its a pretty small unit, too, which gave me hope that I could stuff it under the dash. Its also cheap: around $250 for the newer KEY200.4 thats slightly more powerful. I got a new 180.4 for a good bit less. One really enticing feature for my needs is that it has a biamp mode: instead of sending four different channels of power to four full-range speakers, you can send two channels to the high-frequency drivers in a component setup and the other two to the low-frequency woofers, and the amp will set up an active crossover according to the frequency range capabilities of the drivers. One of its two crossover frequency options is just for a twiddler dash speaker setup like the Camaros, and it uses a high-pass active crossover at 320hz and a low-pass at 640hz. Perfect! This would allow a higher-quality crossover than a cheap capacitor in the signal path, and would really make this sound like much more than 45W through a passive crossover. The Kicker does this along with the EQ and time delay all by itself: you set a little microphone (included) on the headrest of the drivers seat, push a button, and it sends all kinds of sounds out of the speakers while it sets everything for a targeted sound profile. It runs cool and weighs a pound or less. And it takes speaker-level inputs which is all thats available out of the factory radio module. Cool! Heres a
video that shows an install/calibration and explains the functions. I would have wondered if this was all too good to be true, but the reviews were quite good, even from hard-core car stereo gurus. Take a look at the end of that video, where they discuss the results of their installation.
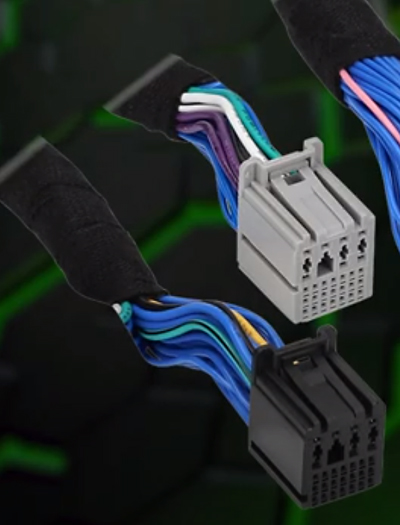
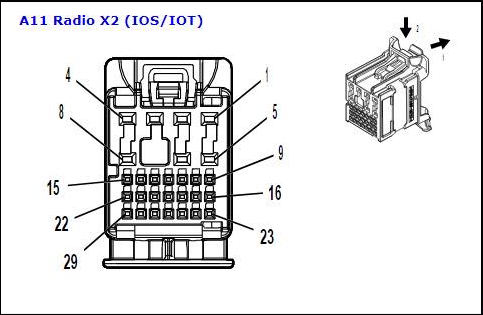
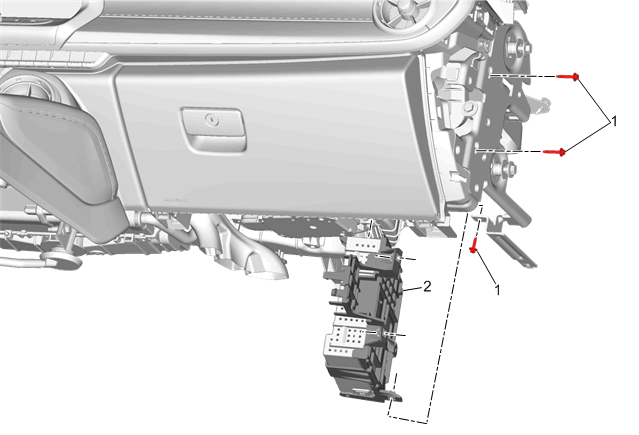
The last piece of the puzzle was how to tap the speaker-level wires and get power and ground to the amp. For the speaker-level signals, I knew I needed to tap the front outputs of the radio module, but I didnt want to cut the wires if I could avoid it. The connectors to that module are different for 2019+, and nobody offered an adapter. There are two big connectors that appear identical in all but color, but all four front-channel wires are pinned to the X2 plug that is grey in color (the X1 connector is black). There are 29 different wires from each of these connectors in total, though! This is what Im talking about
:
I needed a breakout harness with a male plug into the module, a female plug for the factory harness to plug into, and all the wiring passing through between them except for the four front speaker outputs which needed to be cut (broken out) to allow the amp to be inserted inline. Simple concept, but making one myself was daunting, and the connectors would be expensive if I could even really get them. I emailed Gen5DIY and described what I wanted, and they agreed to make one. I had to wait a couple months because supplies of the connectors were delayed due to COVID (as were lots of other GM parts!). Once I finally got it, I was ready to install my amp. I apologize for forgetting to take a picture of the harness before installing it. However, it looks just like youd think it looks.
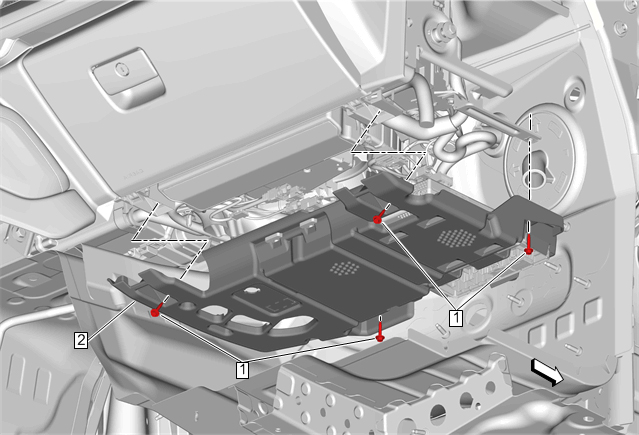
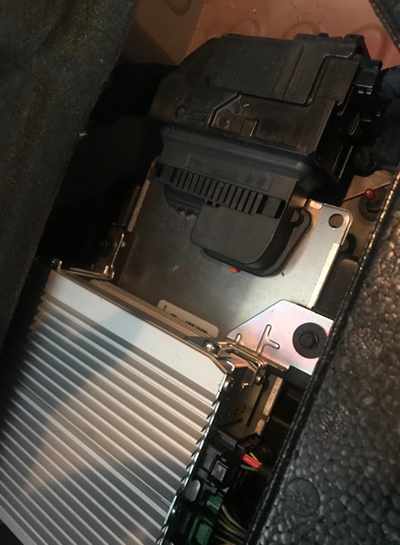
To install the breakout harness, you need to remove the big Multiuse Module Bracket under the passenger side of the dash. Its four 7mm screws, then you push it back toward the firewall and it comes down. I didnt have to disconnect the one module that it holds. This process is described in
this video, starting at 6:23. Heres a pic from the Factory Service Manual:
Luckily, you dont have to remove the radio module like they describe in that video! You can get underneath the dash and see the bottom edge of the radio module well enough on the right side of the space. Heres a pic from the manual that gives you a good idea where it is:
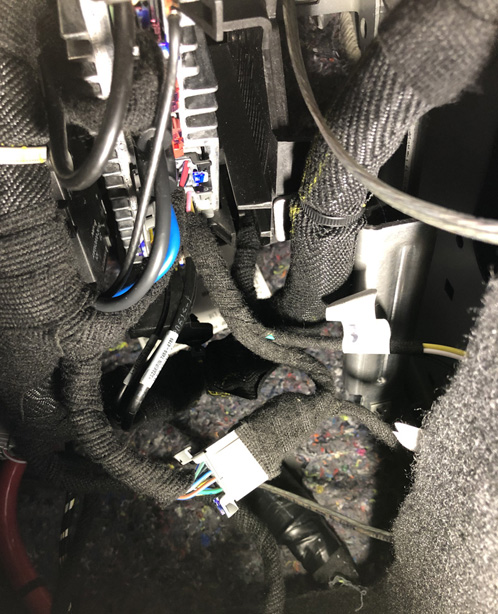
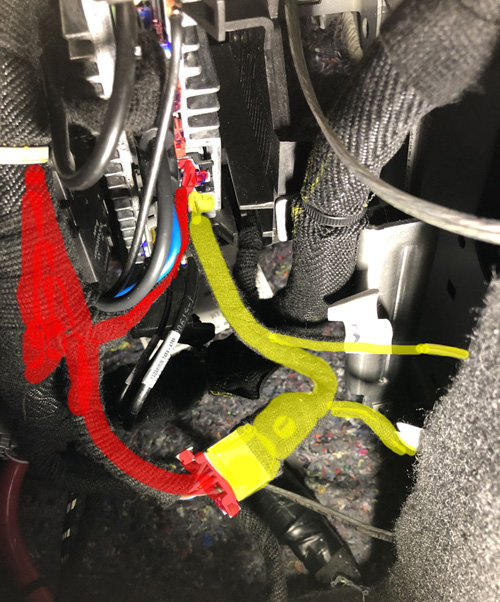
To remove the X2 connector, you pull back (down toward the floor, really) a little tab. Then you squeeze the release tab and pull the connector out of the module (see the diagram of the connector above). The male end of the harness then plugs into the module, and the factory male connector plugs into the female end of the breakout harness. Youre left with four wires coming from the radio unit that you will connect to the inputs of the amp, and four wires that go back into the factory wire harness to the four speakers that you will connect to your amps outputs. Here are two pics of my harness after I installed it. The first is just the picture, the second highlights the breakout harness in yellow and the factory wiring harness in red so you know what youre looking out. The aluminum heat sink is the radio module. The pic is a little overexposed, so the gray plugs look white sorry.
In my case, I was going to use the biamp option of the Kicker amp and would therefore have eight wires coming back to the four front speakers. I still used the factory harness to send the woofer signals to the 6x9s in the doors. This was convenient and I didnt want to remove the door panels again. I hate removing interior trim panels! I was going to need to remove the dash speakers anyway so I could remove the high-pass capacitors in their positive leads, so I just ran new speaker wires from them over to the right side under the dash. I left the factory speaker wire and connectors in there just in case I ever want to revert back to a stock connection for some reason.
I had hoped to mount the amp on the Multiuse Module Bracket, but it was a bit too big to fit in there without cutting up the bracket. Then I also would have to figure out a power lead as well as a way to get the calibration mic plugged in to the amp when needed (it doesnt need to stay connected when not in use). I might have been able to make it work, but I decided that it was better to mount the amp in the trunk. I settled on mounting it over the MRC module, which is where the factory amp would mount in a 2SS Camaro with MRC shocks:
I made a bracket out of plastic and screwed it to the MRC bracket just like the stock amp setup. I screwed the Kicker KEY180.4 to it:
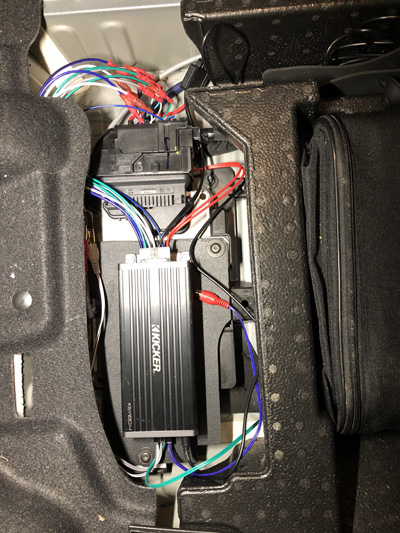
I ran 10awg wire to the battery post for the power lead, and 10awg wire to a nearby ground lug. I was able to run cable to the trunk from the radio module area fairly easily, without having to remove the rear interior side panel (which seems like a hassle): I removed the rear seat bottom and back (very easy), the door sill trim (super easy), the two round plastic push trim connectors that hold the carpet down under the sill trim (use a trim tool!), and finally the one front piece of the big rear side panel that snaps into the sill area (also very easy). That allowed me to run cables by tucking them up under the bottom edge of the rear side panel in one spot (easy to do with the other stuff removed), and I followed the giant red battery cable forward toward the firewall. I used 16/4 cable for the run from the Radio Module to the amp inputs (I could have used 18/4 but Home Depot only had the larger cable in stock), and I used Metra MC-918-20 9-conductor speed wire for the run from the amps speaker outputs back to the speaker connections near the radio module.
Once everything was connected, I waited for evening when there would not be much ambient noise (nearby housing construction is a daily thing for me) and ran the calibration process. It all went as planned and I got the happy noise at the end of the process. I got in and listened for a bit and was immediately happy with the results. Then I put the interior stuff back in and ran it again, because the missing back seat in particular would affect the calibration. When you run the calibration, you have to make sure any speakers not powered by the KEY180.4 (in my case, the rears) are turned off (just turn the fader all the way to the front in my case) and that the factory equalizer bands are all set in the middle. Afterward the calibration is set, you can fade the unpowered speakers back in if you want (I dont) and you can futz with the factory equalizer if you want to adjust the sound. I have added a bit of midrange and treble to the Kickers equalization.
The sound is great! The frequency range is much more even now, and there is far more control over the low bass notes. Unless youre into thumping SPL sound-off competitions, you may not miss a subwoofer at all with the setup I have. And now there is legit imaging! Ive retained the good ambience and detail I had with just the speaker upgrades before the amp install, but its better integrated to the sound as a whole. And all the detail comes without any penalty of harshness. I still have the gains at minimum. I might move them up a bit, but right now it plays pretty loud as is. And at this setting, the chimes are probably no louder than stock. This is a very musical system, and I have found myself just sitting in the car after arriving at my destination just to listen to more music. I am really, really pleased with the performance, and Im still around $800 all in. Undoubtedly it is possible to improve on it with a higher-end amp and separate DSP. But for a budget system that doesnt require much time to calibrate and that plays actual music really well, this has exceeded my expectations.
Other ways to skin this cat:
- If you dont want to mess with an active crossover and auto EQ, you could use the same speakers I did and install a mini amp in the Multiuse Module Bracket and not have to run cables to the trunk at all. One such amp that I looked at is the Mosconi Pico 2. This could be a compact, even lighter, good-sounding, minimalist system.
- If you dont want to mess with an active crossover and auto EQ and you want bigger power, you could mount a bigger 2-channel amp in the trunk and just use one run of speed wire, using four conductors for the speaker-level inputs and another four for the amp outputs.
- You could do subs with this Gen5DIY breakout harness: just split each of the four front speaker outputs from the radio module into two and use the second set to run signals to the sub(s). If you do this, it might be better to use 6 round GS60 speakers in the doors instead of 6x9 (probably a bit more accuracy and integration with the GS25s). Unless you want a really big sub, it may make more sense to use two smaller subs in the rear deck 6x9 holes (there is nothing mounted in these unless you have the Bose system). Audiofrog has a new 8 sub that might be adaptable. But again, the GS690 is rated down to 42Hz, and thats low enough to cover the lowest bass guitar notes. There really isnt a lot of music signal lower than that in most music, so before you decide that you just have to have a sub, you should listen to a really good, low-ranging 6x9 with a decent amp. You might find that door-mounted woofers are all you need.
- If you really want the rear side speakers powered, you can run a 4-channel amp from the trunk. However, the breakout harness that Gen5DIY made for me will not get the job done because one of the rear-speaker negative leads is on the black X1 connector instead of the gray X2 connector. Who knows why? Since you have to take the rear side panels off to get to these speakers anyway, it probably makes more sense to splice into the speaker wires for your rear channel signals while youre in there than to add the second harness connectors to your breakout harness. But I think the cost of new speakers and two additional amp channels is hard to justify since nobody is ever going to sit back there and the speakers are really only good for rear fill.