You are browsing camaro5 
|
|
 02-26-2020, 04:01 PM
|
#71 |
       
|
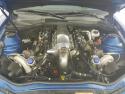
Getting ready to button up everything in the engine bay following finishing up the clutch tamer controller install. Just have to tap the wire line into the ECM for the signal wire that will eventually be the mph pulse wire to the stov controller. Had to order the female pin terminal pin so I could get it done. The delivery waiting game starts now since I just ordered 2 terminals. I also did some wire prep work on the solenoid by installing a lingenfelter solenoid diode recommended by lingenfelter. I had one laying around from my 2step install that I didn’t put on the 2step. I added the diode and wrapped the solenoid wires with fire sleeve.
The install on our cars to use the lingenfelter stov controller requires you to add a terminal and wire into the ECM C1 pin 57. The info is in the instructions that comes with the stov controller. As for actually learning how to pull the C1 connector apart to access and install the terminal in pin hole 57 I found a great YouTube video 2 part video that was perfect and kept me from breaking the connector and any of the fragile plastic tabs. I’ll post a video link on here for you all. Really was helpful. I got everything apart easy and now just waiting for the terminal to arrive.
__________________
Car mods: never enough!
 |

|

|
|
02-26-2020, 04:34 PM
|
#72 |
|
|
Part 1
https://youtu.be/w0cv6LwCDjg Part2 https://youtu.be/oTEfNvHJcI0 Link to ECM how to add or remove terminals in the connectors. Nice videos!
__________________
Car mods: never enough!
|
|
|
|
|
02-27-2020, 10:40 AM
|
#73 |
|
|
Clutch system all bleed and purged. Pedal is back to normal. No leaks so far. Hope it stays like that..lol. I tried the pedal with the main on and then with main off and works smooth.
I temporarily set up a spare battery and basic switch so I could test the tamer system out to see just the pedal return in action. With the main line valve off and just using the tamer system the pedal feels about the same either way. When I hit the temporary switch arming the solenoid and pushing pedal in it seemed almost the same pushing in the pedal but with just a slight more resistance ( due to the solenoid closed and only pushing through the needle valve) When i let the pedal come out it worked great and allowed the pedal to return slowly and smooth. I currently have the needle on the lowest setting but can tell it already can be opened up some more allowing the pedal to return faster etc. The unit and lay out works great. I am very confident this will allow the car to launch consistent and more precise compared to me using my foot that is not going to be the same each time. Works very smooth and steady return of pedal and is adjustable so it can dial in as weather and track conditions change. I will post a YouTube link once i can shoot a video of the pedal testing so you guys can see the pedal return differences.
__________________
Car mods: never enough!
|
|
|
|
|
02-28-2020, 07:19 AM
|
#74 |

|
I got stuck at a point where I installed a new Tick adjustable master cylinder at the same time and it did not work properly for me. I've sent it back to get them to check it out. The stock master cylinder works fine when I put it back in.
__________________
 |
|
|
|
|
02-28-2020, 11:23 AM
|
#75 | |
|
|
Quote:
__________________
Car mods: never enough!
|
|
|
|
|
|
02-28-2020, 11:27 AM
|
#76 |
|
|
Here is a video I shot and put up on YouTube real quick so you can see the pedal in action. In the video I had the setting to where there still room for adjustment for slower or faster return on pedal.
https://youtu.be/mVvh-uR1sqQ I will work on the electrical set up as soon as the female terminals arrive so I can finish up in the engine bay area. Just need to put the wire into the ECM C1 pin 57 so everything is wired to inside the cabin. From there I can start installing the MPH controller.
__________________
Car mods: never enough!
Last edited by Jayjellyfish212; 03-01-2020 at 09:50 AM. |
|
|
|
|
02-28-2020, 01:12 PM
|
#77 |
Drives: 2010 Camaro SS/RS Twin Turbo LSX454 Join Date: Aug 2018
Location: Detroit, MI
Posts: 143
|
Excellent video finds Jay. I hadn't gotten that far yet but did read through the instructions and know it was going to have to happen. You mentioned installing the wire but how do you plan to "turn on" the VSS output of the pin? Lingenfelter mentions using Live EFI I believe but I think I'm going to invest in HP Tuners. I'm hoping that won't be a huge learning curve.
|
|
|
|
|
02-28-2020, 01:29 PM
|
#78 | |
|
|
Quote:
__________________
Car mods: never enough!
|
|
|
|
|
|
03-01-2020, 03:25 PM
|
#79 |
|
|
I put my racing seat in today and the harness bar while I'm waiting for the Tick master cylinder to come back.
__________________
|
|
|
|
|
03-01-2020, 05:14 PM
|
#80 | |
|
Join Date: Apr 2014
Posts: 138
|
Quote:
Sent from my Pixel 2 XL using Tapatalk |
|
|
|
|
|
03-03-2020, 08:12 AM
|
#81 | |
|
|
Quote:
I either couldn't get the car to shift into gear, or the car would not start. I put the stock one back in, and everything worked. We will try it all over again.
__________________
|
|
|
|
|
|
03-03-2020, 07:14 PM
|
#82 | |
|
Join Date: Apr 2014
Posts: 138
|
Quote:
After replacing my clutch and slave it was almost impossible to bleed the system. I had to use a vacuum bleeder on both ends to get any fluid moving through the system, and it came out very dark. Then another 2hrs of bleeding manually to get a decent pedal feel. I think there was an abnormal amount of grease put onto the slave fittings/oring connections causing blockage... After that it took almost a month(about 2 qts) of bleeding every other day to get clear fluid coming out of the Tick bleeder line. Otherwise it would be black w/in a day or less(even w the fluid in reservoir still looking new). But the Tick master cyl has been great! Sent from my Pixel 2 XL using Tapatalk |
|
|
|
|
|
03-10-2020, 01:26 PM
|
#83 |
|
Drives: 2010 Camaro SS/RS Twin Turbo LSX454 Join Date: Aug 2018
Location: Detroit, MI
Posts: 143
|
Was finally able to get some time to put stuff together. Although not as pretty as other installations on the thread , I think it will get the job done. I used the same number of fittings in the original configuration simply swapping the 3an equivalent hardline out for some 4an steel braided PTFE hose and fittings. The adjustment is right on top for easy access allows for some flex so I can access things easier. I went ahead and added new lines from the master cylinder and the transmission as well and wrapped them in some incredibly think fire covers from DEI. This stuff looks serious! Given my mass of pipes under the hood for the turbos I had to get a little creative with the hard line routing for the line lock so its a little close to the headers but I went ahead and wrapped all of the lines as well. Hopefully that, along with the incredibly high temp fluid I used, should keep my brakes from fading. I experienced that last year during a very hot, slow cruise (Woodward Dream Cruise if youre familiar with it) and it was a little scary.
Of course Ill need to control everything as well so I decided to put the boxes in the glove box to keep them away from the heat of the engine bay and make tuning them a completely in-car job. Youll see Ive got the 2000-2SR for my 2-step and them a CTAP and STOV to control turning them on and off at appropriate times. That took quite a bit of planning to ensure it would function as planned given the clutch release valve needs to stay on after the 2-step turns off so I couldnt simply activate it off of the CTAP. Let me know if you guys have any questions about the wiring. Im sure there are other ways to do it, and this may not even be correct or the best way but as far as I can tell its going to function how I envisioned it. Ive yet to get into the ECM to activate the VSS signal for the STOV but it seems pretty simple. Once thats done its going to be a lot of trial and error on the street and the track to get it to work efficiently. Hopefully Ill have some company in that endeavor come spring time. |
|
|
|
|
03-11-2020, 11:05 PM
|
#84 | |
|
|
Quote:
 You got me reconsidering placing my stov and ctap now in my glove box to. I like the convenience of access to the controllers there. I had my ctap in that driverside panel where the interior electrical fuse panel is. I havent had a chance to put the stov controller in yet but I did get the wire installed in the ECM and feed into the cabin of the car. Work stuff got busy past week and a half so I havent had much energy after hours to get the stov box wired in. Hopefully next week sometime I can get it finished up and set the signaling with the HPTuners. In a sense it was almost great I didnt get it finalized since seeing yours wired in the glove box I think thats a perfect idea and better location for the controllers. 
__________________
Car mods: never enough!
|
|
|
|
|
|
|
|
|
 |
|
|


