You are browsing camaro5 
|
|
 02-21-2016, 09:43 AM
|
#1 |
 
|
Afterburner 2.0 Installation Tips and Lessons Learned
Bought a set of 2.0's in Plasma and got a great price from JDP. Was tempted to puss out and get the round style (easier to install cause they conform and stick to the Lens Better), but felt the 2.0's were better looking. So researched all of the install stuff on the forum and Web, and gotta say, the Oracle Video on cutting open the assembly's to get the lens off looked WAY too easy. Yeah - heat them, and just cut a little and Wha-Laa, the lens will pop right off. Uhhh - no way, at least not for me. After minor butchering of one of the Len's I bought a replacement. Note - it is real easy to cut too close to the inner part of the lens and it will look like crap. I used a Dremmel and thin cutoff wheel, and what a mess. Reference the first picture here!
 So fortunately replacements are inexpensive and less than $40 from A1 Auto, and then practiced on my butchered Lens before I started in on the others. I purchased a #543 1.25" Carbide from Home D at $17 figuring this would work better, and it did. I also decided to not even try cutting the housing where the Lens joins it, and instead cut just flush inside of the step in the Black Housing, so the lens is not touched. This made for a clean cut, and minimal gaps in mating the parts back together. A steady hand and eating plastic dust is what it takes. After some light filing to clean up the cut edges I went at adhering the Plasma Afterburner LEDs to the clear lens. I have heard that pressing on them to stick can cause cracking and failure, so I only lightly pressed on them to stick, and used a good grade of 2 part plastic epoxy and dabbed some on the ends of each afterburner, and then at the center (if you look closely at the pic you can see it). Since they DO NOT conform to the Lens profile, they will only marginally stick at the ends and at the center. Do not get any on the outer surface of the Led strips, just at the edges or sides. Don't need much, but they will not fall off if you do this. And drill the holes for the wires large enough to get the small white connector into the housing, and pull ALL of the slack out of the wires inside and tuck them along the side of the Lens - you will need all of the length to orient the Purple Resistors, and you CANNOT lengthen these wires. Then you see the little Purple Resistors that I think are unique to the Plasma's. They can only be mounted as shown or the Lens Assembly will not fit back into the rear end tail light housing! Found this out in a hurry and the first one. In the orientation shown they will just clear a little hump opening in the rear end tail light housing that is in-line with the mounting bolt on the tail light assembly. Note that the OUTBOARD Lens's must have the rib trimmed back to allow it to fit flush on the housing. A little dab more of epoxy secures them. At each step, I tested the lights to ensure they worked, especially before I sealed the housing. Lastly, I centered each Housing on the Lens, epoxied each corner, let it dry, and then used Clear Silicone to final seal them. They look great, and are BRIGHT! Now it is time to install them and wire them - the "Easy" Part. I hope this detail helps anyone wanting to undertake the installation of these. 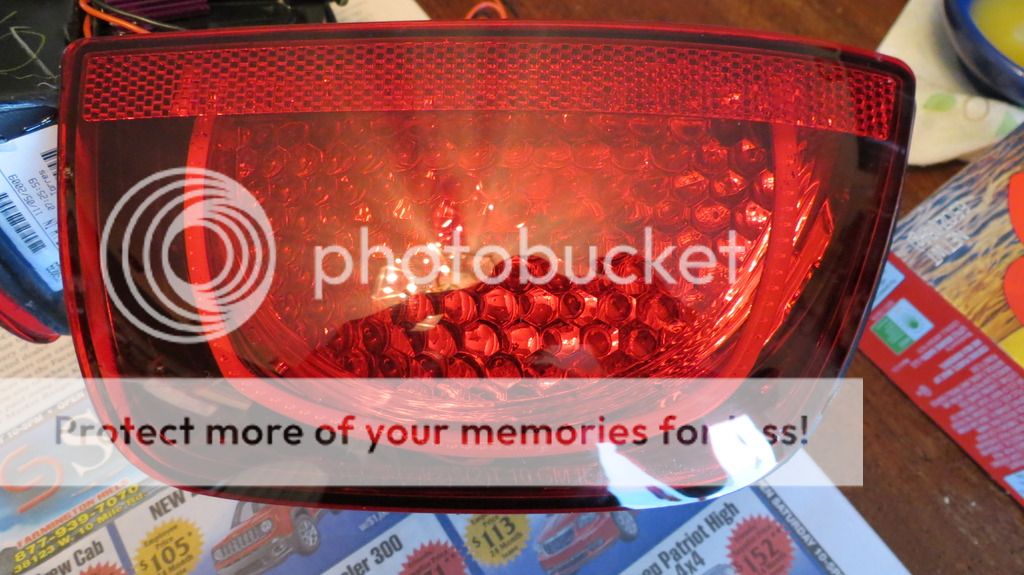 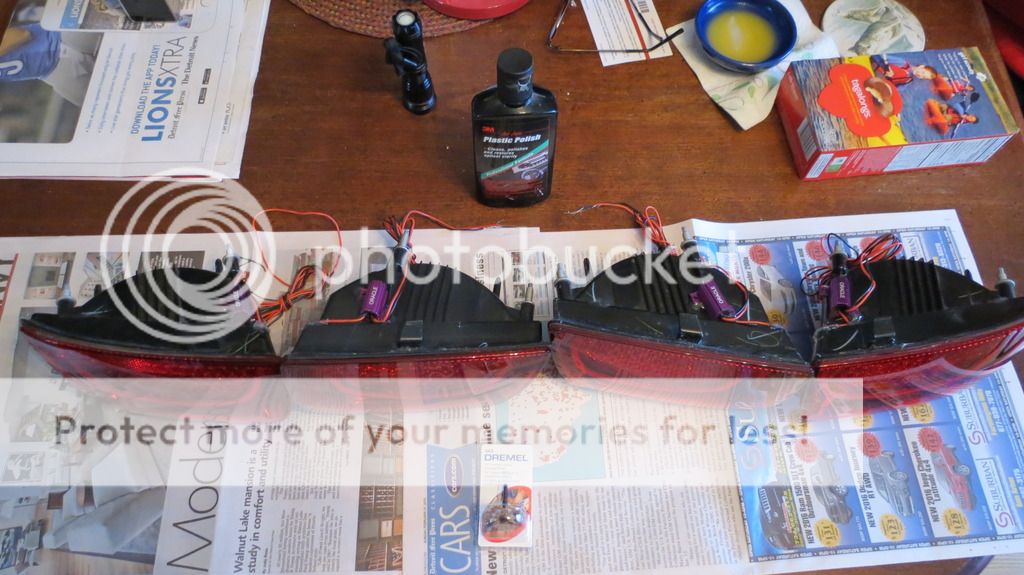 
Last edited by hesster; 11-22-2018 at 06:34 AM. |

|

|
|
02-21-2016, 10:39 AM
|
#2 |
        
Drives: 2016 SS w/2SS A8 Blue Velvet Join Date: Dec 2009
Location: 39.793153,-86.238223
Posts: 3,678
|
I bought some LED's that I plan to install on some extra tail lamps I have in the garage. I'm hoping to get them cut open, mounted and closed back up nicely and hope they work the way that I want. If my current Technostalgia ever go bad, I'll switch back to these and hope that my LED rings will be on as my park lights and then centers light up as brake lights. We'll see...... Can't wait to see you pics when done.
__________________
Never grow up, it's a trap!
|
|
|
|
|
02-21-2016, 01:53 PM
|
#3 |
|
|
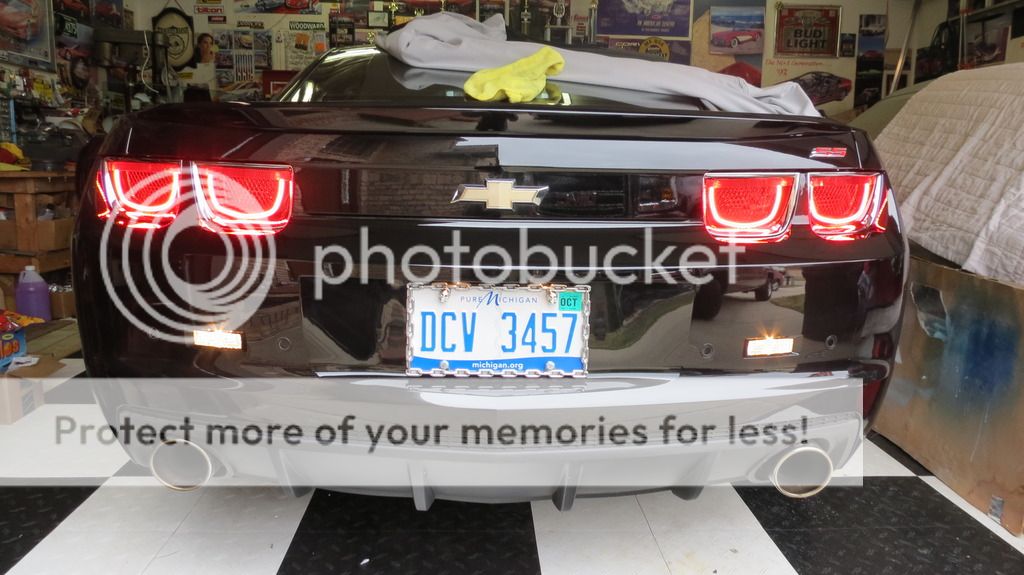
And the finished product.
|
|
|
|
|
02-21-2016, 01:56 PM
|
#4 |
|
Drives: 2016 SS w/2SS A8 Blue Velvet Join Date: Dec 2009
Location: 39.793153,-86.238223
Posts: 3,678
|
Very nice! If you get time, a night shot would be sweet! Curious how that affect looks and I take it the centers come on when brakes applied (all on)
Sent from my iPhone using Tapatalk
__________________
Never grow up, it's a trap!
|
|
|
|
|
02-21-2016, 09:30 PM
|
#5 |

Drives: 2011 Camaro 2SS/RS Join Date: Oct 2011
Location: Texas RGV
Posts: 794
|
They look amazing. I've had them since they came out with them. Some lights (3-5) on some strips have gone out though. Can't really tell since they're bright and the rest make up for it
|
|
|
|
|
02-21-2016, 09:34 PM
|
#6 |
|
Drives: 2011 Camaro 2SS/RS Join Date: Oct 2011
Location: Texas RGV
Posts: 794
|
Looks like 5 are out from this pic
|
|
|
|
|
02-22-2016, 08:42 AM
|
#7 |
 
Drives: 2010 SS Join Date: May 2014
Location: Maryland
Posts: 418
|
Looks good. This is on my mod list but I'm scared to cut open the lights in fear of messing them up.
|
|
|
|
|
02-22-2016, 04:16 PM
|
#8 | |
 
Drives: 2010 SS/RS Join Date: Jun 2012
Location: NJ
Posts: 53
|
Quote:
heres a link to a diy afterburner write up i did years ago |
|
|
|
|
|
03-29-2016, 03:45 PM
|
#9 |
|
Drives: 2010 SS Join Date: May 2014
Location: Maryland
Posts: 418
|
Well guys I finally got around to installing my afterburners. The install was pretty straight forward with the hardest part being the cutting obviously. Big shout out to the OP for recommending the carbide bit that made it a breeze. I went with the 1.0 instead of the 2.0 because I like the shape better. Here is a pic

|
|
|
|
|
03-29-2016, 09:36 PM
|
#10 |

Drives: 2010 Camaro 2SS Join Date: Sep 2015
Location: Richmond Hill ,Ontario, Canada
Posts: 780
|
Just a quick note, I have not done my tail lights yet but i did my fogs the other day which is basically the same procedure and the housings are built very similarly as well. What I ended up using was a ceramic tile wet saw. It was super easy to use because of the fence it had to hold the lens against and the wet saw blade is thin and of course no dust with the wet saw.
|
|
|
|
|
03-30-2016, 07:54 PM
|
#11 |
|
Camaro CRAZY

|
How did you wire these up? I have a set, just never can find a definite answer what wires to tap into..
|
|
|
|
|
04-02-2016, 02:27 AM
|
#12 | |
|
S1N1STR

|
Quote:
Oracle should send instructions with the halos that tell which wires to splice into. I had Ofer and gen5diy make me a plug and play harness so I didn't have to splice into my factory wires. |
|
|
|
|
|
04-02-2016, 05:49 PM
|
#13 | |
|
Drives: 2010 Camaro 2SS Join Date: Sep 2015
Location: Richmond Hill ,Ontario, Canada
Posts: 780
|
Quote:
|
|
|
|
|
|
04-09-2016, 02:59 PM
|
#14 |
|
S1N1STR
|
No, I just didn't want to tap into my factory harness, so I had a harness built that let my afterburners run off my parking lights.
|
|
|
|
|
|
|
|
 |
|
|


