You are browsing camaro5 

|
 05-01-2016, 02:20 PM
|
#57 |
       
|
Well finally getting things just about wrapped up. I'm just waiting on the hydro carbon stuff to get here so I can finish. Went with a graphite black with a black base coat and will do a nice high gloss finish. The custom fan shroud I made came out better than I thought it would despite what a pain it was. The factory one just would not suffice. I built it so it has exact to the factory one dimensions and used the top and bottom sections epoxied and fiber glassed into the new fiberglass fan shroud. By using the factory top and bottom this allows me to pop on the water drip guard if I ever need it as I will just leave the rain guard in the trunk just encase I get stuck in heavy rain. This part should give me the custom look and allow for cleaner carbon look part. I did a test fit and it fits perfect. From what I'm told if I upgrade to a better radiator I still can use this as it is almost exact to factory part just smooth and better looking. Here are some pics of the custom fan shroud and the other parts prep for the dipping stage. I also decided to just do the entire air intake manifold so I ditched the plenum cover idea that I started because did not look right or finished with the cover. All the parts were de-tabbed from what I did not need sanded, primed gray then painted black, then sanded and they will get one more coat of base prior to dipping.
|

|

|
|
05-01-2016, 02:23 PM
|
#58 |
|
|
Give me a few minutes on the pics.. computer super slow.. time to reboot her.
|
|
|
|
|
05-01-2016, 02:56 PM
|
#59 |
|
|
|
|
|
|
|
05-01-2016, 02:57 PM
|
#60 |
|
|
Sanded an ready for final base coat
|
|
|
|
|
05-01-2016, 03:58 PM
|
#61 |
|
|
factory fan shroud
|
|
|
|
|
05-01-2016, 04:07 PM
|
#62 |
|
|
My custom built fan shroud
 Just one more time sanding then ready for final base and carbon dip. |
|
|
|
|
05-01-2016, 04:12 PM
|
#63 |
|
|
I will probably do a polished extra support to the fins just to reassure myself over the long haul so less stress on the fins that hold the fan motors reassuring no possible stress cracks in the fiberglass plus it should look killer with the rest of the engine bay.
|
|
|
|
|
05-02-2016, 12:48 PM
|
#64 |
|
The BBOMG fill-in husband

Drives: 2015 2SS/RS 1LE AKA V1LE Join Date: Aug 2010
Location: Elmira, NY
Posts: 4,458
|
Looks good man!!! But you should be driving it now, LOL
__________________
UPSTATE C5 MEMBER
 |
|
|
|
|
05-02-2016, 02:36 PM
|
#65 | |
 Drives: 2022 CT4-V Blackwing Join Date: Sep 2013
Location: Florida
Posts: 2,723
|
Quote:
|
|
|
|
|
|
05-02-2016, 05:41 PM
|
#66 |
|
|
Thanks guys...LMAO to by the way.. My goal was to have completed by mid April but hey almost done. Should be done next week( please weather cooperate). Being this close to getting her back on the road I don't want to rush any paint etc work. Nothing worst than doing things twice..LOL. My patience defiantly was tested through the work since Oct 2015 started. The weather here has been freeze rain so hope that in a week or so its summer time.

|
|
|
|
|
06-08-2016, 03:48 PM
|
#67 |
|
|
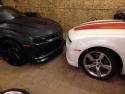
Finally got her back on the road Friday.
 First start and no codes popped up. Felt a huge relief after all I tore apart. A small drip from fuel rail fitting just had to be snugged up. Drove it to get inspected and failed due to not driving after reconnecting the battery so I had to put some miles on her Friday. I drove some more Saturday before returning to get inspection. Passed inspection Saturday. So found one small issue with the idler pulley I added that's an aftermarket part allowed the belt on the idler pully to jump forward about two ribs . I added two washers to shim it out forward as this also appeared to be the sweet spot and natural line of the other pulleys. Drove all day Saturday no issues after that. Weather is now shitty again here in CNY go figure. I could not be happier so far as it now looks like a real muscle car in the engine bay and my car is finally clean again. The car definitely has a bit more power and is more aggressive in sound. I will get you guys some completed pictures shortly if this weather ever gets nice. Wind and hail like crazy since Saturday. We also just had a new addition to the garage as my woman just brought home a really nice fully loaded 2014 Camaro RS vert. First start and no codes popped up. Felt a huge relief after all I tore apart. A small drip from fuel rail fitting just had to be snugged up. Drove it to get inspected and failed due to not driving after reconnecting the battery so I had to put some miles on her Friday. I drove some more Saturday before returning to get inspection. Passed inspection Saturday. So found one small issue with the idler pulley I added that's an aftermarket part allowed the belt on the idler pully to jump forward about two ribs . I added two washers to shim it out forward as this also appeared to be the sweet spot and natural line of the other pulleys. Drove all day Saturday no issues after that. Weather is now shitty again here in CNY go figure. I could not be happier so far as it now looks like a real muscle car in the engine bay and my car is finally clean again. The car definitely has a bit more power and is more aggressive in sound. I will get you guys some completed pictures shortly if this weather ever gets nice. Wind and hail like crazy since Saturday. We also just had a new addition to the garage as my woman just brought home a really nice fully loaded 2014 Camaro RS vert.
|
|
|
|
|
06-08-2016, 04:05 PM
|
#68 |
|
The BBOMG fill-in husband
Drives: 2015 2SS/RS 1LE AKA V1LE Join Date: Aug 2010
Location: Elmira, NY
Posts: 4,458
|
Nice, can't wait to see some more pics!!!
__________________
UPSTATE C5 MEMBER
|
|
|
|
|
06-08-2016, 08:01 PM
|
#69 |
Drives: 2014 2SS 1LE Join Date: Sep 2013
Location: Twin Cities
Posts: 621
|
Looks amazing so far!
__________________
14 2SS RS 1LE Recaro NPP Pat G cam and tune, Trick flow heads Long tube headers catless
|
|
|
|
|
06-08-2016, 10:11 PM
|
#70 |
 Drives: 2015 1LE Join Date: Dec 2015
Location: Twin Cities, MN
Posts: 92
|
Wow - really nice job. Look forward to some more pics. Didn't read all the posts in this thread, but how did you come up with the new plenum and new fan shroud? Particularly with all critical dimensions accounted for? Did you design with CAD, then some CNC type machine created them? If you are not laughing by now, I will admit I am not knowledgeable about such things! Thank you and congrats!
|
|
|
|
|
|
|
|
 |
|
|


