You are browsing camaro5 

|
 05-05-2015, 01:55 PM
|
#225 |
|
yellow_dragon

Drives: yellow camaro, black stripes Join Date: Mar 2014
Location: el paso, tx
Posts: 97
|
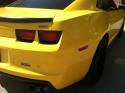
Yes installing myself not too hard, the guide holes are a tad off so I had to make them bigger, I have some miss alignment by the blinkers, not flush, and the top of the bumper holes are off , so had to drill new ones. Over all it looks good, just need to mount the led when I get more mesh..
|

|

|
|
05-05-2015, 02:13 PM
|
#226 | |
|
Demon Bu1LT

Drives: 2012 1LT Join Date: Dec 2012
Location: East Texas
Posts: 396
|
Quote:
 My excitement for mine quickly turned to anger. The shop I dropped mine off with on March 10th called me last Thursday (April 30). I was told I needed to come pick up the bumper, that it was trash and would never work.  When I got to the shop those morons were attempting to install the factory grille with the shipping support straps still in place When I got to the shop those morons were attempting to install the factory grille with the shipping support straps still in place  . The paint was now cracked due to them not properly molding the bumper back into shape, which they stated they had prior experience with urethane. The paint was peeling straight off of the bumper, no prep work at all!! . The paint was now cracked due to them not properly molding the bumper back into shape, which they stated they had prior experience with urethane. The paint was peeling straight off of the bumper, no prep work at all!! The owner of the shop kept telling me the bumper couldn't be salvaged and they couldn't manage to get the urethane to straighten out no matter how much heat they applied to it. My buddy and I took the bumper back to my apt and in 1 hour of using a hair dryer and dremmel tool had the bumper looking great. We are planning on removing the worthless paint job this weekend and doing our own test fit for further modification, then painting it ourselves and installing. I wish I would have just diy'ed this project from the beginning. I did get all of my money back from the shop after filing a complaint with the Better Business Bureau. I'm trying to put together a pretty good DIY thread for this to help anyone else out in the future. The owner of the shop kept telling me the bumper couldn't be salvaged and they couldn't manage to get the urethane to straighten out no matter how much heat they applied to it. My buddy and I took the bumper back to my apt and in 1 hour of using a hair dryer and dremmel tool had the bumper looking great. We are planning on removing the worthless paint job this weekend and doing our own test fit for further modification, then painting it ourselves and installing. I wish I would have just diy'ed this project from the beginning. I did get all of my money back from the shop after filing a complaint with the Better Business Bureau. I'm trying to put together a pretty good DIY thread for this to help anyone else out in the future.
__________________
Performance Mods: CAI Cold Air Intake, SLP Loudmouth 1, 1LE Strut Tower Brace, Vitesse TC
Appearance Mods: 20" Havoc wheels with 245 Nittos up front and 275 Toyos in the rear, 1LT Badges by Emblem Pros, NS1 inspired striping, Aggressor 2 fascia, T-Rex Phantom Grille, 4 pack gauge cluster, Hydro dipped engine bay, Iggee synthetic leather seat covers Audio Mods: Rockford Fosgate P3 12", Rockford Fosgate 1000w amp Build Thread: http://www.camaro5.com/forums/showthread.php?t=404436 |
|
|
|
|
|
05-05-2015, 02:24 PM
|
#227 | |
Drives: 2013 SS 1LE Join Date: Jul 2014
Location: North Dallas
Posts: 228
|
Quote:
|
|
|
|
|
|
05-05-2015, 02:25 PM
|
#228 | |
|
Drives: 2013 SS 1LE Join Date: Jul 2014
Location: North Dallas
Posts: 228
|
Quote:
|
|
|
|
|
|
05-05-2015, 02:31 PM
|
#229 |
|
yellow_dragon
Drives: yellow camaro, black stripes Join Date: Mar 2014
Location: el paso, tx
Posts: 97
|
Yeah in prefer trying myself first, there some areas that need work but I'll have a shop fix it, but they aren't noticeable. But yeah I love the look. Just such to put my grill on it cuz it had too much play
|
|
|
|
|
05-05-2015, 03:33 PM
|
#230 |
|
yellow_dragon
Drives: yellow camaro, black stripes Join Date: Mar 2014
Location: el paso, tx
Posts: 97
|
Just need a little work but looks good |
|
|
|
|
05-05-2015, 07:03 PM
|
#231 |
 
Drives: 2012 LT Join Date: Apr 2015
Location: NJ
Posts: 42
|
I'm sorry to hear about your troubles Uhoh5oh. I hope that all works out. Reggiocamaro it looks really good!
|
|
|
|
|
05-05-2015, 08:06 PM
|
#232 |
|
yellow_dragon
Drives: yellow camaro, black stripes Join Date: Mar 2014
Location: el paso, tx
Posts: 97
|
Thanks
|
|
|
|
|
05-06-2015, 12:33 PM
|
#233 | |
 Drives: '11 SW 2SS/RS LS3 Vert Join Date: Jul 2013
Location: Ontario, Canada
Posts: 156
|
Quote:
|
|
|
|
|
|
05-06-2015, 01:18 PM
|
#234 |
|
yellow_dragon
Drives: yellow camaro, black stripes Join Date: Mar 2014
Location: el paso, tx
Posts: 97
|
Main issues I had was removing the guides and reinstalling, I use bolts to hold them on, had to drill the holes bigger. To slide on easier. U need to cut holes to insert your park lights. Besides that, it's pretty simple. Love how it looks
|
|
|
|
|
05-06-2015, 01:23 PM
|
#235 |
|
yellow_dragon
Drives: yellow camaro, black stripes Join Date: Mar 2014
Location: el paso, tx
Posts: 97
|
Didn't mean to add 2
|
|
|
|
|
05-06-2015, 02:40 PM
|
#236 |
  
Drives: Fast Join Date: Mar 2011
Location: Phoenix, AZ
Posts: 785
|
First off, your car is awesome dude, my last Camaro was yellow and yours is bad-ass. But, the fit, whether it be the bumper or your body shop, doesn't look like it fits for sh*t. The spots by the side markers don't flow, and it looks like it's sagging in the lower grill section (still see pieces of the bracing). Again, no disrespect to you or your ride but that would drive me crazy.
Love that grill, wish they made those for the '14+
__________________
2014 SS
|
|
|
|
|
05-06-2015, 02:58 PM
|
#237 | |
|
yellow_dragon
Drives: yellow camaro, black stripes Join Date: Mar 2014
Location: el paso, tx
Posts: 97
|
Quote:
|
|
|
|
|
|
05-06-2015, 02:58 PM
|
#238 | |
|
Demon Bu1LT
Drives: 2012 1LT Join Date: Dec 2012
Location: East Texas
Posts: 396
|
Quote:
__________________
Performance Mods: CAI Cold Air Intake, SLP Loudmouth 1, 1LE Strut Tower Brace, Vitesse TC
Appearance Mods: 20" Havoc wheels with 245 Nittos up front and 275 Toyos in the rear, 1LT Badges by Emblem Pros, NS1 inspired striping, Aggressor 2 fascia, T-Rex Phantom Grille, 4 pack gauge cluster, Hydro dipped engine bay, Iggee synthetic leather seat covers Audio Mods: Rockford Fosgate P3 12", Rockford Fosgate 1000w amp Build Thread: http://www.camaro5.com/forums/showthread.php?t=404436 |
|
|
|
|
|
|
|
|
 |
|
|


