You are browsing camaro5 

|
 01-05-2014, 01:20 PM
|
#1 |
|
GM is in my blood..

Drives: 2011 IBM 1SS/RS LS3 Join Date: Aug 2013
Location: Austin Texas
Posts: 62
|
APEX Air Scoop & Washer relocate Install W/pics
we had a chance to install our Apex scoop and washer relocation kit the other day & we took a bunch of photos along the way.
Figured I would post them up for everyone enjoyment   This thing is stout. Thicker steel that what you find on my 68 Chevy pickup... I was impressed! Love the fact that the scoop already has the stamped out holes for the tank mount... Nice touch  Washer kit comes compete with everything you need to do the install, except the buck to drain your stock tank.    Wheel well cover was truly easy to remove, just a few plastic clips, 2-7mm bolts & 3-T20 screws...  3 bolts, and a hose plug... and the washer tank comes right out. we just used a 1/4" socket extension to plug the hose. Worked like a charm    This is the only piece on the car that has to be modified.   Removed the horn mounting bolt & replaced it with the supplied longer stainless bolt. (Bolt in the middle of the picture)    using one of the old washer tank bolts you can see were the 2nd mounting bolt for the scoop is attached.  The first vertical cut we made was as instructed, but we felt like it was a bit to tight, so we trimmed it a little bit more than in this picture. (Picture shows the cut as per the instructions).  Here is how our scoop ended up sitting against the front grill. We are going to make a few adjustment here in the next week or so. This tight area made the inner mounting bolt alignment a bit tricky & that is why you see me in a few of the above pictures sitting under the car pushing the scoop up while attempting to thread the bolt in.  Ok its mounted and in,  we decided to mount the filler in the air-box because it was easy & out of the way. We didn't even use half of the supplied hose. Apex gives you enough hose to pretty much mount the filler wherever you want on the drivers side of the engine bay.   We over filled the tank to see if we had any leaks.. Nope everything is sealed up tight, even the large tank cap. The cap has a rubber inner liner and it worked perfect. NOTE: filling the tank was a bit slow, this was due to the tank venting and filling thru the same hose. If we had cracked the tank cap it would of filled much faster.   All in all this install took us about and hour, and was an easy and fun mod..... Scott Last edited by austinscott; 01-05-2014 at 01:21 PM. Reason: Spelling |

|

|
|
01-05-2014, 01:25 PM
|
#2 |
|
Recalled user

Drives: '12 Camaro SS, '18 Colorado Z71 Join Date: Mar 2009
Location: Richmond, VA
Posts: 3,419
|
Great post. Ive been considering this mod. Before after comparisons?
__________________
 2012 2SS 45th AE LS3 M6 Borla ATAK Catback Kooks Stepped LT Headers CAI Intake Hexvents VMAX CNC Ported Throttle Body RX Catch Can Hurst Short Throw Shifter Pfadt ZL-Spec Stage 3 Suspension Forgestar F14 Tuned by Frost |
|
|
|
|
01-05-2014, 01:35 PM
|
#3 | |
|
GM is in my blood..
Drives: 2011 IBM 1SS/RS LS3 Join Date: Aug 2013
Location: Austin Texas
Posts: 62
|
Quote:
Cant honestly tell if the scoop is making the difference or just the ambient temps outside. I'm pretty sure its a combo of them both. But what I can tell you is my BUTT DYNO is truly impressed so far  Scott |
|
|
|
|
|
01-05-2014, 03:21 PM
|
#4 |
|
INJACC

Drives: 2010 Camaro 2SS/RS CGM/IO 6M Join Date: Aug 2009
Location: Burritts Rapids, ON Canada
Posts: 770
|
Is your cold air intake installed correctly?
 Seems to me the base of the housing should sit down on the body/rail with the vertical metal bracket/tab straddling the crease in the body/rail. I wouldn't expect a gap at the bottom of the cai. Looks like it is "standing off" a little. Seems to me the base of the housing should sit down on the body/rail with the vertical metal bracket/tab straddling the crease in the body/rail. I wouldn't expect a gap at the bottom of the cai. Looks like it is "standing off" a little.
__________________
Pedders Xa Coilovers & Sways w/Fe4, Pfadt Rear Trailing Arms & Tie Rods, Forgestar CF5s, ZL1 Brakes, 1LE 3.91 Diff, Pedders Cradle Bushings, MGW STS, BTR Stage II Cam, Fluidampr U/D Pulley, Performance Redline Dyno Tune, CAI & Apex Scoop, Pfadt Tri-Y Headers w/HF Cats, Magnaflow 3" Cat Back, RX Catch Can, VMax TB, Billet Tunnel Brace, SRP Pedals, Skip Shift, Seibon CF Hood & ST Trunk, 1LE Splitter, ZL1 Rockers & Diffuser, Heritage Grill, F & R Sparks "SS" badges, Billet Door Handles, Tint, Technostalgia Tail Lights, AAC Side Markers, BlackVue dash cam and my favourite accessory...Litho #163.
|
|
|
|
|
01-05-2014, 05:00 PM
|
#5 |
|
GM is in my blood..
Drives: 2011 IBM 1SS/RS LS3 Join Date: Aug 2013
Location: Austin Texas
Posts: 62
|
I'm not sure, the CAI was installed on the car when I bought it. Never thought about finding the install instruction and double checking....
I'll look into it.. just figured this was the K&N way of making it and that's why no one really likes them, because they down seal very well. |
|
|
|
|
01-05-2014, 05:19 PM
|
#6 | |
|
GM is in my blood..
Drives: 2011 IBM 1SS/RS LS3 Join Date: Aug 2013
Location: Austin Texas
Posts: 62
|
Quote:
 After looking over the instructions.. online it seems the PO left off the lower section of the gasket. He must of installed it before putting on the gasket, then said Owell... Some people..... in the images below, you can clearly see the lower section of the gasket that is not on my CAI...   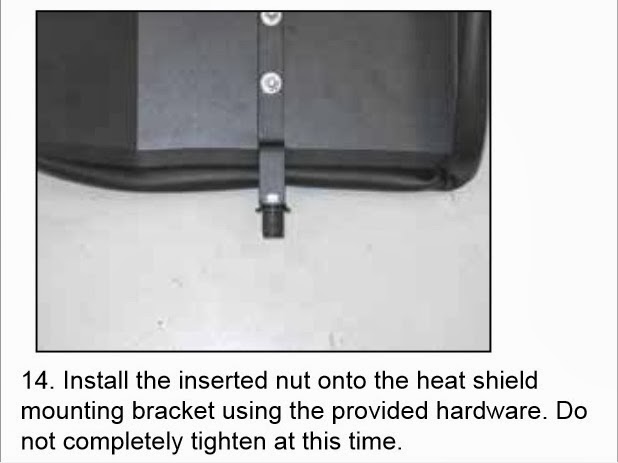  I guess I have to get with K&N and get a replacement gasket....  Scott |
|
|
|
|
|
01-05-2014, 06:10 PM
|
#7 |
    Drives: 2SS RS Join Date: Mar 2010
Location: MD
Posts: 1,272
|
I bought one of these almost 2 years ago and still haven't installed it. I really MUST knock this out this spring.
__________________
Livernois 2C cam and tune, LS3 conversion, Roto-Fab intake, Kooks headers, DSS driveshaft and axles, BMR suspension parts, VMax ported throttle body, Whipple blower. (623hp).
|
|
|
|
|
01-05-2014, 06:32 PM
|
#8 |
 
Drives: Camaro Join Date: Sep 2013
Location: NOVA
Posts: 1,718
|
Interesting, the plastic piece you have to cut away to let air in threw the lower grill is different on yours that it was on mine. Mine wrapped under. Your seems flat across.
|
|
|
|
|
01-06-2014, 06:17 AM
|
#9 | |
|
INJACC
Drives: 2010 Camaro 2SS/RS CGM/IO 6M Join Date: Aug 2009
Location: Burritts Rapids, ON Canada
Posts: 770
|
Quote:
__________________
Pedders Xa Coilovers & Sways w/Fe4, Pfadt Rear Trailing Arms & Tie Rods, Forgestar CF5s, ZL1 Brakes, 1LE 3.91 Diff, Pedders Cradle Bushings, MGW STS, BTR Stage II Cam, Fluidampr U/D Pulley, Performance Redline Dyno Tune, CAI & Apex Scoop, Pfadt Tri-Y Headers w/HF Cats, Magnaflow 3" Cat Back, RX Catch Can, VMax TB, Billet Tunnel Brace, SRP Pedals, Skip Shift, Seibon CF Hood & ST Trunk, 1LE Splitter, ZL1 Rockers & Diffuser, Heritage Grill, F & R Sparks "SS" badges, Billet Door Handles, Tint, Technostalgia Tail Lights, AAC Side Markers, BlackVue dash cam and my favourite accessory...Litho #163.
|
|
|
|
|
|
01-06-2014, 12:02 PM
|
#10 | |

Drives: 2000 Camaro SS Join Date: Feb 2010
Location: Louisville, Ky.
Posts: 25,179
|
Quote:

|
|
|
|
|
|
01-06-2014, 06:21 PM
|
#11 |
 
Drives: '21 TRx '22 ZLe Join Date: Oct 2013
Location: Louisiana
Posts: 133
|
Chase ETA on 14 Scoop
__________________
2014 Camaro 2SS/1LE AGM/768rwhp
Recaro's, Custom Autometer Gauges, Hotchkis 1" Lowering Coils, CAi Intake, Elite Catch Can's, 1 7/8" StainlessWorks LT's w/Hi Flo Cat's mated to factory NPP Exhaust, 160* Thermo, NightFury Cam, 2.9l Whipple on Meth @ 11lbs, JoeGibbs LS30 in the CrankCase, Built by Nick, Steven, and Tuned By Shawn at Lethal Racing.... |
|
|
|
|
01-06-2014, 06:49 PM
|
#12 | |
|
Drives: 2000 Camaro SS Join Date: Feb 2010
Location: Louisville, Ky.
Posts: 25,179
|
Quote:
|
|
|
|
|
|
01-06-2014, 09:11 PM
|
#13 |
|
Obsessed and Loving It...
Drives: 2013 1LE-SS Join Date: Jun 2013
Location: Saginaw, MI
Posts: 524
|
Man I just ordered this and now that I see the area it mounts better I wonder if my ACS T3/S ports will clear it when installed....
|
|
|
|
|
01-06-2014, 09:18 PM
|
#14 |
|
Space Coast Camaros

Drives: 2012 Camaro Vert Join Date: Sep 2011
Location: Palm Bay , FL
Posts: 1,281
|
Thanks for the 101. I have the same parts and need to install it soon also :-)
__________________
|
|
|
|
|
|
|
|
 |
|
|


